Superfly10
Member
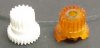
This is the picture of the gear I need...Its actually the Dark gear coming off the worm gear.



Thank you so much!!! How may I ask did you enlarge the center hole?I created a dropbox with the file that can be printed. I had mine printed by Xometry in durable vinyl.
https://www.dropbox.com/sh/vq69ugca1dyfrkn/AABvQIeC77yAMG2YS07ueDp8a?dl=0
Let me know if I can be of further assistance. Don't forget that you will need to slightly enlarge the center hole for the shaft.
Well, I placed my order with xometry today. Actually got 2 printed just in case and got the first time discount as you instructed. Thank you so much for you time and assistance as I know how valuable one's time can be these days. I will let you know how it goes once I get this 1055 up to full auto with the gear.I used a drill bit that was just slightly larger than the existing hole. The reason the printed part has a hole that is slightly too small is that when I mic'd the original part, I forgot to a a couple of 1000's to the shaft diameter. If you get Xometry to print the part, ask for a 1st time discount. I ended up paying slightly more than $20, including shipping.
I have had the gear made based on the file that was given to but was so busy over holidays i had not had the chance to get it to my tech. I plan on getting it to him this weekendSuperfly, did you ever get this issue resolved?
Considering buying one
Thx
Well gear worked awesome. Up and running good as new. That was a turntable saver!!Superfly, did you ever get this issue resolved?
Considering buying one
Thx

Reviving a super old thread here, but I have the same TT with the same issue as OP. I see OP took the 3D printed gear to someone to repair for him.
Is this something that would be difficult to replace myself if I have the gear printed up?


I haven't taken apart my TT before, but I've got some experience in taking apart/putting back together my PC. If it is something as simple as taking out some screws, maybe unplugging some internal wires, and popping out the gear, I think I could handle it. Do you know if there is any sort of guide, video perhaps, to taking this TT or one similar apart?Welcome to the AK turn table forum.
The gear is available on Ebay.
No idea what your experience with turn table repair is, may be you can do it.
What is your expertise or skill level?
I haven't taken apart my TT before, but I've got some experience in taking apart/putting back together my PC. If it is something as simple as taking out some screws, maybe unplugging some internal wires, and popping out the gear, I think I could handle it. Do you know if there is any sort of guide, video perhaps, to taking this TT or one similar apart?
Also, can you point me in the direction of the correct gear on ebay? Not sure if it is specific to this TT or something a little more universal, so I'm not sure exactly what to search for.


Great. Thanks for the info. Anything else I should know ahead of time? The ebay listing mentions cleaning off the grease and reapplying new grease/oil. Did you do that? Also do I need any tools to remove/replace the gear, apart from obviously a screwdriver to remove the bottom cover?I would say you'd have no problem replacing the gear yourself if you do PC work. I have a 1057F with the same issue and replacing it is quite easy. Should just have to take off the platter, remove the bottom panel and the mechanism will be accessible. Be careful with the C-clip holding the gear in place, it is tiny and could be easy to lose.