• The move to the new server is done. There are some software and database maintenance updates in process. This has us passing the hat around to help out. We appreciate any donations. Seriously, even a dollar helps. The payment page may be found here - https://www.audiokarma.org/support.html

Hunter Ceiling Fan Remote Control Issues

LiveandLearn

Active Member
It’s been three years since my last post, and I’m happy to report all three of my Kenwood AM FM receivers are still going strong after getting some TLC with assistance from the Audiokarma members.

I built my house 20 years ago, installing four Hunter Ergonomic ceiling fans with remote controls (no pull chains).
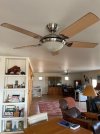
IMG_0008.jpg

All four worked fine until last year when three of them lost the reversible feature, then last week one lost medium and low speed. Like any good Audiokarma dude, I did my research, learned that there were capacitors mounted in the remote receiver assembly, and prime suspect #1 was the starting capacitor.

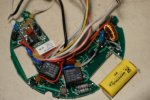
The urge to tinker took over and yesterday I disassembled the fan and found this:
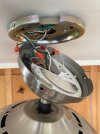
IMG_0007.jpg

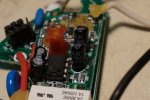
Since the caps are all soldered to a little motherboard, and this metal plate is riveted to the bottom of the receiver chassis, first thing I did was drill out the rivet, exposing the underside of the motherboard.
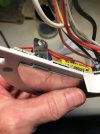
IMG_0209.JPG

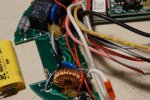
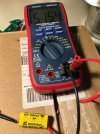
I then desoldered the caps, discharged and tested each one:
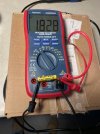
IMG_0009.jpg

The starting capacitor is marked 1.8 micro ferrules, and tested at 1.828 on the multimeter.


The second cap (Reverse?) is marked 5 micro ferrules, and tested at 5.024.
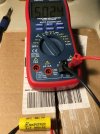
IMG_0212.JPG

The third and fourth caps are marked 5 micro ferrules, and tested at 5.154 and 5.138:
IMG_0213.JPGIMG_0214.JPG


So all four caps tested higher then their ratings ( 1.8, 5, 5, and 5). Does this mean they should be replaced? I moved one jumper on the disassembled fan’s remote to match the jumper setup on one of the other three fans, and it works fine with that fan, so it appears the problem is in the receiver.

If replacing the caps will fix the problem, I’ll do that, but I don’t want to replace parts that aren’t broke.

Any advice here will be greatly appreciated!
 
Register to hide this ad
I have a 32 yr old Hunter ceiling fan, it has one pull chain to select 2 or 4 light bulbs, with the light on/off button on the remote, and all the fan controls are on the remote. The carbon pads in the remote wore out over time and stopped conducting current across the contacts on the circuit board. I glued on small aluminum foil pads on to each of the button carbon pads and now the remote works fine. Did clean pads with isopropanol first, and then dried with hair dryer. Superglue, or contact cement, was used to adhere the heavy duty aluminum foil. Contact cement, Weldwood, worked best. Need to use back of finger nail to press the aluminum foil onto the carbon button to make sure it is flat/ smooth so it touches both contacts on the circuitboard at the same time.

The buttons I used the most on the remote (medium and low fan speeds, and then later light on/off) started failing first. So if I pressed the button for medium several times it would work, but then over time that did not help and the button would not work.

Of course, if the 9V battery gets low, remote will stop working for ALL functions..
 
Last edited:
I have a 32 yr old Hunter ceiling fan, it has one pull chain to select 2 or 4 light bulbs, with the light on/off button on the remote, and all the fan controls are on the remote. The carbon pads in the remote wore out over time and stopped conducting current across the contacts on the circuit board. I glued on small aluminum foil pads on to each of the button carbon pads and now the remote works fine. Did clean pads with isopropanol first, and then dried with hair dryer. Superglue, or contact cement, was used to adhere the heavy duty aluminum foil. Contact cement, Weldwood, worked best. Need to use back of finger nail to press the aluminum foil onto the carbon button to make sure it is flat/ smooth so it touches both contacts on the circuitboard at the same time.

The buttons I used the most on the remote (medium and low fan speeds, and then later light on/off) started failing first. So if I pressed the button for medium several times it would work, but then over time that did not help and the button would not work.

Of course, if the 9V battery gets low, remote will stop working for ALL functions..
Wow, thanks for the tip - I should have thought of that, with our tv remotes doing the same thing over the years. Ima gonna give it a shot tomorrow :)
 
.
It’s been three years since my last post, and I’m happy to report all three of my Kenwood AM FM receivers are still going strong after getting some TLC with assistance from the Audiokarma members.

I built my house 20 years ago, installing four Hunter Ergonomic ceiling fans with remote controls (no pull chains).

View attachment 3431864

All four worked fine until last year when three of them lost the reversible feature, then last week one lost medium and low speed. Like any good Audiokarma dude, I did my research, learned that there were capacitors mounted in the remote receiver assembly, and prime suspect #1 was the starting capacitor.

The urge to tinker took over and yesterday I disassembled the fan and found this:

View attachment 3431862

Since the caps are all soldered to a little motherboard, and this metal plate is riveted to the bottom of the receiver chassis, first thing I did was drill out the rivet, exposing the underside of the motherboard.

View attachment 3431874

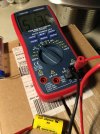
I then desoldered the caps, discharged and tested each one:

View attachment 3431890

The starting capacitor is marked 1.8 micro ferrules, and tested at 1.828 on the multimeter.


The second cap (Reverse?) is marked 5 micro ferrules, and tested at 5.024.

View attachment 3431834

The third and fourth caps are marked 5 micro ferrules, and tested at 5.154 and 5.138:
View attachment 3431836View attachment 3431837


So all four caps tested higher then their ratings ( 1.8, 5, 5, and 5). Does this mean they should be replaced? I moved one jumper on the disassembled fan’s remote to match the jumper setup on one of the other three fans, and it works fine with that fan, so it appears the problem is in the receiver.

If replacing the caps will fix the problem, I’ll do that, but I don’t want to replace parts that aren’t broke.

Any advice here will be greatly appreciated!
I wouldn't replace them soley based on measured values, 10% or even 20% off would still be considered in tolerance. Yours are all 5% or less. I would not suspect they're the problem.
 
It’s been three years since my last post, and I’m happy to report all three of my Kenwood AM FM receivers are still going strong after getting some TLC with assistance from the Audiokarma members.

I built my house 20 years ago, installing four Hunter Ergonomic ceiling fans with remote controls (no pull chains).

View attachment 3431864

All four worked fine until last year when three of them lost the reversible feature, then last week one lost medium and low speed. Like any good Audiokarma dude, I did my research, learned that there were capacitors mounted in the remote receiver assembly, and prime suspect #1 was the starting capacitor.

The urge to tinker took over and yesterday I disassembled the fan and found this:

View attachment 3431862

Since the caps are all soldered to a little motherboard, and this metal plate is riveted to the bottom of the receiver chassis, first thing I did was drill out the rivet, exposing the underside of the motherboard.

View attachment 3431874

I then desoldered the caps, discharged and tested each one:

View attachment 3431890

The starting capacitor is marked 1.8 micro ferrules, and tested at 1.828 on the multimeter.


The second cap (Reverse?) is marked 5 micro ferrules, and tested at 5.024.

View attachment 3431834

The third and fourth caps are marked 5 micro ferrules, and tested at 5.154 and 5.138:

View attachment 3431836View attachment 3431837


So all four caps tested higher then their ratings ( 1.8, 5, 5, and 5). Does this mean they should be replaced? I moved one jumper on the disassembled fan’s remote to match the jumper setup on one of the other three fans, and it works fine with that fan, so it appears the problem is in the receiver.

If replacing the caps will fix the problem, I’ll do that, but I don’t want to replace parts that aren’t broke.

Any advice here will be greatly appreciated!
micro Farads.
 
I would try testing the 4 black capacitors on the circuit board. They look like no name chinesium caps. You will probably have to desolder them from the board to test.
 
It's not audio, but it is really cool you are trying to fix these. Most people would just replace.
I did a search on this forum, typed in ceiling fan, and got 11 pages of threads - go figure.
These particular fans are really cool, neither my wife nor I want to replace them, so repair is the only option for me.
 
...10% or even 20% off would still be considered in tolerance. Yours are all 5% or less. I would not suspect they're the problem.

Frankly, I would be surprised of the meter calibration is within 1%, so consider that as well. If I got NEW caps that close to the specified value I would be pleased.
 
Hunter looks like a good outfit with parts and real live customer service reps. If you don't know your model number, there's a video on their website on how to find it. I'd give 'em a call:

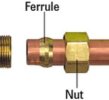
btw--not all ferrules are created equal, you nut:
1740086998539.jpeg
 
We have a winner - @Sandman1221 made the correct call, with @petes'picks a close second!

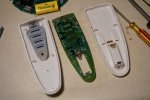
Based on their comments, I opened the remote:

DSC00851.JPG

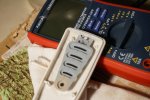
The circuit board and button pad were both a little dusty, but looked better than I expected. I sprayed DeOxit on q tips and cleaned everything, then cut a very small square of aluminum tape and pressed it onto the top button:

DSC00856.JPG

I reassembled the unit for a test on one of the other fans, crossed my fingers and pushed the high button, the blades began turning, I then pressed the reverse button (the one with the aluminum tape) and VOILA the blades slowed, then reversed. WOOHOO!! All buttons work!

Next step is reassemble the fan, starting with resoldering the 4 caps.

STAY TUNED - - -
 
We have a winner - @Sandman1221 made the correct call, with @petes'picks a close second!

Based on their comments, I opened the remote:


The circuit board and button pad were both a little dusty, but looked better than I expected. I sprayed DeOxit on q tips and cleaned everything, then cut a very small square of aluminum tape and pressed it onto the top button:

View attachment 3433223

I reassembled the unit for a test on one of the other fans, crossed my fingers and pushed the high button, the blades began turning, I then pressed the reverse button (the one with the aluminum tape) and VOILA the blades slowed, then reversed. WOOHOO!! All buttons work!

Next step is reassemble the fan, starting with resoldering the 4 caps.

STAY TUNED - - -
Good job and good thinking using aluminum tape; it eliminates the need for a separate adhesive that must adhere to the rubber backing and hold up over time rather than harden and crack (like "crazy glue" does).
  • This kind of press-button switch is generally known as a membrane switch--very common and cheaper to produce than a mechanical switch but they do wear out with age and use.
  • DIY repair requires good manual skills working with pretty small parts, like cutting small pieces of foil. (Not quite so much as tiny SMDs, tho, where a microscope comes in handy.)
  • Google or youtube "how to repair a membrane switch" and you get mucho hits. Besides aluminum foil there's conductive paint and replacement carbon film. Main thing is that the new conductor on the rubber "bubble" contacts the two traces on the circuit board when pressed (i.e., closes the switch) and pops back up (opens) when released.
IDK what brand my own ceiling fan is but it's been running pretty much constantly for 22 years--praise be to modern caps, bearings, and motors! Not that many things are designed to last so long, rather it's unrepairable "designed obsolescence" so you have to buy a new one before long and send the worn-out one to the landfill. Oughta be a law . . .
 
Back
Top Bottom