• The move to the new server is done. There are some software and database maintenance updates in process. This has us passing the hat around to help out. We appreciate any donations. Seriously, even a dollar helps. The payment page may be found here - https://www.audiokarma.org/support.html

Improving the Fisher 400

Problem Solver

Continuing on, the only practical way to really solve the level control roll off problem then is to install a SS buffer circuit between the level control, and the input to the power amps. Since the level control has a loudness circuit associated with it, that makes it a part of the preamp section -- as opposed to being part of the power amp section. Therefore, the buffer circuit should be fed by the level control, with the output of the buffer feeding the new Preamp Out Jack. With the jack straps in place, that means that the consistently low output impedance of the buffer (regardless of level control setting) will then directly drive the input to the internal power amps, and remove the concern for Miller. It also means that when the straps are removed, the Preamp Out Jack represents a nice low impedance source to drive any other power amplifier you might wish -- solid state or otherwise! That lets the 400 operate as a very nice tuner preamp control unit for great versatility in any system.

As for the buffer circuit itself, an op-amp set up to operate as a unity gain amplifier offers the greatest performance return in this application. With good power supply noise rejection, and the capability of very low output impedance, it's a package that's hard to beat. A bifet device was chosen because of its extremely high input impedance, with that figure being in the trillions of ohms. Also, since the chosen device is a dual inline package (DIP), it's very small, and has two op amps built into it, which is perfect for the application. Best of all, being that the device is a TL082/LF353N, you can run right down to the nearest RS and pick one up since it's a store inventory item.

For those concerned about sonics with an op-amp in the signal path, you shouldn't be. Being that the buffer circuit offers no gain (employing 100% NFB), it's about as neutral sounding as any circuit can be, and solves bucket loads of problems, while introducing virtually none. Therefore, it is quite responsible for actually improving sonics, rather than hurting them.

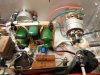
With a basic plan developed then, a small R/S perfboard was used to build the buffer circuitry, and space was made available behind and to the right of the balance control for mounting. This was accomplished by relocating the two 25 ohm 'Speakers Off' load resistors to the other side of the terminal board they connect to, leaving the space between the balance and level controls rather open. The small perfboard could then be mounted in this area with a small L-bracket through one of the cooling holes around the tuner can cap, meaning that once again, no physical alterations were necessary to install the circuit. The location was also ideal, since it allowed for only 3.5 inch shielded leads to connect the signal between the level control, and the input to the buffer amp board. Shielded cable can also cause excessive HF roll off in high impedance circuits if they have any length to them at all, and keeping them short in this case is icing on the cake. With the plan off attack for this problem nearly finished then, all that was left was to figure out how to power it. Remember that neatly folded up white wire that used to supply bias to the output tubes before EFB was installed?

It was perfect. It is relatively well filtered -- well enough for an op amp anyway, and was just lying there, supplying about -18 volts to.......nowhere. Tying the buffer circuit to this source dropped the available voltage down to about -15.5 vdc, which will allow it to develop 5.0 vac RMS at the Preamp Output Jacks if necessary, which isn't necessary for the internal power amps, since they are driven to full power output with just under 2.0 vac RMS at the Power Amp In Jacks. Also, a 5 volt RMS output level will certainly drive almost any external power amplifier to full power output as well if the 400 is used as tuner preamp unit only. Altogether then, the buffer circuit became the perfect answer to the problems imposed by Mr. Miller, and boy oh boy did it solve the problem.

Pics include:

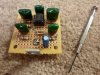
1. The basic buffer circuit board before connecting leads were attached.

2. Mounted and connected up in the space created as discussed.

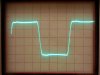
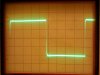
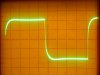
3. What a difference a buffer makes! Here is the same 10 kHz square wave produced with the level control in the same position as before, driven by the tone stage amplifier, but this time with the buffer installed and operating. It does not change its shape with rotation of the control -- only its amplitude. There simply is no comparison.

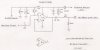
4. The schematic of the buffer amplifier, with one channel shown, and the terminals within the DIP representing the other channel.

To be honest, this part of my 400 project was quite challenging -- not only in developing a practical and workable solution that really solved the problem, but also in building and installing it so that the finished job was neat and professional.

The effort was well worth it however, as removing this compromise takes the 400 completely out of the 'receiver' performance category, and moves it to a level where few other pieces of equipment reside. Just as a chain is only as strong as its weakest link, improving all the individual elements in the power amplifier section proper won't solve the problems created by the original level control design. Installing the buffer circuit does however, and then allows the power amplifier modifications to really shine, delivering a realism I have never heard out of a Fisher product before.

Obviously, for those that implement this modification, it does require skill to work with a small circuit board -- or with whatever format you might chose to build the circuit on, and installing it is somewhat tedious, but again, well worth the effort. The basic circuit and idea should be very adaptable to many Fisher products to enhance their performance as well.

In resolving this issue however, one last opportunity to wring out maximum performance from the 400 presented itself -- very much in keeping with the proverbial thread I've been pulling on that I mentioned at the beginning of the EFB thread. By comparison, it is rather simple as compared to the buffer modification, but again, makes the 400 even better, more practical, and much more up to date as well. Next time. But thank heavens, we really are about out of thread!

Dave

EDIT: The Buffer Amplifier circuit has now been revised, which is presented and discussed in post #345 of this thread. The revised design will only offer improved performance in selected scenarios as discussed in the text.
 

Attachments
  • 2013_0405group10001.jpg
    2013_0405group10001.jpg
    95.3 KB · Views: 610
  • 2013_0405group10006.jpg
    2013_0405group10006.jpg
    78.2 KB · Views: 576
  • 2013_0405group10003.jpg
    2013_0405group10003.jpg
    46.2 KB · Views: 497
  • scan0003.jpg
    scan0003.jpg
    36.7 KB · Views: 641
Last edited:
Dave, is there any option of changing the phase splitter tubes for a more 'miller friendly' capacitance tube?
 
Hi Sony -- Not with any other tube that would supply the needed gain.

The only other "practical" option is to convert the entire driver circuit to a 6U8/6GH8 etc. type of tube. The triode portion of the tube would be the actual phase splitter just as in the Fisher design, while the pentode section would be the input AF amplifier stage. With a pentode input stage, Miller then goes away. However, many such circuits like this would have much too much sensitivity for use in the 400 as is, so the pentode section would need to be tamed considerably to make it properly compatible with the gain characteristics of the existing line/tone stage sections in the 400.

For example, the Dynaco SCA35 power amplifier section (using a 7199) only requires an input of ~ .15 vac to develop full power output, with a similar amount of NFB. In that design, passive tone controls are used in front of the power amp section so that the actual operating sensitivity at the high level input jacks is on the order of 1 volt or so, but you get the point. That unit also uses 6BQ5 tubes, but the Gm of those tubes and the 7868 is very similar, so that difference drops out of the equation.

The pentode section can in fact be "dumbed down" -- without triode strapping it (which would let Miller move in again), so that is an option. With the approach I used, I was trying to stay true to the original basic Fisher design. Yes, I've changed some things and added some things, but the basis of the original design is fundamentally still there.

If that is of no concern to you (said with no judgement on my part at all), then the pentode option is the way to go.

I'm almost ready to post my last modification, but I've got to tell you, this darn thing is just getting addictive to listen to. Whichever way you go, I know you'll enjoy the results.

Dave
 
7199, 6U8, 6EA8, 6GH8 to my ears leave a lot to be desired. I built & upgraded a lot of amps, both PP & SET. This Fisher 400 does have the most addicting sonics I ever heard. It has a slight chime sound to it, yet very clear. It really came around with the right tubes and a healthy power supply upgrade. I love this freakin thing and everyone else that hears it. An audiophile with Audio Research amps could not believe this Fisher. He almost looked confused.
 
They are truly superb instruments! As I mentioned, I wanted to keep the basic topology of the design in tact, and converting the driver stage of the power amplifiers to a pentode input stage would not be in keeping with that goal.

Of course, another drawback to using the pentode input stage to the power amp, is that while using the pentode eradicates Miller, it doesn't solve the high output impedance presented from the wiper of the level control, making the Preamp Out jack essentially useless except with the jack strap to reinsert the signal back into the internal Power Amp In jack. The capacitance from any interconnect cables used to connect the Preamp Out jack to an external device would act on the high impedance at the wiper and destroy any high frequency detail in the signal.

The buffer circuit solves the problem completely, allowing a constant low impedance to be presented at the output of the audio control section of the design, serving the needs of the internal power amps, and any external connections/devices as well. Any good preamp/control unit will offer a low output impedance to ensure that cable capacitance has a negligible effect on signal quality.

This is also the reason that any stand alone power amplifier that employ a triode input stage and also provide an input level control (think Eico HF-87/89 for example) should always have the level controls up full to prevent any response deterioration from Miller in the triode input stage. On the other hand, designs like Eico's HF-22/35/50 and 60 employ pentode input stages, allowing their level controls to be set anywhere desired.

Dave
 
Dave; I like the buffer idea. Anyway you can dumb down the schematic for those of us with lack of understanding what an op amp is and how to connect this up? Think of a standard 400 without the reverb jack mod. I don't really understand the schematic as to 1.)what do I duplicate to get right channel 2.) what is "to other channel" 3.) what is the "new preamp out jack"?

I just back read a bit. If I read this right, pin 5 and pin 3 are from the outputs of the volume control, and pins 1 and 7 go to the 47ohm resistor (or did that come out it wasn't clear to me) before the 12ax7. And I would loop pin 6 back around to pin 7 like the L channel and duplicate the .1uf 100R and 220kR on the output??? Which leaves Question 2. Where does it go???

800mg motrin is NOT getting rid of the headache I'm getting just looking at the schematic!

(eventually I want to put this in an 800-C IF the circuit is compatible).
 
Last edited:
Hi Larry -- Looking back, more explanation of the circuit is certainly necessary, so I apologize for the lack of clarity.

First, an "op-amp" is lingo for a theoretically perfect, basic differential amplification device. By perfect, we mean it has:

1. Infinite input impedance,
2. Zero output impedance,
3. Infinite gain, and
4. Infinite frequency response.

By differential, we mean that is has balanced inputs -- one that is inverting, and one that is not with respect to the output.

Of course, in an absolute sense, none of these things are achievable, but with modern solid state electronics, we can virtually achieve them for all practical purposes.

An op-amp can be made up of tubes or transistors. Early vacuum tube computers employed op-amps that were small two tube modules that plugged into a socket providing all the necessary connections: Ground, B+, Heater, Inputs, and Output.

The modern symbol for an op-amp is the near equilateral (isosceles) triangle, with the inputs shown on one side (+ = Non-inverting input, - = Inverting input), and the output shown where the two sides meet opposite of the inputs.

The power supply terminals are the single leads shown on the remaining sides. It is customary that when you have more than one op-amp on a single integrated circuit (IC), power is shown provided to one op-amp symbol, with the other op-amps on that IC understood to be receiving power also, since the two terminals for power on any IC provide power to all the circuits on it. Today, it is common to find ICs with 1,2, or 4 op-amps on it.

The IC specified has two op-amps on it, so it is called a Dual Op-Amp IC. Within the IC, one op-amp is connected to terminals 1,2 & 3, while the other completely independent (except for power terminals) op amp is connected to terminals 5,6 & 7.

Pins 4 & 8 provide power to both op-amps on the IC. With three terminals required for each op-amp then, and two for power, the IC has a total of 8 terminals.

Since this IC has the terminals arranged so that half of the terminals are on each side, it is called a Dual Inline Package or DIP style device. As such then, you can get 8 pin DIP sockets to mount on a circuit board that the IC then simply plugs into. If you look at the first pic back in post #41, you can clearly see the socket and the IC plugged into it.

In audio work op-amps can perform any function a tube (circuit) can from phono preamp, to line/tone stage service, to power amplifier service. If you look inside these modern multichannel home theater receivers, each power amplifier is basically a power op-amp with a (very) few external components to make up a complete power amplifier circuit, except for the power supply of course.

Regarding the buffer circuit then, one complete channel is shown, with the second op-amp "block" simply having its terminals called out, so you will know what terminals connect to what in duplicating the circuit for the second channel.

The only components that are duplicated are the .1 uF input cap, that literally connects to the wiper of the level control and the + input of each op-amp (pins 3 & 5), the 1 meg resistor that connects between the + op-amp inputs and the "To Other Channel" point, and the .22 uF, 100 ohm, and 220K output components. The output would then either connect to either the "Preamp Out Jack" (one of the old SpaceXpander jacks), or the 47K (or 10K of my modified circuit) input resistor of the power amplifier circuit.

The remaining components are single item components.

Because the IC is being powered from an UNbalanced power supply (no plus and minus power supply voltages available), some means has to be devised to create that condition.

When plus and minus power supply sources are available, they would be applied to the IC, and the inputs would then be referenced to ground, just like a grid is required to be in a typical small signal vacuum tube amplification stage. So configured, the DC output of the op-amp would be zero under quiescent conditions, and with any AC output, swinging + and - above and below ground level. This is a very nice condition to have, because then no coupling caps are required!

In the 400 however, I only had ground (of course), and about -15 volts to work with in powering the IC. This is connected between pins 4 & 8 to power it. But with only a single source of power, that meant that the op-amps had to be biased properly, so that under quiescent conditions, their outputs rests at ~ -7.5 vdc, or one half of the power supply voltage. Doing that is the job of the two 47K resistors than form a voltage divider for the 1 Meg input resistors to connect to. Connected this way, any AC output signal then varies + and - of -7.5 vdc. Since this is not 0 vdc, coupling caps are required on both the input and output of the buffer stage as shown.

With the output also directly connected back to the inverting input, we have a condition of 100% NFB, which produces an output with essentially zero distortion, zero output impedance, and unity gain, or a gain of 1. Therefore, the buffer amps provide no gain, and totally isolate whatever they drive from the effects of the high impedance level control wiper circuit.

I hope this helps!

Dave
 
Hi Dave!!

I just added the Unity gain buffer in the drawings.Let me Know if anything else is necessary!!!

Regards

Luis
 
Last edited:
The Control Section Plan -- An Overview

The final stop on my 400 journey lands in the control section of the unit. The major short coming here has already been resolved with the installation of the buffer circuit discussed earlier. And while the basic performance of this section is good otherwise, opportunities exist in this section not only to further improve performance, but improve practicality as well.

One possibility that has already been mentioned, is converting the old SpaceXpander jacks into a Preamp Output and Power Amp Input pair for each channel. With the buffer circuit now providing a low impedance output from the wiper of the level control, these new jacks tremendously increase the versatility of the unit, allowing it to be a tuner/preamp control section for other equipment, or other equipment to directly drive the internal power amplifiers if so desired. Or, active crossovers can be connected to these jacks, or equalizers, or....... The possibilities are endless. Of course, when external devices at not used, inserting the jack straps allows the unit to again operate as it always did, with the buffer providing a low impedance drive for the internal power amps. The old space expander jacks are virtually useless in this day and age, so converting them to the new jacks is a very worthwhile upgrade.

If you're going to be in that rat's net of wires where those jacks are located, you might as well jump in all the way, and also deal with the "goofy" Aux/Tape and Tape Monitor jacks. The bleed through circuit between these two jacks was a slick effort to try and get something from nothing in terms of features. Back in the day, it may have in fact proved useful for some folks, but today, it is merely an annoyance. It is best to remove the bleed through circuit, and allow the Aux input to be just that, and the Tape Monitor input to be just that as well, without any bleed through possibilities. But don't leave the nest just yet.

Fisher also built into the 400's control section line stage a permanent two stage low frequency (LF) roll off filter, presumably to help deal with the rumble from record changers, or acoustic feedback in console installations. They also built a one stage LF filter into the phono preamp section as well, so that altogether, all three sections got the job done. Today, if such equalization is needed, it is best provided by a good external subsonic filter connected through the Tape Out/Tape Monitor jacks, or better yet, through the new Preamp/Power Amp connection jacks, and allow the line stage to have a flat LF response for all input sources. Removing this filter requires shorting out one component, and removing another -- in the rat's nest area of course.

Next up, the High Filter Switch. Back in the day, this filter may have provided useful service as well, for a scratch filter. But today, it's a wasted feature from an era gone by. Again, if such a filter is needed, a good external filter unit will do a far superior job than the rather crude filter built in. So what to do with the switch?

Fisher rather religiously stuck to using passive tone controls in virtually all of their designs. Not every single one, but darn near. The 400 is no exception. Passive controls work well enough in use, but lack the sharp on center flat performance that active tone controls provide. So while they're good enough when needed, how nice would it be to be able to bypass them at will, to produce known, truly accurate flat performance? That's what you do with the old High Filter switch. In the down or off position, the tone controls are bypassed, while in the up position, the tone controls -- being a "filter" themselves -- are connected back into the circuit just as they originally were. Again, this modification takes a near useless feature today, and turns it into a very desirable feature for today's audio use.

And finally, there's the circuit provisions for the Tape Output and Tape Monitor jacks. These were placed in a strange position circuit wise, almost assuredly determined by the grand new SpaceXpander feature of the day. The Tape Output signal is taken after the reverb signal -- presumably to be able to record said signal so you could wow your friends when you play your reverbed tape on their non-reverbed system, and see their looks of envy! But then, playing this reverbed recording back through the 400 (through the goofy Tape/Aux jacks) then sends the playback signal through the reverb circuits AGAIN for a double dose of the stuff. From an engineering standpoint, the whole affair is comical to say the least, and the marketing department must have had a hay-day with it all, but today, it represents a serious flaw for serious audio use.

Since the Tape Output and Tape Monitor jacks are inserted after the line stage amplifier, it means that any signals taken from that point (for recording, or otherwise) are inverted in phase from that of the original source. Granted, if you playback the recording through the Tape Monitor input with the Tape Monitor switch on in the existing design, the phase will be correct. But played back through all other conforming (i.e. non-inverting) equipment, the phase will be inverted from that of the original source. For some folks, they might say who cares? For others however, inverted phase is audible, particularly if a kick drum (for example) was recorded as a positive wave movement, but is being reproduced by your speakers as a negative wave movement. The answer lies in moving the tape jack facilities to the input of the line stage, where no phase reversal can happen.

So, all told then, the the basic topology of the circuitry can still remain in tact, but the "features" of the circuitry can be made much more usable for today's audio needs. And, with removal of the sub-sonic and high frequency filters and being able to bypass the tone controls, performance of the control unit can be enhanced to the maximum the circuit can provide.

Details up soon!

Dave
 
Luis -- That's it. You're hired to do all my schematics! Of course, the pay is pretty lousy.......:) :)

One thing I notice right off the bat is the diode supplying power to the buffer op-amp. It's turned around backwards -- remember this is a negative voltage at this point, so it would be oriented opposite that which you might normally see.

Also, the cap following the diode is a 1000 uF, not a 100 uF as shown.

Thanks again for all your hard work to include these modifications into the original drawings!

Dave
 
Thanks Dave. I got about 60% on the 1st read thru. Then I used Luis' schematic revision and it makes sense. What modifications to the circuit as drawn would I need to make to have it run on an 800-C? From what i can see probably not much.

Larry
 
Hi Larry -- I'll take a look when I get a chance, but off hand, the biggest (and likely only) thing I think you would have to do is to create a new power take off from the existing bias/filament supply. The basic supply can certainly power the little buffer circuit, but it does draw about 5 ma of current which draws the voltage down if you use the existing bias supply point for power -- which would upset the bias on the output tubes. Therefore, creating a new power take off point -- which could likely be identical to the one Fisher originally provided for the output tube bias in the first place -- would allow the supply to power the buffer, and the output tube bias, without one affecting the other.

Learning SS terms and technology can certainly be confusing if all you are used to is vacuum tube equipment. Probably as confusing as for those who are only used to SS equipment who are now trying to understand vacuum tube technology. I'm glad it's starting to make more sense now. The circuit of the little buffer is actually very simple -- and probably much easier to understand with Luis's inclusion of it in the original schematic now.

If/when you do install it, plan your installation so that the leads connecting the volume control to the buffer are as short as possible. In my installation, they are no more than 3.5 inches. Shielded cable has capacitance to it, which can act to degrade the signal, as surely as Miller does in the operation of a triode. Of course, the output leads can be as long as you might wish.

Dave
 
Currently on my 800-C I've got a 400V 8a diode bridge, supplying -24V to the bias supply. I didn't drop it any. It's running to an IBAM board, and supplying the needed bias voltage well. (EH7591's). I can tap off the transformer to make another power point as the 800-C supply is the same as the 400 for the bias supply.

Would an "old" not being used interconnect (RCA Type) work for the shielded cable for the inputs? If so I've got a few 12' ones I'm not using. I'm thinking about cutting them down to 3-4 ft long anyway.

I'm thinking this is going to be an over the summer project. Gotta get some $$ together for this one. The EFB, the buffer circuit, the phase inverter circuit et al. Then assemble all the parts and start one thing at a time.

The questions will be flying!!

Larry
 
Last edited:
Larry -- you would not need a second bridge rectifier to operate the buffer. Much as the current bridge operates the heaters and provides bias, it would also provide power to the buffer. At best, you would only need a dropping resistor, a shunt resistor, and a filter cap to provide a power point off of the existing bridge rectifier.

Any shielded cable will work, but the smaller the cable, the better. It displays less capacitance, and is easier to work with. Keeping it short on the input side from the wiper is the name of the game.

I hope you do try the modifications. I'll be happy to help with any and all questions.

Luis -- It is amazing how you have worked the modifications into the schematic, while still having it look like the factory schematic. It looks fantastic!

Dave
 
I'm very grateful for this thread and Sony6060's power supply upgrade thread, as well as Eduarsan's schematic update.

This collaboration is an example of why I've contributed not only my knowledge, but money to AK.
My feeling is that if I contribute what I know to educate others, I'll receive the same type of education in return. This thread (actually all four if we consider EFB in the Fisher SA-100 clone and in the Fisher SA-100 as well) shows that to the finest degree.

Eduarsan, can I impose on you to put dotted-line borders or some other type of flag for future readers around the schematic changes so we have a way to know where to look for the changes from stock in at least one version?

I know I'm going to print it out later and now I know where the changes are, but later I may not and those who stumble across this later also won't know where to look.
Links to the relevant threads:
Power Supply: http://www.audiokarma.org/forums/showthread.php?t=500753&highlight=power+supply+update

EFB in the Fisher 400: http://www.audiokarma.org/forums/showthread.php?t=509090&highlight=power+supply+update

6/2/2013
dcgillespie has updated information about the earlier version of the 400 with two 6AU6s that uses a different transformer. Go to the start of this thread:
http://www.audiokarma.org/forums/showthread.php?t=524133
The update is published in this thread:
 
Last edited:
Hi Don

No problem !! I can do that!!! will be a pleasure!!!

In the other hand, I´m working in the sony´s Power Supply update to insert in the drawings.

My intention is to do all this updates in my vacation time on June, I´m looking for all the materials on mouser and amazon as well.

So If something else is necessary let me know

Regards

Luis
 
Control Section Execution/Rounding Third for Home

One of the most important performance elements of any stereo amplifier is to have a close tracking level control. When the levels of the two channels do not closely track, nothing can spoil the stereo image/sound stage faster.

At the time I acquired my 400 (1987), the level control and AC switch had already been replaced, and its tracking was nothing short of gawdawful (hard to expect much more for the $10 I bought it for!). As a result, and because of the decline in FM in my area, it's hardly gotten any use.

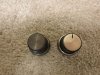
Thanks to a tip from Larry, I want to give a huge shout out to Mark Oppat of Antique Audio. He assembled a new control for me that has nearly perfect tracking throughout the entire range of the control. Just that alone, and some Brasso on the knobs (that you could hardly see the brass trim on anymore) breathed new life into my Fisher. The Brasso isn't perfect, as it leaves a copperish tinge when finished, but you'd have to look close and long to notice it. The knobs are now light years from where they were. Hey, they're part of the control section too, right? Anyway, with all the other work being done, it would have been a shame not to address these two issue as well, and so now they have been, with great success.

As for modifying the control amplifier section to remove the old features and install the new, it's a rather straight forward process. It's somewhat tedious keeping the channels straight with the copious amounts of shielded cable used, but just remembering that black cables represent left channel signals, and white cables represent right channel signals will generally keep you straight.

The new configuration makes for a much more usable device in today's audio environment. Gone is the tape circuit bleed through issue. Also gone is the phase inversion of the Tape Out signal. Gone are both high and low frequency filters, and gone are the useless SpaceXpander connections.

In are Preamp Out/Power Amp In jacks, and tape circuits that don't bleed through or change phase, either. Also in is a a much flatter response curve, with an ability to make it dead flat by bypassing the tone controls. While retaining the heritage of what it is, it is simply a much more modern device now.

One of the neat things about a Fisher, is that the darn things just do what they do well. No hiss, and no hum. Controls that are as smooth in their action as they look. They are as impressive in the bad behavior they don't exhibit, as they are in how they look. They don't intrude or make demands. They simply do what is asked of them, and impress by doing that, and nothing more.

As for modifications, all too often modifications work, but...... the smooth action is gone. Appearance has changed, or manners are forgotten. The best modifications will only add to a unit's performance, and take nothing in return. Such is the case here. The unit is still quiet as a church mouse. Controls are still quiet, smooth, and predictable in operation, with it's etiquette and demeanor still in tack. And appearance is still all Fisher.

Sonically, the unit has changed though, but in my opinion, for the better. The overly warm Fisher sound is now refined into a very accurate, high performance sound, much the way the performance of a refined drivetrain and quiet cabin in a luxury car impresses over more conventional offerings.

The mid bass bloom has been replaced by a deeper and more solid bass, while the mids are still as inviting as ever. On the high end, detail is now there that was missing before, but this was not achieved by any false emphasis of high frequencies. Rather, it was created by simply letting all the high frequency information come through. There is no harshness, or anything shrill; just all the HF information coming through that was not before.

Back in the day, recordings simply did not have the detail information that it does today, so a less than stellar HF response often went unnoticed with the limited source material of the day. With today's recording capabilities far exceeding those of yesterday, the limitations of yesterday's equipment is more readily apparent. The modifications then -- all of them -- correcting the output stage operating parameters, the stranglehold on the phase inverter, the rather poor feedback/stability networks, the level control limitations, removing the high and low frequency filters, and bypassing the tone controls, remove these limitations, letting all the music come through. It all combines to produce a very engaging sound, that is presented effortlessly, holding your attention as long as your time permits.

I mention all of this because with so many changes from a stage by stage walk through, from the output stage back to the input jacks, something must change, and it must change for the better, or it is all in vein. I think the new found dynamic authority, detail, finesse, and clarity this rework presents is well worth the effort -- not to mention the greatly extended tube life that EFB operation of the output stage affords your output tubes. I would like to think that Avery would be pleased. A few quirks, and then some pics.

For the tube rollers out there, know this: Each phono preamp tube represents a channel. Each phase inverter tube represents a channel. But the line/tone stage amplifiers? Each channel passes through EACH tube. The tube closest to the selector switch is the line amp for both channels, while the tube closest to the Stereo Beacon is the tone amp for both channels. Result? Make sure that any tubes you roll into these two positions have matched halves, or you'll potentially change the stereo image simply by changing the match betweenthe sections in the tubes used. In the modified control section, I have made a couple of changes to minimize the difference created by possible mismatch between the sections of a given tube in these positions.

Finally, due to the overall design of the control section in the 400, the line and tone stages run "flat out" signal wise. That is, with the level control appearing AFTER these stages, it is therefore possible to overload the line and tone amp stages from an unchecked input source. The modified control section is even less likely to be over-driven than the original design was, but understand that signals greater than 2.75 vac RMS will start to overload the receiver's control section stages -- modified or not.

Pics include:

1. Square wave response (10kHz) passing through the modified control section with the tone controls engaged and electrically centered. Being that they are of a passive design, some rounding would be expected, but all in all, not too bad, better than the original circuit produced, and produced by each control being within about 1/2 hour of a twelve noon setting.

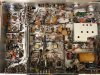
2. Work in progress. Lots and lots of changes, but it still basically looks like a Fisher 400 underneath. In this pic, all that remains is to reconnect the Tape Monitor switch and Tape Output jack wiring into the new circuit.

3. Who cares where the tone controls are set? Hit the bypass switch, and this is what you get: A near text book example of a 10 kHz square wave passing through the control section. This is very high performance indeed, and shows not only the extent of the HF response, but how utterly flat it is as well. This is performance that many other designs could only wish they could achieve. Most equipment of the day did not include tone control bypass capability, but the difference is quite clear!

Since the control section is the topic of interest in this post, the waveforms presented here and in pic #1 are from the control section only. With the modified 400, it is now very easy to check the performance of this section only: Just plug the scope into the Preamp Output jack!

4. A study of the basic control circuit modifications shown here, versus that of the original schematic, will show that the basic design has been left in tack, while removing the filter circuits, adding the tone control bypass circuit, and making a few other modifications as necessary to achieve the new level of performance achieved. Also, the various connecting jacks have been rearranged for more beneficial use.

5. Like I said, it's not perfect, but which one would you rather have on your Fisher?

Finally, a quick note about square waves. Some may think I'm obsessed with them. No, I'm not. Sine waves are wonderful for determining usable sustained power capability, and distortion levels among other things. But sine waves hardly represent music. On the other hand square waves tell so very much about how a given circuit will respond to a musical signal. Music is very transient in nature. Basically a gazillion transients put together to create our favorite tunes. A square wave is a very intense transient -- more intense than most music even, so if a circuit can pass a good square wave, without distorting its look, or adding a bunch a squiggles and wiggles to it, then it is a very strong indication of how accurately that circuit can faithfully handle a musical signal.

Besides the transient nature of a square wave, a square wave is also chocked full of a gazillion harmonics of the fundamental frequency. Therefore, as a basic fact, a circuit must typically be able to handle a frequency response of up to ten times, and down to one tenth of the fundamental frequency to accurately display a square wave of that fundamental frequency. As a result, these waveforms figure prominently in the design and development of a high performance preamp/control unit.

Some minor cleanup items next time, but that will bring this project to a close. My 400 now has a very well deserved spot in the major rotation chain of my listening room, being just as great to look at, as it is to listen to.

Dave
 

Attachments

  • scan0004.jpg
    scan0004.jpg
    54.3 KB · Views: 964
  • 2013_0408group10004.jpg
    2013_0408group10004.jpg
    47.5 KB · Views: 353
  • 2013_0408group10009.jpg
    2013_0408group10009.jpg
    140.8 KB · Views: 387
  • 2013_0408group10003.jpg
    2013_0408group10003.jpg
    46.1 KB · Views: 287
  • 2013_0408group10002.jpg
    2013_0408group10002.jpg
    69.9 KB · Views: 345
I continue to be amazed.

The need for tube rolling diminishes when you no longer need to attempt to correct for design decisions made for a different market.
 
The square wave pictures are say very pretty to my eyes- just impressive from a technical view. It tells me a lot about the Fisher audio transformers too. Nice work. I use 1.2% or better matched tubes in PI, input & tone controls. I have been fortunate receiving such well matched tubes. All these tubes are 1950s era.
 
Last edited:
Back
Top Bottom