• The move to the new server is done. There are some software and database maintenance updates in process. This has us passing the hat around to help out. We appreciate any donations. Seriously, even a dollar helps. The payment page may be found here - https://www.audiokarma.org/support.html

JBL L100 capacitor suggestions

"extracted" the crossover from within the cabinet with a 1" hole saw to avoid removing the foilcals. It worked great!

I'm planning my cap replacement on my L100s soon. Still trying to decide which caps to use. After reading through this thread I don't know if I am closer or further away from making a decision. I think I have narrowed it down though.

Can you elaborate on how you removed the crossover without removing the foil label using a 1" hole saw? Where did you use a 1" hole saw?
Thanks in advance.
 
I'm planning my cap replacement on my L100s soon. Still trying to decide which caps to use. After reading through this thread I don't know if I am closer or further away from making a decision. I think I have narrowed it down though.

Can you elaborate on how you removed the crossover without removing the foil label using a 1" hole saw? Where did you use a 1" hole saw?
Thanks in advance.

Hi Greg, the process is different based on if u have the gen 1 inline or staggered driver later generation. The later ones only have one wing nut to saw around and it's right at woofer opening. The gen 1's are much trickier and have 2 wing nuts to saw around, way in the back. Let me know if you have a gen 1 and I can advise on a couple of methods. My pics are a gen 1.

I used a 1" hole saw on a right angle attachment and attached to my drill. You need a big hand held mirror and a small light u can position to see under xover. Then u carefully line up the hole saw over the wing nut on bottom of xover and slowly start sawing until u have dug in a groove, then u can speed up and cut the hole 1/4" way thru masonite of xover board. It helps if you loosen the other screws a lot, but dont remove. Then u will feel the xover detach when u have hole sawed enough, but it wont complete fall off the baffle.

To reattach, drill a small hole thru masonite a little larger than threads of the around 3/4" screw u are using to reattach, put xover in, tighten 3 other bolts hand tight, then drill a small pilot hole into baffle thru hole u drilled in xover, using tape on drill bit to get exact depth of screw to be installed. Go slow, you dont want to drill thru ur baffle! Then ur done, and if u need to remove it again, its easy, just unscrew the screws.

You should also clean the pots real good by disassembling them if they dont have vents to spray deoxit into. You can remove the metal plate with 2 vice grips turning in opposite directions, then remove the c-clamp holding post on to remove shaft from pot. U can regrease the shaft and put dielectric grease on pot contacts for super smooth turning and contact. Also bend the contacts slightly so they push with more pressure for better signal transfer. I know this a lot of info, just let me know if you have any questions.
 

Attachments

  • 171F4233-106D-435E-B988-6B3678AA39C9.jpeg
    171F4233-106D-435E-B988-6B3678AA39C9.jpeg
    104.4 KB · Views: 41
  • CB27DDF9-F23E-4A79-9452-868372E41765.jpeg
    CB27DDF9-F23E-4A79-9452-868372E41765.jpeg
    157.6 KB · Views: 37
  • 63FCA8B5-09ED-4883-AAB8-00D8DB784963.jpeg
    63FCA8B5-09ED-4883-AAB8-00D8DB784963.jpeg
    193.5 KB · Views: 38
  • 05059EA2-4856-48FE-8CF5-630F5624D763.jpeg
    05059EA2-4856-48FE-8CF5-630F5624D763.jpeg
    163.1 KB · Views: 38
Definitely not too much info. I've got the non linear L100s where 3 of the 4 mounting screws are accessible. I now know exactly how you did it. I'm trying to decide if it would be easier to pry up a little of the foil label to access the 1 screw or use your method.

I already refinished the cabinets and replaced the unbelievable crappy speaker terminals with some banana plug style.
IMG_3358.JPG IMG_3273.JPG
 
Definitely not too much info. I've got the non linear L100s where 3 of the 4 mounting screws are accessible. I now know exactly how you did it. I'm trying to decide if it would be easier to pry up a little of the foil label to access the 1 screw or use your method.

I already refinished the cabinets and replaced the unbelievable crappy speaker terminals with some banana plug style.
View attachment 2668528 View attachment 2668529
My major argument with messing with the foilcal has 2 main points. First of all, the foilcal is 50+ yrs old and if u mess it up, there is no going back. Secondly, with my method u can remove the crossover multiple times more easily over the time you have the speakers for maintenance. The risk of damaging the original foilcal is much greater than work to cut around that single bolt. You can never go back once the foilcal is damaged.
 
I'm leaning toward using Jantzen Blue for my L100 re-cap but Jantzen doesn't make a 3uF or 8uF cap. They do make a 3.3 and an 8.2 or I could make it up running smaller in parallel. Dayton Audio looks like they have the same 3.3 and 8.2.
What's the preferred way of replacing caps for the L100 with Jantzen (or Dayton Audio)? How important is it to use the same uF value?
Thanks in advance.
 
My major argument with messing with the foilcal has 2 main points. First of all, the foilcal is 50+ yrs old and if u mess it up, there is no going back. Secondly, with my method u can remove the crossover multiple times more easily over the time you have the speakers for maintenance. The risk of damaging the original foilcal is much greater than work to cut around that single bolt. You can never go back once the foilcal is damaged.
Good points.
I've also considered using my track saw to make a perfect cut around the back of the cabinet removing the entire back. Cleats on the inside for backing to re-fasten the back with screws when finished. Pretty simple.
 
Last edited:
I'm leaning toward using Jantzen Blue for my L100 re-cap but Jantzen doesn't make a 3uF or 8uF cap. They do make a 3.3 and an 8.2 or I could make it up running smaller in parallel. Dayton Audio looks like they have the same 3.3 and 8.2.
What's the preferred way of replacing caps for the L100 with Jantzen (or Dayton Audio)? How important is it to use the same uF value?
Thanks in advance.
Sonicap has those exact values and sound better as well.
 
I'm leaning toward using Jantzen Blue for my L100 re-cap but Jantzen doesn't make a 3uF or 8uF cap. They do make a 3.3 and an 8.2 or I could make it up running smaller in parallel. Dayton Audio looks like they have the same 3.3 and 8.2.
What's the preferred way of replacing caps for the L100 with Jantzen (or Dayton Audio)? How important is it to use the same uF value?
Thanks in advance.
I always just get 2 or 3 in parallel that add up to exact uF value. It can get tricky getting the right values to add up, but I like to match exactly. I know a lot of people say getting within .5 uF range is close enough.
 
I have the Solens with the Theta by-pass caps in the L200/300s and the Audyn Q4s (no by-pass caps) in the Mermans. I like the Audyns and consider them as good bang for the buck, though the two are not really comparable because of the other components in each system.
 
Here we are almost a year and a half later and I finally replaced the caps in my L100s. I used a modified version of Brad's method to remove the Masonite board from the front baffle in order to access the caps. Instead of using a hole saw with right angle attachment, using a mirror and headlight, I used a multi-tool with the blade mounted at 90° and cut the corner of the board with the inaccessible screw which releases the board once the other 3 screws that are accessible were removed.

The wires that are connected to the caps are old and brittle, so I had to be careful not to break them when stripping the casing. One kept breaking so I replaced the entire wire. To remove the existing caps, I used a multi tool to cut thru the glue on the old caps. I just slide the blade between the cap and the board while cutting. The friction from the blade causes some melting and smearing of the old glue but not a big deal. I use extra strength hot glue to fasten the new caps to the original Masonite board.
Now to re-mount the woofer. This is where I ran into some problems. The front baffle is made from 2 layers of cheapo particle board. The woofer is mounted to the inner layer which is cut smaller than the outer layer in order to create a lip (Typical). There are T-Nuts pressed into the back of the inner layer to receive the mounting screws of the woofer. This method is very common in speaker box building. The problem was, several of the T-Nuts dislodged from the particle board when trying to remove the woofer. I had to epoxy the T-Nuts back in place. Getting the T-Nut back in the exact same location was challenging and necessary in order for the screws to line up. I replaced the original screws with stainless steel ones. With everything finally back together, I fired them up. Note: I did do a side-by-side comparison after the first speaker and before the second to see if there was any audible difference the replaced caps made. (A friend of my brother's father gave us each a pair of L100s that he bought new in the mid-70s. My brother was visiting from out of town during this recap job and for the comparison.) We are both audiophiles who have, between us, recapped probably 10 pairs of speakers. I would say that every one of them prior to this one showed either some improvement or a lot of improvement in SQ. To our disappointment, we heard no difference whatsoever. It made my brother re-prioritize re-capping his pair when he gets home. I'm still glad I did it but not sure if I would have done the job knowing what the final results were going to be. I would think that 50 year old caps would have failed by now. Don't get me wrong, the speakers still sound great but I was expecting them to sound even better. Oh well.

 
Electrolytic caps fail but lot of other types may not. My Horizons have the original caps (Mylar?) and sound awesome. Read that they should not necessarily be changed in the Lansing Legacy forum here, and sure enough they are apparently working fine.
 
Electrolytic caps fail but lot of other types may not. My Horizons have the original caps (Mylar?) and sound awesome. Read that they should not necessarily be changed in the Lansing Legacy forum here, and sure enough they are apparently working fine.
While Mylar caps do not degrade like electrolytic they leave a lot to be desired sonically...A LOT!!!
 
Here we are almost a year and a half later and I finally replaced the caps in my L100s. I used a modified version of Brad's method to remove the Masonite board from the front baffle in order to access the caps. Instead of using a hole saw with right angle attachment, using a mirror and headlight, I used a multi-tool with the blade mounted at 90° and cut the corner of the board with the inaccessible screw which releases the board once the other 3 screws that are accessible were removed.

The wires that are connected to the caps are old and brittle, so I had to be careful not to break them when stripping the casing. One kept breaking so I replaced the entire wire. To remove the existing caps, I used a multi tool to cut thru the glue on the old caps. I just slide the blade between the cap and the board while cutting. The friction from the blade causes some melting and smearing of the old glue but not a big deal. I use extra strength hot glue to fasten the new caps to the original Masonite board.
Now to re-mount the woofer. This is where I ran into some problems. The front baffle is made from 2 layers of cheapo particle board. The woofer is mounted to the inner layer which is cut smaller than the outer layer in order to create a lip (Typical). There are T-Nuts pressed into the back of the inner layer to receive the mounting screws of the woofer. This method is very common in speaker box building. The problem was, several of the T-Nuts dislodged from the particle board when trying to remove the woofer. I had to epoxy the T-Nuts back in place. Getting the T-Nut back in the exact same location was challenging and necessary in order for the screws to line up. I replaced the original screws with stainless steel ones. With everything finally back together, I fired them up. Note: I did do a side-by-side comparison after the first speaker and before the second to see if there was any audible difference the replaced caps made. (A friend of my brother's father gave us each a pair of L100s that he bought new in the mid-70s. My brother was visiting from out of town during this recap job and for the comparison.) We are both audiophiles who have, between us, recapped probably 10 pairs of speakers. I would say that every one of them prior to this one showed either some improvement or a lot of improvement in SQ. To our disappointment, we heard no difference whatsoever. It made my brother re-prioritize re-capping his pair when he gets home. I'm still glad I did it but not sure if I would have done the job knowing what the final results were going to be. I would think that 50 year old caps would have failed by now. Don't get me wrong, the speakers still sound great but I was expecting them to sound even better. Oh well.
That is great you were able to cut the xover out from the inside and leave the foilcal alone. It never makes sense to me to mess with the foilcal just to get to one screw on the gen 2 and 3 L100's! Sorry to hear the sound didn't improve a lot, maybe give them about 10-15 hrs of break in time and reassess. I found my recap of gen 3 L100's with mundorf oil caps made them a lot brighter and cleaned up mid sound quality a lot.

Did you clean the pots really really well or replace them? Some JBL experts have told me those pots can deteriorate sound quality and should be replaced, if not popped open and thoroughly rinsed/scrubbed with deoxit.
 
While Mylar caps do not degrade like electrolytic they leave a lot to be desired sonically...A LOT!!!
Yeah, I have found incredible sound improvements from replacing mylar caps in Cerwin Vegas, the metalized PP are always an improvement over mylars, though it can change the "original" sound that some may prefer. Same holds true for stereo tone boards as well, the small value mylars all over tone boards dont need replacement, but replacing with PP caps can dramatically clear up sound, though also change it a little from original sound. Its kind of a crap shoot which way to go I have found in stereo restores.
 
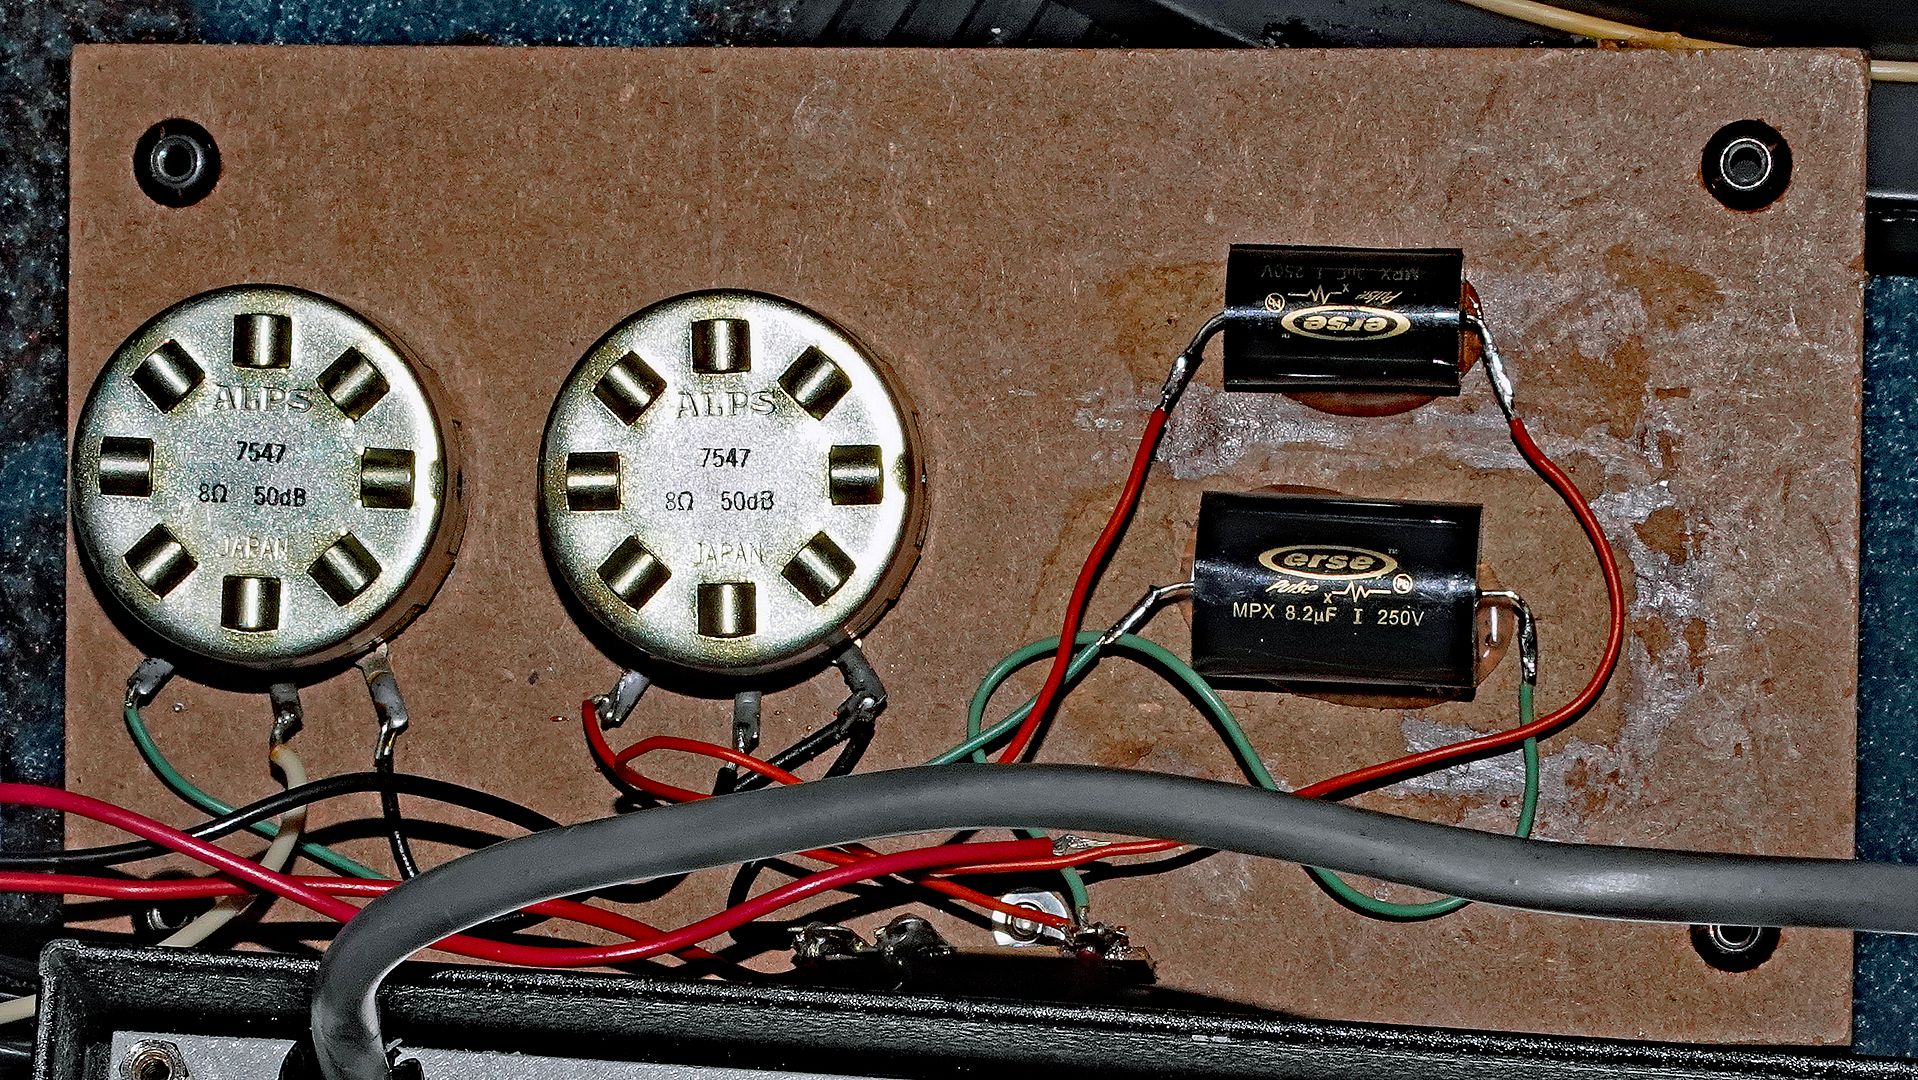
I used ERSE caps in my L100 crossover R&R. This was about 10-years ago (ERSE is no longer in business).

So far so good.

!_L100_crossover_-_ERSE_caps.jpg
 
Back
Top Bottom