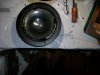
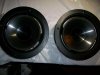
Here are photos so far . It is going to be a slow process .
Ive decided to take my time and diw ..
( without AK i would never even consider ) ( my initials are AK )
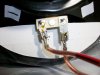
#1 I attempted to pull off clips but they seem to be glued and also looks like a bit of solder holding them in and they wont budge
What is the best way to remove them .?
Just a bit of back story .. ( cautionary tale )
The surrounds were actually fine before I started to mess w them
( if it aint broke dont fix it ! ) If you notice how dark the surround appears it is because about a week ago I thought :
" I wonder if theres a way to " Moisturize " the surrounds so I WONT have to replace them any time soon ?
" HMMM " How About Canola Oil ??? ! ?
OH THIS IS BRILLIANT ( WAIT TILL I BREAK THIS ON AK )
" No Cholesterol no Trans Fats .. good stuff ? Right ?
Everything seemed hunky dory and they looked nicer w the darker surrounds .. ( I felt 1/2 way smart for a day and a half )
Then I thought "Oh the cones are a little dusty , Ill just spiff them up a bit "
So I took a soft cloth and didnt realize that part of my rag was hanging down over the surround as I was buffing . and when I picked up the rag I saw it was black and that I had rubbed off enugh material to have created the crack ( you can see my feeble attemt in desperation to apply silicone . when i did that it totally fell appart .. so now no music for a while but it will be good to give them new life ( They do that for me every day )
FIRST THING is to get drivers disconected . I still cant figure if I can get the binding clip to release or if I should cut wire above . ( I have never actually removed a driver before ( from any speaker ) so I want to be sure Im doing things right . How do I get the wires off terminals ?
(((( NOTE TO SELF ))))
WHEN YOU ARE READY TO RE INSTAL WOOFERS AND SOLDER CONNECTIONS BE SURE TO PLACE A BARRIER BETWEEN TERMINAL AND WOOFER CONE . ONE DROP OF SOLDER AND DISTASTER STRIKES .
Don't clip the wires if you can avoid it. These are called Faston connectors and have a progressive crimp that holds them rather tight. In this case, Infinity or someone else also soldered them. You'll have to position them so that the driver is steady and won't tip over (like face down). Have good light so you can see where everything is, have your soldering station close by with a wet sponge to clean off the tip, and some good 60/40 or 63/37 rosin core solder with a good flux for electrical connections. Have a pair of long needle nose pliers handy. If you have a right angle needle nose pliers that will work too.
If there is a fair amount of solder on the terminal/connector, then remove some by heating and applying solder braid or a solder sucker device to pull excess solder out. You really want a minimal amount of solder to deal with.
The idea is normally to grasp the neck of the connector just above the crimp that holds the insulation and wire. Then clean off the hot solder tip, then apply a small amount of solder to wet it (tinning it). Then press and hold the flattest part of the solder iron tip to the head of the connector. If hot enough, you should see the solder melt. Hold it for an additional 2-3 seconds, then rock the connector side to side while also pulling away from the driver terminal - The motion will do two things - it will start to slide the connector off and it will disrupt the crystallizing of the cooling solder joint, making it less mechanically strong.
If the connector doesn't come off with the first attempt, let it cool (the wire needs to cool a bit so it won't melt the insulation too much). Then repeat again with a fresh clean tinned tip and rock away. Should come off within 1-3 attempts. Repeat for the other side. Be sure to take photos or mark the driver and wires so you know how to put them back together again.
Since the woofers are soldered in you either have to clip the wires or heat the connectors to reflow and pull them off at the same time. When it comes off like this it can spray the solder all over the place so yeah, cover the surroundings to avoid damage.
I used this kit since it was only $15 and $2 shipping:
http://www.ebay.com/itm/INFINITY-KA...286?pt=LH_DefaultDomain_2&hash=item43d5d654ee
I think I ended up using aileens for glue. Contact cement could be better, it's pretty cheap at a hardware store. I've done some "tests"

to make sure those surrounds are glued on good, which they are.
As for the "cleaning" with canola oil (!) and then silicone (!!), obviously the surrounds may have already been compromised or didn't like those materials. Importantly, you must be sure the cone is completely free of oils, solvents, or other materials which will interfere with proper glue adhesion. IMG is Injection Molded Graphite, my understanding is a polyproplyene cone with graphite fibers - generally it should be fairly able to resist most solvents but I would start first with a moist rag with a little, very little soapy water (dawn dish detergent in water) and clean the cone lightly of any silicone and old stuff.
See this thread for comments on cleaning and prepping IMG cones. There are comments about the type of solvents used, and importantly, the type of glues to be used. I would be cautious about contact cement because of the solvent in it, unless there is documented EXPERIENCE with it as a proper and usable glue. Some refoam companies includes specific glues for use with poly cones or cones other than paper. So review what other AK members have used successfully or get the correct glue from the refoam supplier for IMG cones.
http://www.audiokarma.org/forums/showthread.php?t=261274