KEF 101 crossover repair and restoration
I wanted to post a thread on KEF 101 crossover restoration. I have a similar thread on the KEF 103.2 crossover, and also one on a KEF 101 restoration and comparison with similar size Pioneer and Wharfedale speakers. The aim of this thread is to highlight the differences between the two versions of the crossover, and the different options available.
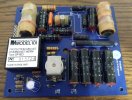
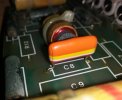
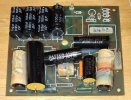
The pictures below show the crossover once removed from the enclosure. The three smaller capacitors for the protection circuitry are notorious for leaking, and corroding the tracks on the PCB. These are C3, C4 and C5 on the PCB, they are the only polarized capacitors on the board. You can see from the area circled in red on the back, one of the tracks has started to corrode. This is actually a good example, some of them can be really bad. You will notice that this version has a 300uF and a 100uF capacitor in the top right corner.

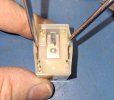
This is how you want to get the PCB, with all the old electrolytic capacitors removed. I would advise doing one at a time, as you can use the other one for reference. You will notice that I have removed the "Bumblebee" capacitor C8 and the relay. C8 does not necessarily go bad, but they are prone to cracking with age, so it makes sense to replace them. I take the relay off so I can get inside and clean the contacts. To remove the cover, insert two picks down the sides to spread the outer cover past it's locating tabs, and carefully pull it out. If you wish you had an extra pair of hands at this point, you'd be right. The contact can be cleaned by folding a piece of paper into a thin strip, spraying it with DeOxit, and dragging it through the contacts (I forgot to take a picture of that).

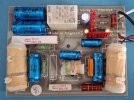
Here is the crossover recapped and back together. This is using the excellent kit from Falcon Acoustics in the UK. This is the kit to use if you are concerned about changing the "voice" of the speakers by using film capacitors, and also if you are concerned about affecting the potential resale value in the future. As you can see, part of the kit includes a 0.33uF film capacitor to replace C8. What is not included in the kit are the capacitors for the protection circuit. C3 is a 47uF 100V, C4 and C5 are 100uF 10V, and they can be any general purpose electrolytics. I didn't have any 100uF 10V, and so I used some 100uF 50V. You can go up on the voltage, but never down, and there is no need to change the capacitance. Use a good brand like Nichicon or Panasonic, and buy them from a reputable vendor like Digikey or Mouser.
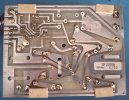
On the back, you can see that it was easy to use the lead of the protection circuit capacitor to repair the damaged trace in the PCB. Like I said, this board was in pretty good shape. I have worked on some with horrendous corrosion in this area.


I wanted to post a thread on KEF 101 crossover restoration. I have a similar thread on the KEF 103.2 crossover, and also one on a KEF 101 restoration and comparison with similar size Pioneer and Wharfedale speakers. The aim of this thread is to highlight the differences between the two versions of the crossover, and the different options available.
The pictures below show the crossover once removed from the enclosure. The three smaller capacitors for the protection circuitry are notorious for leaking, and corroding the tracks on the PCB. These are C3, C4 and C5 on the PCB, they are the only polarized capacitors on the board. You can see from the area circled in red on the back, one of the tracks has started to corrode. This is actually a good example, some of them can be really bad. You will notice that this version has a 300uF and a 100uF capacitor in the top right corner.
This is how you want to get the PCB, with all the old electrolytic capacitors removed. I would advise doing one at a time, as you can use the other one for reference. You will notice that I have removed the "Bumblebee" capacitor C8 and the relay. C8 does not necessarily go bad, but they are prone to cracking with age, so it makes sense to replace them. I take the relay off so I can get inside and clean the contacts. To remove the cover, insert two picks down the sides to spread the outer cover past it's locating tabs, and carefully pull it out. If you wish you had an extra pair of hands at this point, you'd be right. The contact can be cleaned by folding a piece of paper into a thin strip, spraying it with DeOxit, and dragging it through the contacts (I forgot to take a picture of that).
Here is the crossover recapped and back together. This is using the excellent kit from Falcon Acoustics in the UK. This is the kit to use if you are concerned about changing the "voice" of the speakers by using film capacitors, and also if you are concerned about affecting the potential resale value in the future. As you can see, part of the kit includes a 0.33uF film capacitor to replace C8. What is not included in the kit are the capacitors for the protection circuit. C3 is a 47uF 100V, C4 and C5 are 100uF 10V, and they can be any general purpose electrolytics. I didn't have any 100uF 10V, and so I used some 100uF 50V. You can go up on the voltage, but never down, and there is no need to change the capacitance. Use a good brand like Nichicon or Panasonic, and buy them from a reputable vendor like Digikey or Mouser.
On the back, you can see that it was easy to use the lead of the protection circuit capacitor to repair the damaged trace in the PCB. Like I said, this board was in pretty good shape. I have worked on some with horrendous corrosion in this area.
Last edited: