• The move to the new server is done. There are some software and database maintenance updates in process. This has us passing the hat around to help out. We appreciate any donations. Seriously, even a dollar helps. The payment page may be found here - https://www.audiokarma.org/support.html

MC-2002 and it's mine, all mine!

Excellent! I’m with you on the LEDs. Just replaced all the lamps in a MR85 with incandescents. I don’t like the color temp nor the AC flickering of LEDs.

Betting your issue was the fried resistor, probably causing a DC imbalance and triggering the SCR. Who knows.
 
You’ll have to make your own choice on the ebay buy, but it is my expectation that the “kit” will arrive with some decent quality parts and some that you will not want to use, you will need to vet the kit part-by-part for which are appropriate for use in the particular position in your Mc. This is what you expect for a seller who offers LED “upgrade” kits for the MC452, ... an amplifier that is equipped at the factory with LEDs and a much lower-current rated power switch for the MC2255 than original and one far less current than McIntosh recommends as “fine”. Searching hifiaudio or his former name captainfantastic here and on the web is enough to give one doubts.

The problem with “recap kits” in general however is that you need to trust that the seller actually knows and understands electronic/audio at an Engineer’s level so he will be able to tell you whether the several variables in a capacitor choice are best for that application or at least as good as the original, and for the most part they’re only able to read a part list or schematic enough to see the basic values (voltage and capacitance), and presume that every “audio-grade” electrolytic is adequate or a film-cap will be better. There are also changes in the circuits / schematics and most of these sellers don’t know that. Finally as a “reformed” Engineer I know that many times we designed a circuit that worked well on paper, but when pushed with manufacturing-tolerance parts would have problems, and that is one reason you revise the design (pre-production). Out here in the consumer world, unless you have McIntosh knowledge and OE parts, and all of the Service Bulletins etc. you will be presuming that everything is fine and that you can use slightly different parts. Not always true, it is best to trust someone with actual design knowledge, specific model knowledge, Technician experience, or any combination of these. These people exist here on AK but it is unlikely you’ll find one on ebay hawking “recap kits” for dozens of different models and manufacturers.

I’m in agreement that in general, LED conversions on McIntosh equipment don’t look as even nor does it retain the original color/hue. LEDs do not have the light in the same position and aren’t as omnidirectional as a filament bulb and therefore the optics/prisms/light-pipes designed for filaments aren’t going to distribute the light in the same way. Many people here and elsewhere have spent a fair amount of time experimenting and in some cases modifying to retain an original look with LEDs, some successful and some not as successful. The other problem is the color of light, white LEDs are either blue LEDs with phosphor (like a fluorescent bulb would have) which have a spike in its color and very little warm light, plus the phosphor burns off and the light output becomes increasingly dimmer and bluer over time, ... or it has both a blue and amber LED inside which is better and can be warmer, but still doesn’t have the same color palette as an incandescent. Reds are typically too pure and don’t show up as well either through the red filters. New McIntosh gear often has the bi-color LED or RGB LEDs in them with pots on the board to trim/adjust the color.

There are a couple of vendors, one who frequents AK who sell the long-life bulbs correct for McIntosh, if it doesn’t have a heat problem (a couple of models apparently can) to the meters then I would always replace with good long-life incandescents and just plan on changing them in another 5 years or so. A matter of preference entirely.

 
Last edited:
@w3jn and @SaturationPt

Just a brief update: both MC2002s are now working beautifully. Checked the second one to make sure there's nothing suspect there before I put it back in permanent service.

I'm about to start the swap on the glass, gels and bulbs, but I've run into a (minor?) issue:

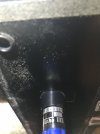
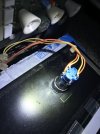
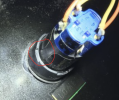
I can't figure out how to get the power switch out. I tried to find information/photos of the switch based on markings, but didn't turn up a lot. The back side has something that looks like a "castle nut", but I can't tell if it's threaded or not. Given the fragility of the other plastic around the bulbs and meters, I really don't want to just go forcing it or cranking on it without some idea of what I'm doing. If I could find correct replacement switches, I'd just buy them and save myself the hassle, but alas...

Does anyone know if this is indeed a "castle nut" on the rear of the switch, probably on a threaded body? I took some measurements and mocked it up, cut a little spanner out of 1/4" plywood, should do the trick. Just wanted to ask around for advice before I give it a whack. The old glass is in pretty poor shape (bubbling paint galore) but I'd like to keep them for backups just in case... maybe even rework them and feather in new paint since all the print is still in good shape. Would hate to break them trying to get the power switches out.
 
Not familiar with that switch, could you post a picture? Is the entire switch assembly mounted to the glass, or just a bezel?
 
Not familiar with that switch, could you post a picture? Is the entire switch assembly mounted to the glass, or just a bezel?
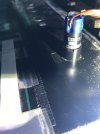
Sorry for the delay, I took a couple of photos, apologies for the dust and crud... 40 year old secondhand amp and I had to use a flashlight to get the focus to work even halfway. Attaching here:

Hope this helps, and I appreciate you taking the time to look at it for me.
 

Attachments

  • IMG_0350.jpeg
    IMG_0350.jpeg
    57.6 KB · Views: 19
  • IMG_0346.jpeg
    IMG_0346.jpeg
    76.4 KB · Views: 19
  • IMG_0345.jpeg
    IMG_0345.jpeg
    74.3 KB · Views: 19
  • IMG_0348.jpeg
    IMG_0348.jpeg
    113.3 KB · Views: 19
I am not familiar with this switch, but it sure appears threaded vs twist-loc or other method, and hard to really tell.

I would look at whether any lubrication could be used (plastic-safe of course), and warm the assembly carefully to expand the plastic lengthwise (hopefully) to relieve the clamping stress before trying to loosen?

Best of luck, hopefully it will disassemble without drama.
 
It appears the collar is glued to the front panel, and the guts of the switch unscrew, or maybe vice versa. It does appear that the collar and guts screw together somehow, with the indentations for the spanner apparent in the collar. If the old glass is bad anyway, I'd start by cutting that glue away with a dremel, and then try unscrewing the collar. Or maybe the guts snap in, and the release tab(s) per the circled area. Hard to tell. But I'd guess the guts pull forward, ie from the front of the panel.

You might call McIntosh and see if they can offer any guidance.

1695393730280.png
 
Excellent advice fellas, thank you both. I tried to turn the switch body, hoping that it would move freely, leaving the glued collar in place on the back of the glass. But, no such luck, it didn't turn at all. I think I'm going to do what was suggested and cut away the glue and use a plastic safe lubricant (DeoxIt Fader F5 sounds reasonable) to see if I can get it loose. Not a deal breaker if the glass is screwed up -- since it's already screwed up -- just wanted to avoid screwing it up further if at all possible. My homemade spanner fits perfectly (and doesn't slip!) so I'm going to give it a go this evening after I'm done with work. (Very) adjustable hot air rework station is on standby just in case this thing refuses to give up.

Thanks to both of you, and I'll report back. I'll call Mc if I can't get it to release.
 
The collar screws off the switch, try using a razor blade to separate the adhesive if it's stopping it from turning. I had to replace the switch in the one I had as it was missing the lens.

I can't remember but there may be an o ring or rubber washer in there too.
 
Back
Top Bottom