• The move to the new server is done. There are some software and database maintenance updates in process. This has us passing the hat around to help out. We appreciate any donations. Seriously, even a dollar helps. The payment page may be found here - https://www.audiokarma.org/support.html

My Large Advent Econo-Waveguide Build Thread

Mark used 18 Ga. 0.6 mH air cores, whereas the original spec calls for smaller 20 Ga. ones, which are to be mounted as he has shown. They are occasionally on backorder at PE, so the substitution may be necessary at times. The 18 Ga will work fine, though the leads are a bit cramped, and might fit the board better standing up like a wheel. It is located far enough away from the laminate-core inductor at the other end of the board that the orientation does not matter.

Here's how I mounted the oversize 18 Ga. inductor:

attachment.php

Excellent work thus far. I also found that I did not have to shave the waveguide in my OLA chamfered-edge cabs once the vinyl trim was removed. I'd notch that around the waveguide flange and re-install it, preserving the look, which I particularly like.... :yes:
 

Attachments
  • The Guts.jpg
    The Guts.jpg
    78.6 KB · Views: 1,883
Last edited:
Mark, you're doing great work! My project is progressing, I'm just working on the baffles right now. Great to see what the finished crossovers look like! My orders from PE and Zilch should arrive in a few days.

You should be proud of your work!

What woofs ya runnin'?
 
Man, I wish I knew before that I could mount it that way (vertical). That is OK because I will fix it when I solder the jumpers in. It will free up some room for the mounting holes in the board when I do the final assembly. I am in the home stretch, but I probably cannot work on it again until the weekend. I will post pics and progress. Thanks for all of the help and comments!
 
Wherdja git that crazy idea, Zilchster? :D
I couldn't guess. ;)

Man, I wish I knew before that I could mount it that way (vertical). That is OK because I will fix it when I solder the jumpers in. It will free up some room for the mounting holes in the board when I do the final assembly. I am in the home stretch, but I probably cannot work on it again until the weekend. I will post pics and progress. Thanks for all of the help and comments!
Put a double-sided 3M foam tape pad under it like you did the other components. If the leads are now too short and you have to unwind a partial turn to make it fit nicely, that's not a problem, either. Clean the solder pads with a solder sucker or solder wick braid and you're good to go again.... :thmbsp:
 
Mark, you're doing great work! My project is progressing, I'm just working on the baffles right now. Great to see what the finished crossovers look like! My orders from PE and Zilch should arrive in a few days.

You should be proud of your work!

What woofs ya runnin'?

The woofs are stock replacements from a company called AB Tech. I can tell you that for me the most important part was the PC board. Without it, my crossover would have probably turned out like the abortion that was in there before.
 
Nice work,Mark.....

Mark,I have a question & hope it's not an annoying one.Do you know how
much one of your finished Advent econos weighs?
 
Mark,I have a question & hope it's not an annoying one.Do you know how
much one of your finished Advent econos weighs?

As many annoying questions as I ask on this forum, it would be criminal to consider someone else's question to me as annoying!!:D

I am only guessing at this stage, but probably around 40 to 45 lbs each.
 
Update!

UPDATE!

I have now atoned for my crossover sins. I was able to squeeze in a little bit of benchwork in my busy schedule. I soldered in the jumpers, corrected the positioning of my 18 gauge inductors (thanks, Zilch), set up the L-pad, and wired in the speaker leads. Here is how they look:

DSCN3014.jpg


Hopefully, I can finish the prep and finish of the baffle so that all that will be left will be attaching the crossover, binding posts, and L-pad to the masonite that will complete the assembly.
 
Update!

Update:

I really thought that I would get my E-wave's done this weekend but I ran into a little snag. I painted the baffles on the Advents and they looked like a$$. Too many imperfections in the MDF. So, I was looking around for a solution and came up with a can of "fleckstone" out of the shed. So I painted the baffle with it. Looked worse! Here's what it looked like:

DSCN3033.jpg


I then tried matte black. This is about as good as I am going to get it toward WAF. Here is the painted baffle:

DSCN3034.jpg


Fleckstone takes forever to fully cure so I will have to give it a few days. I guess it is on to completing the crossover assembly.
 
I went ahead and grabbed some masonite so that I could get the final crossover assembly done. I drilled the holes for the binding posts and the L-pad and then I screwd the whole thing together. Ina few days, I will screw and glue the masonite to the inner cabinet, reinstall the fiberglass batting, hook up the speakers and then screw them in. Here is where I am now:

DSCN3036.jpg


The other side:

DSCN3035.jpg


More to follow, Gents...
 
Try sanding the MDF smooth before painting. Then use your favorite matt black paint. For extra toughness you can spray a coat of matte lacquer finish on top of the paint.
 
Try sanding the MDF smooth before painting. Then use your favorite matt black paint. For extra toughness you can spray a coat of matte lacquer finish on top of the paint.

Sanding makes so much sense, but as I was getting close to the end state I started rushing things. :no:

Asthetics were fairly important in the beginning, but I just want to hear if these waveguides are as good as Zilch and the boys purport. If I really like them I will do a second project that will be non-econo with first rate furniture grade cabinets.
 
Finally Got em' done!!

I finally got around to finishing the project. First, I secured the masonite crossover boards using construction adhesive. I used a lot and then put a bead around the edges to keep things air tight.

DSCN3096.jpg


After they dried they looked like this:

DSCN3095.jpg


Refilled the cabinets with the original fiberglass batting.

DSCN3103.jpg


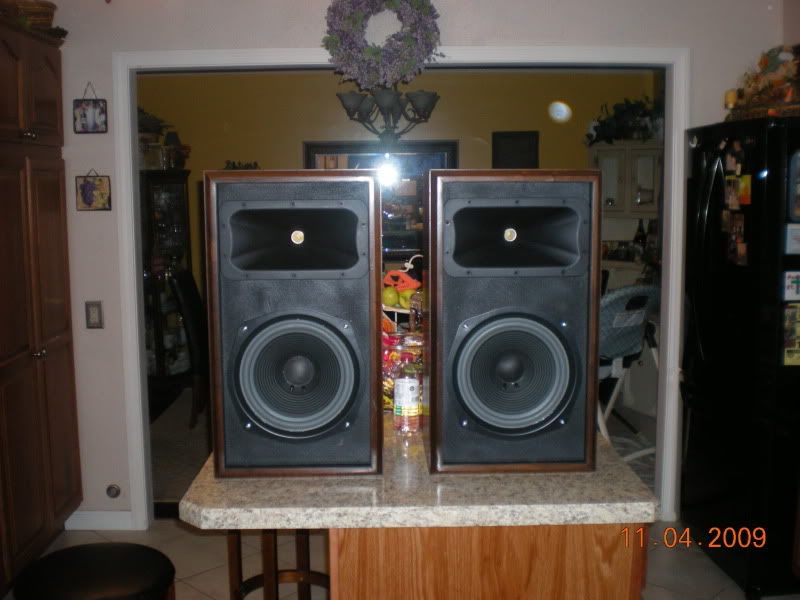
I then secured the wavguides using black cabinet screws after first adding some cell foam speaker insulation I got from PE to keep things airtight . I really like it better than mortite or other "rope" type caulking. Less messy. I then did the same thing to the woofers. I did use T-Nuts on the woofers like Bauhausler did. Good idea, Ross. I couldn't find black machine screws anywhere, so for now, I will have to live with the silver ones. I also added some small handles to the back to pick the cabinets up easier. The OLA E-Waves weigh around 45-50 lbs each. Here is what the finished product looks like:

DSCN3104.jpg


DSCN3105.jpg


DSCN3106.jpg


DSCN3108.jpg


I hooked them up to my tube amp and they sound great. The best way to describe them is that they are so smooooth!. Bass is very good. These speakers seem to mate up well with my Yaqin MC-10L. Tomorrow I will try them with my Sansui AU-G77XII and then my Marantz 2245 and see where the best synergy is. I couldn't be happier with the final result!
 
Last edited:
Nice job. You can color your screws with a black sharpie if you want to make them black. I've done this before and it works very well if you can't find black screws.
 
Thanks for the kind words, guys. Even my Wife was impressed and she could give a damn about stereo equipment. I really don't think I need to add grills to these.
 
They look GREAT, Mark! Congratulations on some awesome looking speakers -- and if the Wife was impressed, that can't hurt either, eh? Especially if you have plans to build more speakers.
 
Back
Top Bottom