I am not qualified to do a tutorial on the subject of veneering seeing that I only have 2 weeks experience myself on the subject. I know that there are qualified ak'ers that could tell you the proper way to do veneering.
However, since there is interest in what I did I will give you a quick rundown of my experience.
-I started by removing the panels and unscrewing any grilles that were attached.
-I sanded the paint off the metal grille from the cassette deck and then painted it with Rust-Oleum Satin Black paint. I put about 3 thin coats on it. It doesn't have the shine of the original grille but I like the satin look. You can use gloss black if you wish.
-I then peeled off the crappy vinyl veneer from the wood panels and sanded the panels with 150 grit paper to remove the shine and then with 220 grit to smooth it out to give a nice surface for the adhesive to adhere to. I then took a slightly damp rag and wiped down the panels to remove any loose sanding dust.
-The front and top edges of the panels apppeared to be some kind of real(?) (fake) veneer, not vinyl. I opted not to try to remove them to avoid damaging the cabinets. I instead sanded those edges with 150 then 220 grit paper then wiped them down with a slightly damp rag.
-I unrolled the oak veneer on the kitchen table and cut the pieces for the sides of the panels, with scissors, to size plus 1/4" all around. I made sure to cut so the grain would follow the long side of the panel.
-I plugged in the clothing iron and set it to "cotton" and let it come up to temperature. Placing aluminum foil between the iron and the veneer, I heated up the veneer to melt the adhesive and allow the glue to adhere to the panels. Of course I was doing 1 panel at a time as the glue will adhere quickly. If you make a mistake and need to remove a piece of the veneer after the glue has set you will have some work major ahead of you. Trust me from experience. The veneer will come off in small broken pieces and you'll have some pretty stubborn glue to remove as well. The Band-It brand iron-on recommends you let the glue set for 24 hours before attempting to trim. I waited about an hour and I tell you it was really stuck.
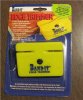
-Using the Ban-It Edge Trimmer, I trimmed the edges of the panel. It does a good job of trimming very close to the panel. NOTE: When trimming against the grain, be sure to score or at least cut into the veneer outer edges with a razor blade cutting or scoring toward the inside of the veneer to avoid chipping the outer edge.
-Then I used strips of Band-It veneer edging, which I purchased in a 25' roll continuous, and ironed it on to the top edge of the panel, let it set, and trimmed using the edge trimmer as described above.
-Then I ironed a strip of veneer edging on the front edge of the panel, let it set and trimmed as previously described.
-Now you have to sand all the edges where they meet to make them blend together, smooth and square. I didn't trust myself with a power tool to do the sanding of the edges so I used 220 grit sandpaper and did all the edges by hand. Be sure to follow the direction of the wood grain. You don't want to scratch it again the direction of the grain.
- Now I had to drill the holes for the mounting screws. I used a 1/8" drill bit and using the existing screw holes from the inside of the cabinets, drilled from the inside of the cabinet to the outside and through the veneer. Then I enlarged the hole on the outside of the cabinet to match the size of the original enlarged recessed holes using the appropriate size drill bit. Sanded around the edge of the holes with 220 paper to smooth the out and blend them in.
-I did the final sanding of the surfaces of each panel by hand with 220 grit sandpaper, again sanding in the direction of the grain, and did another final sanding of the edges, wiped with a slightly damp cloth, allowed to dry.
-Then applied the first coat of Minwax semi-clear polurethane. I let it set for at least 12 hours then lightly sanded with 220 sandpaper, wiped with slightly damp cloth, and applied the second coat of polyurethane.
-I chose to use only 2 coats of polyurethane because I like being able to feel the grain of the wood veneer. There is no doubt that it is real wood when someone touches it and they can feel the actual grain of the wood. After the second coat dried, I felt it to see if I should very lightly sand it with the 220 sanpaper again.
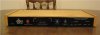
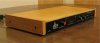
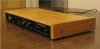
-Then attached the grille, where applicable, and installed the cabinet on the component.
I know this is coming from someone with very little woodworking experience and no photos to show of the process, but hopefully I at least gave you more encouragement to do try it yourself.
It really is a lot of fun.
If anyone with more experience has some tips for me for any future veneering projects, please tell me. If I'm doing something improperly I would really like to know.
Paul