• The move to the new server is done. There are some software and database maintenance updates in process. This has us passing the hat around to help out. We appreciate any donations. Seriously, even a dollar helps. The payment page may be found here - https://www.audiokarma.org/support.html

new project - bamboo not-so flexy

marqueemoon

Gimme indie rock!
I've been hunting for the right material for a double wide flexy-style rack for a while now. I knew I wanted pretty robust shelves as I was hoping to keep some recording gear on it, double wide, and relatively shallow to fit a specific space in the basement.

After a quick look around one of local used audio stores I ducked into a nearby shop that sells bamboo flooring and household stuff. We've been thinking about a kitchen remodel for a while and I thought I could get some ideas. Sitting in the corner were a few 40" x 15 3/4" pieces of 1 1/2" bamboo butcher block in a couple different looks. I talked with the sales guy. Turns out there were a few more in the warehouse in the style I liked. Pre-cut. All I have to do is round over the corners, drill some holes, sand, and finish.

When he asked what I was planning to do with it I told him and pulled up a pic of his own setup on a bamboo rack he had built. It looked totally sweet. The rack was pretty nice too. :thmbsp: He recommend Watco for the finish so that's what I'm going with. I think with the light walnut it should turn out a bit like this:

l_butcher_block_big470.jpg


The other two shelves have to come over from their warehouse, and I managed to clean my local hardware store out of 3/4" hardware for the All Thread, so I'm going to have to wait for some things to come in, but I'm very excited. It ain't gonna be cheap (about $300 in materials), but it should be quite the looker and very sturdy.

I'd like to stick with 4 legs if I can get away with it. Shelf sag will not be an issue, and it will be 36" high with 3/4" rods and 3 shelves. Anybody have an opinion on that?
 
Register to hide this ad
How is the bamboo layed up? The pieces of bamboo plywood I've had are layed in small bundles, most of them vertically stacked with a finish veneer of horizontal grain. The engineered Plyboo and other bamboo products I've seen are very dense and should make good shelves.
 
How is the bamboo layed up? The pieces of bamboo plywood I've had are layed in small bundles, most of them vertically stacked with a finish veneer of horizontal grain. The engineered Plyboo and other bamboo products I've seen are very dense and should make good shelves.

This is 7 ply with alternating vertical and horizontal grain. Very strong stuff, and the edges of the shelves will have cool "stripes".
 
I'll bet that'll look really nice when done. Be careful how warm you let it get though, as I seem to remember that bamboo is a natural thermoplastic. You can straighten cane fishing rods with just a candle or alcohol lamp.
 
More info here: http://www.plyboo.com/

There are some gallery pictures of edge grain bamboo plywood being used for shelving in a coffee shop so I don't think heat is going to be an issue. They do have specifications on the website, most of it ASTM formatted.

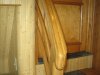
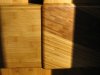
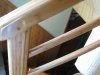
My BIL, the furniture maker, tipped me off to using bamboo in various ways. He loves the precise maching capabilities and the dense finish surfaces. He has also used it extensively in his house to make paneled surfaces, staircases, and cabinets. Attached are some pictures of what is possible.

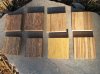
I'm contemplating the use of bamboo for speaker cabs and turntable plinths. The downside is that it is relatively expensive and isn't available locally. The upside is that it is a green product, very dense, and is perfectly flat. Last attached picture is of some samples of different bamboo plywoods and palm plywood.
 

Attachments

  • IMG_0003.JPG
    IMG_0003.JPG
    107.5 KB · Views: 114
  • IMG_0011.JPG
    IMG_0011.JPG
    113.1 KB · Views: 106
  • IMG_0005.JPG
    IMG_0005.JPG
    110.1 KB · Views: 79
  • IMG_0014.jpg
    IMG_0014.jpg
    85.4 KB · Views: 138
A suggestion before you slap that walnut WATCo on there. If you are going to use a saber saw etc to cut off the corners save those little pieces to use as a stain test. Some material that have a high resin content like I assume this Bambo does don't take stain well. Others might soak it up and end up much darker then you image. A little bit of testing goes a long ways.

I have even taken a couple Q tips with me to Home depot and tested stains before buying to get the correct color. I don't figure the loss of a Q tips worth of stain from a pint can is a big deal a couple times I have had the salesperson with me when I did it.
 
Well I made good progress today. Got all the holes drilled and rounded over all the corners (not shown). The holes came out very clean. The edges less so. Going to pick up some wood filler in the next few days.

4593404847_7c030f1874.jpg


Did I mention this is going to be HEAVY? I'm probably going to need to enlist a friend or two to move it into place when it's time.
 
Make sure you get stainable filler or you will have some odd looking edges.

The best way to cut something like this is to heavily score the material with a Razor blade or utility knife on the inside edge of the saw kerf. That way the material is much less likely to chip up. You can also sandwich it between pieces of scrap while you cut.

I recently have to cut some 1/8" thick oak down to 5/8" wide strips and by putting it between two layers of scarp 1/4" plywood I was able to cut it on my table saw very clean.
 
Make sure you get stainable filler or you will have some odd looking edges.

The best way to cut something like this is to heavily score the material with a Razor blade or utility knife on the inside edge of the saw kerf. That way the material is much less likely to chip up. You can also sandwich it between pieces of scrap while you cut.

I recently have to cut some 1/8" thick oak down to 5/8" wide strips and by putting it between two layers of scarp 1/4" plywood I was able to cut it on my table saw very clean.

I didn't cut it. I just rounded over the edges with a router. That's where the chipping occurred. I think it's largely the nature of the material. The pieces in the top two layers are pretty small. I do wonder if it dulled the bit a little though. The chipping did seem to get worse as I went on. It's nothing terrible though. Definitely getting stainable filler.

I'm thinking of just getting some 3/4" threaded couplers for the "feet". That should give me a few inches of adjustment range for my very uneven basement floor.
 
I didn't cut it. I just rounded over the edges with a router. That's where the chipping occurred. I think it's largely the nature of the material. The pieces in the top two layers are pretty small. I do wonder if it dulled the bit a little though. The chipping did seem to get worse as I went on. It's nothing terrible though. Definitely getting stainable filler.

I'm thinking of just getting some 3/4" threaded couplers for the "feet". That should give me a few inches of adjustment range for my very uneven basement floor.

Bamboo is very hard stuff. high silica content. it will dull any and every tool you try to use on it.

best router bits to use are freshly sharpened carbide bits. that, and change the bits out to fresh ones as soon as it seems to lose its edge.
 
Oh well. The routing is done. Too late to change the bit. All I can do at this point is fill and sand.

I'm thinking these would also be an interesting basis for a pair of open baffles. :scratch2:
 
Well the filler worked like a charm. I retouched a few spots but I should be ready for some finer sanding tomorrow and finish by the weekend.

I picked up the couplers for the feet today too. Leveling this thing is going to be a bit of a chore but hopefully I won't have to do it again for quite a while.
 
Back
Top Bottom