Hi I never heard back from you. SorryYes I needed


You are using an out of date browser. It may not display this or other websites correctly.
You should upgrade or use an alternative browser.
You should upgrade or use an alternative browser.
Official AR Turntable Owners Thread
- Thread starter 4Play
- Start date
Yeah, sigh and eye-roll when I see AR XA/XB industrial arts projects like that.HB's AR XA turntable.
It has a modified suspension chassis to accommodate a non-AR tonearm...
View attachment 3233048View attachment 3233049
Hawkeye 87
New Member
Hi and sorry for probably not posting this correctly, I can never figure out how to post a new thread in an established forum.
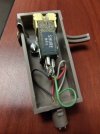
I recently acquired an AR XB turntable. Everything works fine but it came with a Stanton cartridge I didn't like. So I purchased an Audio Technica AT3600L cartridge (cheap but gets great reviews) and hooked it up to the headshell. However, it doesn't seem to get low enough on the record. I moved the counterweight all the way to the front of the arm and it still won't reach the recommended tracking force. When I play a record it skips and the tonearm quickly moves towards the end of the record. The old Stanton cartridge seems to be a little larger and higher than the AT. I posted a photo but not sure that helps. Any ideas?
I recently acquired an AR XB turntable. Everything works fine but it came with a Stanton cartridge I didn't like. So I purchased an Audio Technica AT3600L cartridge (cheap but gets great reviews) and hooked it up to the headshell. However, it doesn't seem to get low enough on the record. I moved the counterweight all the way to the front of the arm and it still won't reach the recommended tracking force. When I play a record it skips and the tonearm quickly moves towards the end of the record. The old Stanton cartridge seems to be a little larger and higher than the AT. I posted a photo but not sure that helps. Any ideas?
Attachments
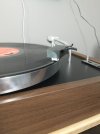

Hawkeye 87
New Member
When I use those spacers, the screws that came with the headshell are too short, I think because the AT carts have deeper screw mounting holes. I tried longer screws from a JVC turntable as well as the provided AT screws and they're not the same thread.First, AR supplied small round spacers for different cartridges, but other types of spacers would work.
Secondly, it looks as though your cueing plunger is set quite high. The plunger screws down into the body.
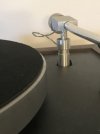
In addition to the above comments also take a look at the curl of the tone arm wires, the curl and direction is what was used for anti-skating. In your picture I can't see the wires in your pic.
Here is an image of my XB that was set up by Marc Morin
Edit, add: In reference to the screw length, I may have some longer ones here from Marc's stash. If you can measure the length of what you have I can see if I have longer ones here. I'm sure you'll get good help from others. Also check the AR thread, I recall some comments in there about the screw lengths
Here is an image of my XB that was set up by Marc Morin
Edit, add: In reference to the screw length, I may have some longer ones here from Marc's stash. If you can measure the length of what you have I can see if I have longer ones here. I'm sure you'll get good help from others. Also check the AR thread, I recall some comments in there about the screw lengths
Attachments

It could be that your pivot bearing screws need to be loosened maybe a 1/4 turn on both sides of the pivot block to allow the arm a little more up and down mobility.Hi and sorry for probably not posting this correctly, I can never figure out how to post a new thread in an established forum.
I recently acquired an AR XB turntable. Everything works fine but it came with a Stanton cartridge I didn't like. So I purchased an Audio Technica AT3600L cartridge (cheap but gets great reviews) and hooked it up to the headshell. However, it doesn't seem to get low enough on the record. I moved the counterweight all the way to the front of the arm and it still won't reach the recommended tracking force. When I play a record it skips and the tonearm quickly moves towards the end of the record. The old Stanton cartridge seems to be a little larger and higher than the AT. I posted a photo but not sure that helps. Any ideas?
Athanasios
Hawkeye 87
New Member
Very helpful. The screw is 1/4" and I heard other forums where they use a 3-48 screw, around 1/2". There's a website Fastenal, that has these screws. Really appreciate your help.In addition to the above comments also take a look at the curl of the tone arm wires, the curl and direction is what was used for anti-skating. In your picture I can't see the wires in your pic.
Here is an image of my XB that was set up by Marc Morin
Edit, add: In reference to the screw length, I may have some longer ones here from Marc's stash. If you can measure the length of what you have I can see if I have longer ones here. I'm sure you'll get good help from others. Also check the AR thread, I recall some comments in there about the screw lengths
Having misplaced the overhang guage that came with my AR XA, how can I measure the overhang on my turntable?
Also, how close is the tolerance on stylus tip position from one to another?
If I set the overhang with one stylus, will it be reasonable / ballpark / way off for another stylus?
Also, how close is the tolerance on stylus tip position from one to another?
If I set the overhang with one stylus, will it be reasonable / ballpark / way off for another stylus?




Reyhifi
Well-Known Member
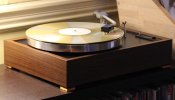
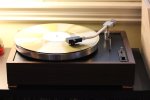
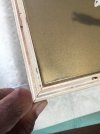
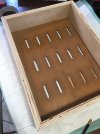
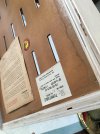
Since my counterweight issue is resolved, i decided to start working on the XA plinth prototype. My plans are to keep it stock looking, but with solid wood and adding some feet and some slight mods. I wanted the plate to be flush with the top of the plinth. also kept the bottom plate. Haven't decided about the power cord, maybe a lighted power switch. The plinth height is going to be around 4" with a very similar footprint wood spices not decided yet but walnut is the obvious choice. The accessories you see on the plate came with it. Not glued up yet, waiting on some corner clamps and I going on a mtb trip so nothing happening for at least a week.
Attachments


pworm14
Active Member
After keeping an eye out for a couple of years I finally get to join the club!!
I was hoping to find an XB but this guy popped up on CL this afternoon and of I went.
Looks to be all original and unmolested. Currently runs at 33.19 rpm's but the spindle well has very little oil. Where the arm connects to the pivot seems a bit sloppy also.
Is that the original 45 adaptor?
Lots of work to do and I can't wait to get started.
Cheers!
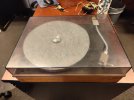
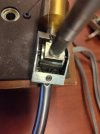
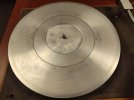
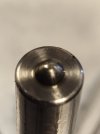

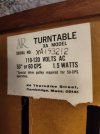
I was hoping to find an XB but this guy popped up on CL this afternoon and of I went.
Looks to be all original and unmolested. Currently runs at 33.19 rpm's but the spindle well has very little oil. Where the arm connects to the pivot seems a bit sloppy also.
Is that the original 45 adaptor?
Lots of work to do and I can't wait to get started.
Cheers!
Reyhifi
Well-Known Member
Looks very nice, the cover looks awesome so jealous. I’m keeping one of mine basically stock, the other was rough enough to warrant a new plinth, the some other mods. Right now waiting on a modded cart.After keeping an eye out for a couple of years I finally get to join the club!!
I was hoping to find an XB but this guy popped up on CL this afternoon and of I went.
Looks to be all original and unmolested. Currently runs at 33.19 rpm's but the spindle well has very little oil. Where the arm connects to the pivot seems a bit sloppy also.
Is that the original 45 adaptor?
Lots of work to do and I can't wait to get started.
Cheers!
View attachment 3260784
View attachment 3260790
View attachment 3260792
View attachment 3260793
View attachment 3260794
View attachment 3260796
View attachment 3260798
<<snip>>
Is that the original 45 adaptor?
Lots of work to do and I can't wait to get started.
Cheers!
<<snip>>
It sure looks like the 45 rpm adapter that came with my AR XA when I bought it.
Welcome to the club!


Question for the “smart XA” members. I’m adding female rca plugs to the back of the plinth along with a new power cable. The power cable wiring was pretty straight forward.
My thinking was to retain the audio connection joint that is in the XA and to remove the old rca plugs and solder the end to the new female rca connectors mounted on the plinth.
The original rca cable has three strands of wire which look to be a right and left channel with the center wire as ground. Both of the channel wires look to have 2 wires in each.
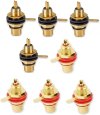
For those who have made this update, what is the preferred wire location for each connection? I’ve attached a picture of the connector being used. Thanks for any tips you have.
My thinking was to retain the audio connection joint that is in the XA and to remove the old rca plugs and solder the end to the new female rca connectors mounted on the plinth.
The original rca cable has three strands of wire which look to be a right and left channel with the center wire as ground. Both of the channel wires look to have 2 wires in each.
For those who have made this update, what is the preferred wire location for each connection? I’ve attached a picture of the connector being used. Thanks for any tips you have.
Attachments

Last edited:

noisefreq
Super Member
I did this to my AR TA several years ago. Make sure you drill the holes close enough to the internal wiring so it will reach the back of the female RCAs. Solder the positive wire from the tonearm to the tip and the neutral wire from the tonearm to the sleeve. Make sure you get the Left and Right to the proper color plug. Combine all the grounds to one (I think I used the original wire bridge) and solder that to the sleeve with the neutral, of either RCA. I, then also added a jumper wire between both RCA sleeves. I believe Marc Morin used copper foil behind the RCA plugs as a common. The jumper wire is not necessary.
Hope everyone is having a good Sunday. On my two motor XA I have the motors reinstalled and wiring connected. Proper voltage is at the new plug and at the switch but neither motor is turning (they did previously). Although I took multiple photos prior to disassembly, I must have crossed 1or 2 of the motor wires. Anyone have a wiring diagram for the 2motor XAs? Thanks