• The move to the new server is done. There are some software and database maintenance updates in process. This has us passing the hat around to help out. We appreciate any donations. Seriously, even a dollar helps. The payment page may be found here - https://www.audiokarma.org/support.html

Pioneer SX 1250 restoration power cap filters

Franco989

Member
Hi Everyone

I'm putting the finishing touches on a full restoration of a Pioneer SX 1250. I wouldn't considered my self an expert but I have learned alot from reading on this forum, here is where I'm stuck and need your help.

I'm replacing the Power Filter Capacitors with the United Chemi-Con 22000uF 100 Volt capacitors that someone else suggested on AudioKarma (Mouser part # 661-E36D101N223TDB7M). When trying to install these, I tried using the original screw for the terminals that came with the OEM caps, and they don't fit.

From reading the datasheet, I believe I determined that it uses M12 screw, but I'm not certain for sure. I tried looking for this type of screw on mouser, but have not been able to find any, does anyone know where I could find the terminal screws for this type of capacitor?

Data Sheet:

Thanks
 
Register to hide this ad
They should of come with the caps.
ACE Hardware has them as well as Lowes.
You have to auger out the terminals slightly.
 
Take the caps down to Lowes or Home Depot and match the diameter of the screw with the holes. They will be a metric size. Those new caps should have had screws on them. Damn. Zeb beat me to it.
 
thank you all, not sure how I missed them in the packaging. They did come with them, after all. After trying to auger out the second set, the cable terminal got caught in the drilled and ripped out of the cable cembre :oops:

Now I have to find a new cable terminal, I'm thinking of going to HomeDepot and searching for a copper terminal.

Not sure if something like this would work: http://www.homedepot.com/p/Gardner-...PIPHorizontal1_rr-_-100126380-_-202522479-_-N

or this
http://www.homedepot.com/p/Blackbur...ug-for-2-Stranded-Wire-CTL2-38-B1-6/100126380

Geez... going to have to remember to call it quits after 9pm:(
 
If its not to late.
I use a Dremel with a small spiral cutting bit. Hold the terminal with a pair of small vice grips or some similar device. Gently cut/grind the inside diameter larger.
Yes, Fatigue causes problems.
Whats the hurry?

Ace has a "Hillman" section of what I wish I could have in my garage. All kinds of solder ring terminals the right size for your screws. No auguring needed.
 
Last edited:
Rumor has it that the only room in your garage left is for audio gear:music: and a keg fridge.:beerchug: Stop being lazy Zeb,;) and drive to the store like the rest of us Audio Peon's!:D:naughty::biggrin:
 
I just did this on my 1250 last week with the same caps. I held the lug with a pair of needle nose and reamed it out with a drill. One of the wires broke as the drill caught so I replaced it with a standard lug, I think for a 10-24 screw with 16 gauge wire (red). I just pulled the plastic insulator off of the lug and soldered it on.

And now I want a Kegerator with a built in stand (above the liquid) for a monster receiver.
 
Five minutes with a rat-tail file works for me. I've also cut off the original terminal and soldered on a new one of the needed size. Either way works fine.
Bob
 
Just as a status update I was able to find a similar size copper terminal with similar size inside diameter to the new terminal screw at Home Depot, soldier the new terminal and good as new, finished the project about a month ago and enjoying the sound of this beautiful receiver. Thanks for the ideas everyone.
 
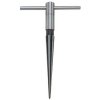
A tapered reamer used by hand works great for opening up small holes without ripping up things like power tools.
Available for under $10.
 

Attachments

  • 31YD7J3UfML._SX425_.jpg
    31YD7J3UfML._SX425_.jpg
    8.2 KB · Views: 17
Back
Top Bottom