

You are using an out of date browser. It may not display this or other websites correctly.
You should upgrade or use an alternative browser.
You should upgrade or use an alternative browser.
Rebuilding a Pioneer CT-F900 Transport
- Thread starter pustelniakr
- Start date


Thanks Glenn & Ron. Coming from you guys, that means alot.
By the way, I have a new thread about to come out: "Recapping a CT-F900", showing the work that has kept me up till early morning for the last 3 nights, working on Zinker's machine: 116 caps on 7 circuit boards. Yee haw!
http://audiokarma.org/forums/showthread.php?t=92053
Rich P
By the way, I have a new thread about to come out: "Recapping a CT-F900", showing the work that has kept me up till early morning for the last 3 nights, working on Zinker's machine: 116 caps on 7 circuit boards. Yee haw!
http://audiokarma.org/forums/showthread.php?t=92053
Rich P

Tapehead47
Addicted Member
I would have to be insane....
Thank you, Rich. You have demonstrated why we need professionals. I would NEVER have been able to perform that CT-F 950 operation successfully. I'm patient and exact and can follow instructions very well, but...! There's a limit to what I can do. I'm taking my deck to a pro for restoration.
I read your instructions all the way through and looked at the photos. What an awesome job you did in this step-by-step! Great pix, too. I was getting enthuiastic for about half the way thru, but my stomach started sinking after the steps in removing the capstans. And that was it for me!
Great job and I have to thank you for your excellent instruction. Whoever designs this gear could probably take over the world. It's amazing how all this stuff works so well.
On a further note, I have a Marantz Model 5051 Deck. The auto-stop function doesn't work. Otherwise it is just a beautiful sounding/recording unit. I think it sounds better than any cassette deck I've ever heard. Maybe there's an 'easy' way to get the thing to stop?
Keep up the good work!
Rick
Thank you, Rich. You have demonstrated why we need professionals. I would NEVER have been able to perform that CT-F 950 operation successfully. I'm patient and exact and can follow instructions very well, but...! There's a limit to what I can do. I'm taking my deck to a pro for restoration.
I read your instructions all the way through and looked at the photos. What an awesome job you did in this step-by-step! Great pix, too. I was getting enthuiastic for about half the way thru, but my stomach started sinking after the steps in removing the capstans. And that was it for me!
Great job and I have to thank you for your excellent instruction. Whoever designs this gear could probably take over the world. It's amazing how all this stuff works so well.
On a further note, I have a Marantz Model 5051 Deck. The auto-stop function doesn't work. Otherwise it is just a beautiful sounding/recording unit. I think it sounds better than any cassette deck I've ever heard. Maybe there's an 'easy' way to get the thing to stop?
Keep up the good work!
Rick
Another Happy CT-F900
Had to repair that famous reel take up motor. Wouldn't have been able to do it without your help, although it took me two tries because I didn't read carefully enough to use a 10X magnifier to look at the armature. Now she sounds happy again! Thanks so much.
Had to repair that famous reel take up motor. Wouldn't have been able to do it without your help, although it took me two tries because I didn't read carefully enough to use a 10X magnifier to look at the armature. Now she sounds happy again! Thanks so much.

shelly_d
Not An Audiophool
Could use a bit of advice on my CT-F900. I did the service on the take up reel motor and it helped quite a bit, but some tapes are still sticking on play. My HK tape deck gets through them OK. I did not change out my idler wheel cause the rubber was not cracked at all. Measuring voltage on the motor during play its about 9.25 ~ 9.75 V. about what the motor rebuild thread recommends.
To get back to the point that its playing all cassettes that are not totally hosed, do I need to redo the motor, get the idler wheel changed, both of those or is there something on the take up reel that needs attention that is not covered here?
Thanks for any advice.
Shelly_D
To get back to the point that its playing all cassettes that are not totally hosed, do I need to redo the motor, get the idler wheel changed, both of those or is there something on the take up reel that needs attention that is not covered here?
Thanks for any advice.
Shelly_D
I have had to redo motor rebuilds. There is only one way to determine what else may be wrong, and that is to carefully monitor the deck operation, to determine if the reel motor stops, or if it continues to spin when the tape stops playing. The takeup reel clutch should slip and the motor should keep spinning if something else is causing the tape to stop. For example, one of your belts might be slipping.Could use a bit of advice on my CT-F900. I did the service on the take up reel motor and it helped quite a bit, but some tapes are still sticking on play. My HK tape deck gets through them OK. I did not change out my idler wheel cause the rubber was not cracked at all. Measuring voltage on the motor during play its about 9.25 ~ 9.75 V. about what the motor rebuild thread recommends.
To get back to the point that its playing all cassettes that are not totally hosed, do I need to redo the motor, get the idler wheel changed, both of those or is there something on the take up reel that needs attention that is not covered here?
Thanks for any advice.
Shelly_D
Enjoy,
Rich P
shelly_d
Not An Audiophool
I have had to redo motor rebuilds. There is only one way to determine what else may be wrong, and that is to carefully monitor the deck operation, to determine if the reel motor stops, or if it continues to spin when the tape stops playing. The takeup reel clutch should slip and the motor should keep spinning if something else is causing the tape to stop. For example, one of your belts might be slipping.
Enjoy,
Rich P
OK, Thanks. I should be able to do that with minimal disassembly. I suspect that the motor continues to spin. If so, would that indicate the idler and belts?
Thanks
Shelly_D
You simply need to determine what is not turning. Is the capstan turning? Are the brakes successfully lifting? Is the reel motor torque actually getting all the way to the take-up reel? Is the tape binding? Does the take-up reel clutch have sufficient torque transfer? Etc.Follow up on my transport problem. When the tape stops, the reel motor continues to spin until the auto stop kills the power to the motor.
I therefore conclude the issue is a mechanical one. Any suggestions on what to look at as a correction on this?
Thanks
Shelly_D
Supplemental Note:
To verify that all is well with your take-up reel drive, do the following:
- Take a sharpie (marker), and put some marks on the edges of the take-up clutch drive surfaces, so you can see how they rotate relative to each other.
- Once the deck is back together enough to load and play a tape, fake the deck into thinking there is a tape in it: push in the tape presence sensor button (to the right of the right capstan), and press play.
- The heads should come up. Release the tape presence sensor button. the button should be held in by the risen head plate, and the transport should continue driving. If not, you will have to adjust the tape presence switch linkage (rotate the switch slightly, etc.).
- Now observe the take-up reel turning, and the tape counter counting.
- With your fingers, momentarily stop the take-up reel from turning (taking it by the hub).
- If you rebuilt your transport correctly, and all your parts are good (tires, belts, etc), the reel motor should continue turning, the reel idler should continue turning, and the take-up reel clutch drive surface should continue turning (the take-up reel clutch slipping correctly).
- If you hold it this way too long, the unit will drop out of play, because the counter stops counting while the reel is stopped.
- If what I described, while stopping the take-up reel, does not happen, find out why. Reel motor stopping (weak)? Reel idler not turning (slipping)? Everything stops turning (clutch bound)? Etc. This will require a repair action of some kind. This is because, when actually playing a tape, the take-up clutch drive surface will rotate at a different rate than the actual take-up reel (clutch slips, to provide correct, smooth take-up torque). This is verified by looking though the cassette window during play and watching those marks I told you to make with a sharpie.
Enjoy,
Rich P
Last edited:
shelly_d
Not An Audiophool
You simply need to determine what is not turning. Is the capstan turning? Are the brakes successfully lifting? Is the reel motor torque actually getting all the way to the takeup reel? Is the tape binding? Does the takeup reel clutch have sufficient torque transfer? Etc.
Enjoy,
Rich P
Thanks, will look into that next.
Shelly_D

stereofanboy
Addicted Member
Wow. I never saw this thread before, but it looks great! I'm going to try it.
shelly_d
Not An Audiophool
Wow. I never saw this thread before, but it looks great! I'm going to try it.
Heed ALL the cautions in the thread. They are WELL founded!
I used little plastic sandwich bags for the parts as I disassembled, one bag for each stage, labeled with the parts. Drew little pictures on how all the washers and spacers went on each shaft as well. First time in my life I was ever so methodical and I'm glad I was.
Will need to go back in once I receive my belt and idler kit.
shelly_d
Not An Audiophool
Could use a little help
I got ham handed in this project and now need some help.
In the photo attached, there is a spring behind the area I outline in blue. It's job is to pull the idler up to contact the pulley that drives the takeup reel.
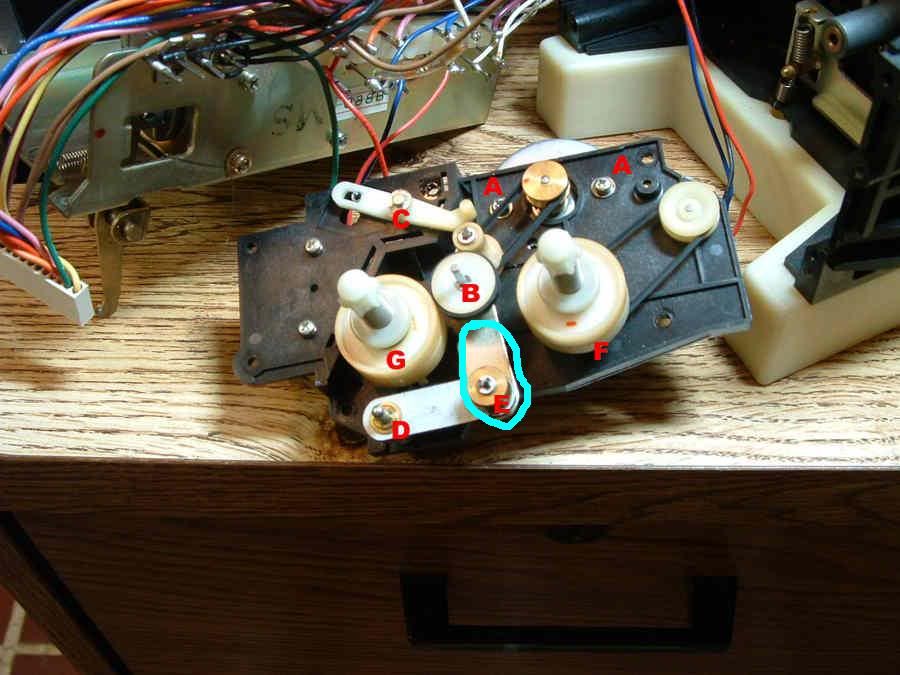
Well I stretched mine and now the idler does not contact the drive pulley. I tried using some heavy duty sewing machine thread to pull the coils together but that results in the drive mechanism chattering a lot. This si after changing both the drive belt and the idler tire.
Any suggestions will be helpful.
Thanks
Shelly_D
I got ham handed in this project and now need some help.
In the photo attached, there is a spring behind the area I outline in blue. It's job is to pull the idler up to contact the pulley that drives the takeup reel.
Well I stretched mine and now the idler does not contact the drive pulley. I tried using some heavy duty sewing machine thread to pull the coils together but that results in the drive mechanism chattering a lot. This si after changing both the drive belt and the idler tire.
Any suggestions will be helpful.
Thanks
Shelly_D
Attachments
Last edited:
shelly_d
Not An Audiophool
Whew! What a journey. Its finally working. After MANY disassemblies and reassemblies.
Got the spring working by tying up some of the coils with some of that really strong sewing machine thread, two loops of it, one on each side to make the thing look close to straight.
Then discovered that the chatter I had is caused by a lack of thrust bearings, (they are broken off and long gone apparently) and when the flywheel drifts back in the bearings you get chatter. Pressing the flywheel forward and squeezing the oil retaining washer back at the same time returns the flywheel to the right position and the chatter goes away. It remains to see how well that holds up.
Then repaired the 3 wires that broke off while I was working on it, first the black wire off the optical sensor last night, then the red wire off the plunger solenoid - on both ends today, and finally the green wire on the solenoid had to be removed and re soldered because of a very real kluge of a misroute when I did the motor.
Finally back together and put some Steeleye Span on.Transport works great, doesn't stop mid tape, but wait - there's more! The speed is off - it sounds slow (or so I think). Pull up the manual and find out how to adjust tape speed. I use the computer, RTA and my HK cassette dick to make a 3 kHz tone test tape and put it in. Throw the multimeter with the frequency counter on it and the counter tells me 3050 Hz. Well so much for my sense of pitch. As least I did hear it was off. Go to adjust it and the little hole for the adjustment access has a plastic membrane covering it. Off comes the back cover (easy at least if you don't loose the tiny screw) and cut through the membrane to gain access to the adjustment. Reassemble and adjust.
Finally done. Steeleye Span now sounds like it should (assuming that I can actually tell - see my referance to the original speed issue:stupid).
I think I will leave it closed for a while.
Shelly_D
Got the spring working by tying up some of the coils with some of that really strong sewing machine thread, two loops of it, one on each side to make the thing look close to straight.
Then discovered that the chatter I had is caused by a lack of thrust bearings, (they are broken off and long gone apparently) and when the flywheel drifts back in the bearings you get chatter. Pressing the flywheel forward and squeezing the oil retaining washer back at the same time returns the flywheel to the right position and the chatter goes away. It remains to see how well that holds up.
Then repaired the 3 wires that broke off while I was working on it, first the black wire off the optical sensor last night, then the red wire off the plunger solenoid - on both ends today, and finally the green wire on the solenoid had to be removed and re soldered because of a very real kluge of a misroute when I did the motor.
Finally back together and put some Steeleye Span on.Transport works great, doesn't stop mid tape, but wait - there's more! The speed is off - it sounds slow (or so I think). Pull up the manual and find out how to adjust tape speed. I use the computer, RTA and my HK cassette dick to make a 3 kHz tone test tape and put it in. Throw the multimeter with the frequency counter on it and the counter tells me 3050 Hz. Well so much for my sense of pitch. As least I did hear it was off. Go to adjust it and the little hole for the adjustment access has a plastic membrane covering it. Off comes the back cover (easy at least if you don't loose the tiny screw) and cut through the membrane to gain access to the adjustment. Reassemble and adjust.
Finally done. Steeleye Span now sounds like it should (assuming that I can actually tell - see my referance to the original speed issue:stupid).
I think I will leave it closed for a while.
Shelly_D

Ixtlan
Member
Ok I got several issues fixed but seem to have a mechanical problem.
The reel marked G in Shelly_d's works fine and the reel marked F seems much tighter.
The Reel motor continues to spin even though the belt has stopped.
Can the reels be disassembled to clean and repair?
Or any ideas?
The reel marked G in Shelly_d's works fine and the reel marked F seems much tighter.
The Reel motor continues to spin even though the belt has stopped.
Can the reels be disassembled to clean and repair?
Or any ideas?
Nick Danger
What about my pickle?!
Top- notch instructions! Just rebuilt transport on my CT F900 and all I can say is it would have been a real ordeal to do without the info and pics you posted. Cheers!
vincent1468
New Member
Pioneer ct-f900
thank you Sr...I did everything by your book ...and now is working ...but ..I believe i made a mistake ...I need a grounding spring ...where to buy ???? thank you ...in advanced....
thank you Sr...I did everything by your book ...and now is working ...but ..I believe i made a mistake ...I need a grounding spring ...where to buy ???? thank you ...in advanced....

Bstable
Super Member
Timely thread.
I purchased a belt kit for my CT-F900 a year ago and it looks like I am about to find some time for this project. I hope it goes well, but it is nice to know there are people that have already gone through the process. I might have a question or two for you...but I hope not.
Thank you for the progress report.
I purchased a belt kit for my CT-F900 a year ago and it looks like I am about to find some time for this project. I hope it goes well, but it is nice to know there are people that have already gone through the process. I might have a question or two for you...but I hope not.
Thank you for the progress report.