• The move to the new server is done. There are some software and database maintenance updates in process. This has us passing the hat around to help out. We appreciate any donations. Seriously, even a dollar helps. The payment page may be found here - https://www.audiokarma.org/support.html

Recap of Allison speakers - not required yet

Despite this being an old thread, the issue raised is still interesting, not so much for the back and forth over whether to recap or not, but for those with Ones, Twos, and maybe Threes, how to recap. The crossover is stoutly bonded to to the top back of the cabinet, and there is not enough room in there to work on it - the tweeter and midrange apertures aren't big enough. It certainly may be possible to pry it off (and it certainly may be possible to break it while doing so), but, one the work is done, reattaching it securely so that it is air tight and doesn't rattle may be just as big of a challenge.
Is it worth it in the absence of definite reason to believe there is something wrong with the caps?
 
Despite this being an old thread, the issue raised is still interesting, not so much for the back and forth over whether to recap or not, but for those with Ones, Twos, and maybe Threes, how to recap. The crossover is stoutly bonded to to the top back of the cabinet, and there is not enough room in there to work on it - the tweeter and midrange apertures aren't big enough. It certainly may be possible to pry it off (and it certainly may be possible to break it while doing so), but, one the work is done, reattaching it securely so that it is air tight and doesn't rattle may be just as big of a challenge.
Is it worth it in the absence of definite reason to believe there is something wrong with the caps?
Yes.
 
I didn’t see redpackman’s photo in this thread. So inside my Allison fours, entire crossover is only two wire wound resisters and one film cap? Hmmmmm. Easily upgrade..... I wonder about that polyestercap. These caps are now 42 years old. I certainly don’t mind doing an easy clip and splice on the single film cap Just to be sure. The poster above worried about how to service this As it’s glued to the board. I’ve done ones like this you can just leave the old cap Glued to the board and snip the leads off of them and connect your new Cap to those wires. Works for me. Might not be beautiful but I don’t see anything wrong with it.
 
Despite this being an old thread, the issue raised is still interesting, not so much for the back and forth over whether to recap or not, but for those with Ones, Twos, and maybe Threes, how to recap. The crossover is stoutly bonded to to the top back of the cabinet, and there is not enough room in there to work on it - the tweeter and midrange apertures aren't big enough. It certainly may be possible to pry it off (and it certainly may be possible to break it while doing so), but, one the work is done, reattaching it securely so that it is air tight and doesn't rattle may be just as big of a challenge.
Is it worth it in the absence of definite reason to believe there is something wrong with the caps?
I did a recap on my Twos.
I removed both mids. Added wire extensions of all of the new caps. (3-4" on either end), and soldered. Removed old caps, one at a time, Soldered wire extensions to points on board. Once each was done, I hot glued caps to a point lower on the back baffle. I found it easier to stranded wire than stiff cap wire. Worked well for me. I will try to add a picture later.
FWIW, I noticed an improvement in the upper end sound after recap.

Good luck.
Glen
 
Very old thread but also very helpful. Particularly about HOW to access these inaccessible caps.

Thanks GLENWCAR,
Peter
 
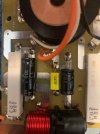
Hello -- adding to this old thread because my question is relevant to the topic: Allison 4 crossover. I have a pair of the later version of the Allison 4 (round edges rather than angular) and it is slightly different. Has different tweeters and probably the woofers are different also. I am in the process of re-foaming the woofers and I can see the crossover network quite easily -- in fact it's very easy to unscrew the PCB board and remove the XVR. I am going to post a pic. My question is should I recap them or not? The XVR looks very recent and new but I cannot determine what type of capacitors are used -- old electrolytic or new film type. Any one knowledgeable care to look at the pic and give me some advice?

IMG_3502.jpg


Paul
 

Attachments

  • IMG_3502.jpg
    IMG_3502.jpg
    90.9 KB · Views: 5
The black ones are electrolytics and the yellow is almost certainly a film cap. I take it by your phrasing that you already know this. Whether to replace the electrolytics is a tough one - they look in fine shape, and though they are old, they aren't as old as many candidates for replacement. You could unsolder a leg and test - I suspect they will still be close to expected values. If you replace them just on general principle, because their equivalent series resistance is likely higher than that of film caps, you have the choice of sticking with electrolytics and maintaining close to the original sound, or, if you go with film caps, you may need to pad the tweeter down a bit or the speakers will be brighter than intended. You might like that, of course. Or not.
 
Back
Top Bottom
