• The move to the new server is done. There are some software and database maintenance updates in process. This has us passing the hat around to help out. We appreciate any donations. Seriously, even a dollar helps. The payment page may be found here - https://www.audiokarma.org/support.html

Rehab for speakers with hard miles - JBL L166

C Hart

AK Subscriber
Subscriber
Hi all. I have been freelancing on pandemic speaker rehab. I really enjoyed it, but had mixed results. (The speakers' appearance generally improves at least.) My most recent project, E-V Interface:As, is almost done and has been quite a chore - rebuilding damaged particle board with injectable and putty epoxy, endless sanding, anxious veneer trimming, etc. It is going pretty well and I have high hopes, but I really don't know what I'm doing.

I just got a pair of JBL Horizons today which sound awesome but have replacement 035Ti tweeters and oddly reconed 122As, i.e. will never be collectible. L166s are a particular favorite of mine and I got a pretty good deal IMO, and I bought them for the sound. But I would like to restore the cabinet appearance to better than their typical fair-condition (damage to corners, deep scratches etc.).

I am seeking pro, veteran, or DIY advice on repairing this kind of cabinet situation that is familiar to all us vintage fans. From quick and dirty all the way up to full new condition restoration. Anyone been down this road and care to share?
 
Register to hide this ad
When i encounter this situation, i just re-veneer over the old finish. You can stain it the color you want and oil it. Wayyy easyer to re-veneer then messing around IMHO.
 
I think that pictures would go a long way in helping people understand what you have to work with and what might be done to help them. 035Ti tweeters are not what the L166 came with. Was the cabinet modified to accept those tweeters? What do you mean by "oddly reconed" when you talk about the 122A woofers? Are the midrange drivers (should be LE5-8) original and functional at least?
 
To all responders - my apologies - I somehow didn't get the alerts that there were responses. Not sure whether there was a technical or operator malfunction - probably the latter. But I will get right on the photos.

The speakers are apart now while I try to figure out how deep I want to go. Thanks for the interest and I hope you return with more.
 
OK here's the full photo gallery.

IMG_2484.jpeg
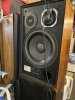
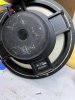
Speaker with drivers installed hooked up to test amp. Note the 035tia, mounted on the surface and a little cockeyed, and the 122A with ~1" of some coating, along with the refoaming on the wrong (front) side.

IMG_2572.jpeg IMG_2573.jpeg
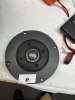
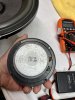
035TIA tweeter front and back. Note the + terminal with the original yellow glue and the lower minus one with new epoxy. The internal wires had been soldered to terminals. To remove them I cut the wires and then, like an idiot, tried to unsolder them and of course the glue melted at a way lower temp than the solder. I had to disassemble the tweeter and resolder the hairlike tinsel leads using a strand of speaker wire. Of course I did this on both tweeters. Bad scene but they do now work.


IMG_2570.jpeg IMG_2571.jpeg
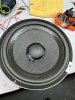
122A with the odd cone. I recant my original statement - I think seeing the Aquaplas that this is the original cone, just a weird set of choices in the refoaming. It does not look like it was trimmed because the old foam is still present on the back.


IMG_2575.jpeg
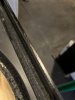
Looks like someone polyurethaned it including the black-painted lip under the grill.


IMG_2574.jpeg
IMG_2576.jpeg
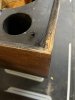
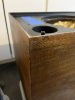
Two views of the bad corner. Looks like it got wet and someone "repaired" it. I am in the process here of resculpting the inner less damaged part with Plastic Wood. Sanding the finish looks likely to burn through the veneer.


IMG_2578.jpeg
And the biggest reason these will not be collectible: Beat up unobtanium grills.
 
Wow, someone had fun with that cone. The foam was incorrectly put onto the front, and unknown why anyone would want to paint a ring around the outer edge of the cone like that. Looks like they used WAY too much glue doing the refoam, and the paint was probably their attempt to cover up all the extra glue on the front of the cone. The glue around the dust cap looks like they tried to remove the dust cap and use shims. Shame, as it's pretty easy to do it the right way just using a test tone, not having to remove the dust cap at all. That is a lot of extra glue/paint on the cone to the point of adding extra mass, and the foam on the wrong side of the cone will change the voice coil's position within the magnetic gap, both things that will affect performance to some extent. If they were mine, I'd start by refoaming them correctly with the foam on the rear, and at least investigate the possibility of trying to remove that paint and extra glue somehow.

Unfortunately, even if you are satisfied with the performance of the woofer, they will never sound like a L166 with that 035TiA in there. On top of the fact that it's simply not a direct replacement, the 035Ti series of tweeters has it's own issues with the foam underneath the titanium dome deteriorating, causing the treble to become more harsh and potentially clogging up the voice coil gap.
 
@Chris Brown - Yeah so much work to put a great woofer out of spec. Toldja it was odd. The thing that really is strange is how precisely that coating was applied.

I had both 035Tia's open (see sad solder story above) and the foam is tweeter shaped but resilient, so I think it's ok.

Despite the woofer ugliness it still thumps prodigiously. Your glue mess theory rings true but I don't think it adds more than a few grams of mass. And, while it isn't the same as the 066, these 035Tia's actually sound excellent. You probably know this, but per JBL's tech sheet it is the correct replacement tweeter but has "slight sonic differences".

My roommate in college had these and I can testify they sound like I remember, with those bell-clear highs, perfectly imaged mids, and the very low and tight bass that really made these speakers stand out from the pack.

You've posted about your L150s - do you have L166s also?

(BTW I use a AAA battery for coil centering - I highly recommend this quick and effective hack)
 
@turboyam - I am debating reveneering and immediately would except these speakers are even then going to be great listening but non-original and a little ugly. All go and no show. I got some great 2'x8' walnut from Home Depot for $27 to use on my last project but these speakers need one of those for each.

Now if someone can suggest a grill solution then we'd be talking veneer for sure.

Will L100 grills fit? Same size box supposedly.
 
Hi all. I have been freelancing on pandemic speaker rehab. I really enjoyed it, but had mixed results. (The speakers' appearance generally improves at least.) My most recent project, E-V Interface:As, is almost done and has been quite a chore - rebuilding damaged particle board with injectable and putty epoxy, endless sanding, anxious veneer trimming, etc. It is going pretty well and I have high hopes, but I really don't know what I'm doing.

I just got a pair of JBL Horizons today which sound awesome but have replacement 035Ti tweeters and oddly reconed 122As, i.e. will never be collectible. L166s are a particular favorite of mine and I got a pretty good deal IMO, and I bought them for the sound. But I would like to restore the cabinet appearance to better than their typical fair-condition (damage to corners, deep scratches etc.).

I am seeking pro, veteran, or DIY advice on repairing this kind of cabinet situation that is familiar to all us vintage fans. From quick and dirty all the way up to full new condition restoration. Anyone been down this road and care to share?
Hey C,
Take a look at my KLH Six resto thread. They were basket cases, from the original owner. I did a complete reveneer and was quite happy with the results. Hopefully you’ll find it helpful for your project.
Cheers Glenn
https://audiokarma.org/forums/index...-original-1963-owner-pics-restoration.520806/
 
You probably know this, but per JBL's tech sheet it is the correct replacement tweeter but has "slight sonic differences".

Hmm, I'm curious which tech sheet says that? The one I have shows 044 as the suggested replacement. But maybe the tech sheet was updated at some point?

l166_ts.png

You've posted about your L150s - do you have L166s also?

No, but I have heard them in person before. I thought that they sounded great, although I am always nervous when pushing an Alnico woofer hard.
 
Thanks @GD70 . That is quite a thread. You did a fantastic job. I especially like the color and the miters on the front - both perfect. I did my EV Interface:As and used Titebond and the hot iron technique and they came out well but they are like brand new museum pieces now (as are your KLHs) which the L166s can never be for the reasons above.

I'm trying to figure out if they're worth the work to improve the aesthetics, and also if reveneering will be less work than individually fixing all the little cabinet uglies.
 
looks like nail polish on the woofer, seen this hack before when someone was trying to "save" a foam surround.
 
@Chris Brown I stand corrected on the tech sheet. I must have read it on AK because the tweeters were cited in the Craiglist ad and I found confirmation somewhere. Anyway, they are high performance tweeters and they do the job.

Re Alnico nervousness, I can see why. I would be jittery with any woofer at 118dB. Your video is awesome.

My brother had L150s. I am on record stating they are one of the top home speakers of all time. IMO the L166 is one of if not the single best bookshelf of all time. These are my first JBLs ever and I am pumped.
 
Thanks @GD70 . That is quite a thread. You did a fantastic job. I especially like the color and the miters on the front - both perfect. I did my EV Interface:As and used Titebond and the hot iron technique and they came out well but they are like brand new museum pieces now (as are your KLHs) which the L166s can never be for the reasons above.

I'm trying to figure out if they're worth the work to improve the aesthetics, and also if reveneering will be less work than individually fixing all the little cabinet uglies.
Thanks for reading through it! It was a satisfying project.
Please post pics as you progress.

BTW, I have seen those grills on epay every once in a while.

Glenn
 
@GD70 (and everyone): If you come across reasonably priced grills anywhere please let me know. The only one I see right now is on eBay for $112 and is in about the same shape as the ones I have. Good ones are negotiable but I would pay maybe $40 for a beaten up as a donor so I could attempt to splice over the broken parts on mine. If I can't find one I'll build something in a crazy JBL color.

@onwardjames - Dr. Biggles is a busy guy with some amazing work.

Building up the corners below with Plastic Wood from the blue tube. It works well if it's not applied too thick and sands really easily. Home Depot is sending two rolls of paper-backed walnut veneer. Down the rabbit hole again...

(For tougher spots Free Form Air epoxy putty works well and is extremely strong despite being sandable. The Abatron soaks into damaged particle board to harden it but once it sets it is really tough like original Bondo. I used both for the EVs but they were really in bad shape.)

The bottoms of the speakers are shown. Note they are what I think is the original color with a medium oil finish on the walnut. The urethane, much darker and redder, was amazingly only applied to the the tops and sides. These speakers were $1100 new in 1978 (and probably about the same today if in good shape). Shaking my head.

IMG_2584.jpegIMG_2585.jpeg
 
Back
Top Bottom