• The move to the new server is done. There are some software and database maintenance updates in process. This has us passing the hat around to help out. We appreciate any donations. Seriously, even a dollar helps. The payment page may be found here - https://www.audiokarma.org/support.html

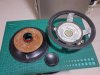
Salvaged a pair of Infinity Reference 2000.3 speakers and found THIS inside! Can I FIX this driver?

mhjmhjones

AK Subscriber
Subscriber
br6S4BD.jpg


Sorry for the clickbait title but I’m not down with all the speaker jargon, so my vocabulary is limited.

Someone had left these speakers on the curb. Shortly after we got over 3” of rain in under a half hour, and lost power for 19 hours, I drove by, spotted them and double back to pick them up. My guess is they were outside during that storm because some of the particle board was a little swollen, but not too bad. The drivers themselves look intact. I noticed something heavy was loose inside one of the cabinets when I picked it up. So today I took it apart and found it was the heavy “magnet” part had broken off of the black metal other part there on the left side of the photo. Sorry - I don’t know what those parts are called.

My question is - how can I fix that? I’m pretty handy and well-tooled. I’ve recapped speakers and rebuilt potentiometers and refoamed woofers, so I’d like to give a go at fixing these maybe give them to my son before he goes off to college whenever that ends up being.

Thanks in advance for help or advice!
 
Register to hide this ad
This won't be easy as you'd need to re-cone to be able to re-rivet those 4 rivets plus, the magnet's front plate is missaligned too :mad:. The voice coil is probably dammaged ( it looks like it is). Maybe easyer to find another woofer, (same model).
 
This won't be easy as you'd need to re-cone to be able to re-rivet those 4 rivets plus, the magnet's front plate is missaligned too :mad:. The voice coil is probably dammaged ( it looks like it is). Maybe easyer to find another woofer, (same model).

Hello and thanks. Is that copper colored tube the voice coil?
 
Match the old glue pattern to get the right rivet holes. Hold it together and put some music to it. Adjust as needed. Then figure out how to hold it in position till the glue dries before you glue it.
 
Some here make a jig for such delicate work. If you're unsure, a heavy hand will result in a damaged voice coil. Feel free to ask lots of questions.

More pics, please. Seems like a great find. @GordonW might be able to help as well, he's perhaps the best at fixing speakers.
 
br6S4BD.jpg


Sorry for the clickbait title but I’m not down with all the speaker jargon, so my vocabulary is limited.

Someone had left these speakers on the curb. Shortly after we got over 3” of rain in under a half hour, and lost power for 19 hours, I drove by, spotted them and double back to pick them up. My guess is they were outside during that storm because some of the particle board was a little swollen, but not too bad. The drivers themselves look intact. I noticed something heavy was loose inside one of the cabinets when I picked it up. So today I took it apart and found it was the heavy “magnet” part had broken off of the black metal other part there on the left side of the photo. Sorry - I don’t know what those parts are called.

My question is - how can I fix that? I’m pretty handy and well-tooled. I’ve recapped speakers and rebuilt potentiometers and refoamed woofers, so I’d like to give a go at fixing these maybe give them to my son before he goes off to college whenever that ends up being.

Thanks in advance for help or advice!
Reach out to AK member Gordonw. A master at this stuff.
 
Match the old glue pattern to get the right rivet holes. Hold it together and put some music to it. Adjust as needed. Then figure out how to hold it in position till the glue dries before you glue it.

what find of glue?
 
br6S4BD.jpg


Sorry for the clickbait title but I’m not down with all the speaker jargon, so my vocabulary is limited.

Someone had left these speakers on the curb. Shortly after we got over 3” of rain in under a half hour, and lost power for 19 hours, I drove by, spotted them and double back to pick them up. My guess is they were outside during that storm because some of the particle board was a little swollen, but not too bad. The drivers themselves look intact. I noticed something heavy was loose inside one of the cabinets when I picked it up. So today I took it apart and found it was the heavy “magnet” part had broken off of the black metal other part there on the left side of the photo. Sorry - I don’t know what those parts are called.

My question is - how can I fix that? I’m pretty handy and well-tooled. I’ve recapped speakers and rebuilt potentiometers and refoamed woofers, so I’d like to give a go at fixing these maybe give them to my son before he goes off to college whenever that ends up being.

Thanks in advance for help or advice!

if you think you can safely remove the speaker surround , speaker cone and spider +desolder the 2 speaker lead wires from the speaker basket shown in the picture , so you can reuse them later and you need not get new part.
20200201_221630.jpg 20191002_201207.jpg
 
Last edited:
This won't be easy as you'd need to re-cone to be able to re-rivet those 4 rivets plus, the magnet's front plate is missaligned too
I'm not sure that's true. The metal shield is obviously off-center, but that's not really significant. I believe the pole piece looks misaligned only due to the angle of the shot. If the OP could take a picture straight on, we could confirm that.
 
I'm not sure that's true. The metal shield is obviously off-center, but that's not really significant. I believe the pole piece looks misaligned only due to the angle of the shot. If the OP could take a picture straight on, we could confirm that.

I was able to align the glue patterns up and I snapped a couple of the rivets back in and it is holding loosely. If I press down on the metal frame, it fits snug and the cone moves freely. Here is the requested photo if I understood correctly:

https://i.imgur.com/UXRD55Z.jpg

also adding more photos in a new comment momentarily.
 
It's an easy fix, I've done several of these.
As long as everything lines up correctly and there's no scraping of the voice coil when you move the cone you should be fine. Use really good epoxy and you're going to need to clamp it down evenly.
 
I've fixed that sort of thing before- without having to tear the cone out of the basket. You will have to slightly enlarge the rivet holes in the basket, to allow the magnet to go back on with a little "wiggle room", so that it can be centered so that the voice coil doesn't want to rub anywhere around the voice coil circumference- a Dremel is a great thing for this. Of course, you WILL have to be ESPECIALLY CAREFUL to GET RID OF all the metal particles generated by this, before the magnet assembly is brought ANYWHERE near the basket, during or after the grinding process!

Once you have it where the basket will slip cleanly over the rivets, and it is properly centered (pushing on the cone in various point around its outer circumference doesn't make it want to rub more quickly in one place, compared to pushing on other points), then just mix up some epoxy, cover the entire area where the basket meets the magnet (while making sure you don't use too much, to make sure it doesn't squish out on the inside, near the voice coil opening), place the basket on the magnet assembly, make sure it's again centered (by pushing on the cone in various places around the cone circumference)- once it's lined up, just let it dry overnight- and it should be fine.

Regards,
Gordon.
 
Makes sense, thank you. I have a Dremel and a drill press, so enlarging the rivet holes should be easy enough.

I’ll probably disassemble the cabinets and rebuild the tops and sides with some better wood. Assuming they sound good that is!

I’ll take photos.


I've fixed that sort of thing before- without having to tear the cone out of the basket. You will have to slightly enlarge the rivet holes in the basket, to allow the magnet to go back on with a little "wiggle room", so that it can be centered so that the voice coil doesn't want to rub anywhere around the voice coil circumference- a Dremel is a great thing for this. Of course, you WILL have to be ESPECIALLY CAREFUL to GET RID OF all the metal particles generated by this, before the magnet assembly is brought ANYWHERE near the basket, during or after the grinding process!

Once you have it where the basket will slip cleanly over the rivets, and it is properly centered (pushing on the cone in various point around its outer circumference doesn't make it want to rub more quickly in one place, compared to pushing on other points), then just mix up some epoxy, cover the entire area where the basket meets the magnet (while making sure you don't use too much, to make sure it doesn't squish out on the inside, near the voice coil opening), place the basket on the magnet assembly, make sure it's again centered (by pushing on the cone in various places around the cone circumference)- once it's lined up, just let it dry overnight- and it should be fine.

Regards,
Gordon.
 
Of course, you WILL have to be ESPECIALLY CAREFUL to GET RID OF all the metal particles generated by this, before the magnet assembly is brought ANYWHERE near the basket, during or after the grinding process!
Agreed, and move the magnet to another room or put it in a bag or box while you're working to prevent any stray shards from getting in there. It's possible to clean the gap if necessary, but why worry about it? Once done cutting, wipe the frame (inside and out) with a damp rag to make sure you get rid of all the shavings. If you can find a cup or something similar that's a little larger than the voice coil, tape it down to the frame over the coil to prevent anything from sticking to it.
 
Back
Top Bottom