• The move to the new server is done. There are some software and database maintenance updates in process. This has us passing the hat around to help out. We appreciate any donations. Seriously, even a dollar helps. The payment page may be found here - https://www.audiokarma.org/support.html

Sansui 9090DB Dial Lights Out After LED Upgrade to Power Meters

cykotic

New Member
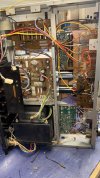
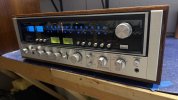
I am in the process of upgrading all of the incandescent lamps to LED. The Dial lights and Signal and Tuner lights turned out beautiful. I then upgraded the left and right Power Meter lamps to LED and now have NO lights on anywhere. I must say that changing the lamps in the Power Meters were a huge pain, so much so that I ended up removing the entire Power Meter assembly from the unit in order to access and replace the lamps with LED. During reassembly, I spliced the cut wires back togehter with solder and heat shrink, and resoldered all of the wires I had unsoldered in order to remove the assembly (I took several detailed photos before removing the assembly so all of the wires are soldered back into their correct places). I will say that my soldering skills have not improved much since 7th grade metal shop, so I feel fairly certain that my sodering is causing a short somewhere. In summary...after reassembly I switched on the 9090DB, had lights everywhere for roughly 3 seconds and then all of them went out. I presume I blew a fuse but cannot locate a blown fuse on any of the boards. What else could it be? I've heard there are fusible resistors that could be blown but have no way to identify these as I am still a novice at this stuff. Can anyone point me in the right direction to correcting this problem? I had the entire unit restored to factory specs 6 years ago by qrxrestore dot com out of Eugene, OR, but at that time, LED upgrades were not offered or I would have had them complete it. Anyway, any help will be greatlh appreciated. Here are a few before and after photos of the Power Meters and a few others as well. I am also refinishing the wood case.
If anything jumps out at you, please feel free to jump in and give me hell! :) .
Thanks much! :)
~Cy


index.php


SANSUI 9090DB POWER METERS BEFORE.jpeg


SANSUI 9090DB POWER METERS  - AFTER.jpeg


SANSUI 9090DB DIAL LIGHT HOUSING.jpeg


SSANSUI 9090DB FUSES NOT BLOWN.jpeg


SANSUI 9090DB INTERIOR.jpeg


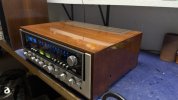
SANSUI 9090DB WOODEN CASE SIDE REFINISHED.jpeg


SANSUI 9090DB WOOD CASE REFINISHED-1.jpeg
 

Attachments

  • SANSUI 9090DB LED UPGRADE TO DIAL.JPG
    SANSUI 9090DB LED UPGRADE TO DIAL.JPG
    102 KB · Views: 131
  • SANSUI 9090DB BACK OF SIGNAL AND TUNER METERS.jpeg
    SANSUI 9090DB BACK OF SIGNAL AND TUNER METERS.jpeg
    80.3 KB · Views: 7
Last edited:
Register to hide this ad
Greetings and welcome. Big all bold text is generally considered shouting! ;)

There is indeed a fuse for all of the lamps. It is on the power supply board.
9090dblampfuse.jpg

SANSUI 9090DB INTERIORa.jpg

It is tucked in under the capacitor wiring in your picture. Don't just toss in a new fuse and try it again, find the problem first.

You have given us and yourself a good hint. It sure sounds like all was well until you did the meters. So go back and check all of the wiring and soldering.
look for solder bridges where you soldered the lamps in to the little circuit boards.

These areas look a little suspicious, but it is hard to tell even after I enlarged the image. And yes it appears you need to work on your soldering skills. :p

SANSUI 9090DB POWER METERS - AFTERa.jpg
 
Yes! My soldering is amateurish at best! I will go check that fuse on the power board now. And will remove the bold print. I use bold because I am pushing 70 years of age, am hard of hearing so I have to shout in my mind when reading text! I’ve also reached that age where I blast my pickup radio, but have to turn it way down when looking for a street address.
 

Attachments

  • IMG_2572.jpeg
    IMG_2572.jpeg
    125.9 KB · Views: 8
Yes!! That was it! The fuse on the power board is blown! 250V 3 AMP fuse. Now I have to track down the short that’s blowing the fuse. It’s gotta be somewhere in that 7th grade soldering job I performed. I have a magnifying glass but think I’ll pick up a Jewler’s headlamp to wear. I already need 3 hands to solder with properly.
Thanks so much! I’ll repost my findings when it’s up and running with all new LED lights working!

IMG_2801.jpegIMG_2804.jpeg
 
Yes! My soldering is amateurish at best! I will go check that fuse on the power board now. And will remove the bold print. I use bold because I am pushing 70 years of age, am hard of hearing so I have to shout in my mind when reading text! I’ve also reached that age where I blast my pickup radio, but have to turn it way down when looking for a street address.
Got it :) Not quite 70 yet but in the neighborhood now. I'm going out on the limb a ways in betting that your profile picture is not recent? If it is share the secret man!

Case looks good. Finish woodwork is my Kryptonite.
 
Greetings and welcome. Big all bold text is generally considered shouting! ;)

There is indeed a fuse for all of the lamps. It is on the power supply board.
View attachment 3392446

View attachment 3392447

It is tucked in under the capacitor wiring in your picture. Don't just toss in a new fuse and try it again, find the problem first.

You have given us and yourself a good hint. It sure sounds like all was well until you did the meters. So go back and check all of the wiring and soldering.
look for solder bridges where you soldered the lamps in to the little circuit boards.

These areas look a little suspicious, but it is hard to tell even after I enlarged the image. And yes it appears you need to work on your soldering skills. :p

View attachment 3392456
Let’s see!
1. I found the short by checking my soldering on the back of each power meter circuit board, and even though I didn’t see anything blatantly wrong, I did notice that a couple of the areas where I soldered in the new lamps were extremely close to one another. I felt that I should probably separate these two before any hanky-panky occurs, fuses start to blow, money begins missing from my dresser and my daughter gets knocked up! I performed that brief adjustment, installed a new fuse (of equal value I might add), plugged in and switched on the unit and counted 3, 4, 5, 6 seconds and the lights are still on!! I can’t believe it was something that simple!

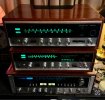
I still have to finish applying a few coats of lacquer to the cabinet but I’ve included some new pics of the LED upgrade.
This 48 year old Japanese lady is looking fine!!
You are correct! That profile photo was taken in 2000. Rather misleading, I know. I’ll update the photo to something current!

Wood Cabinet:
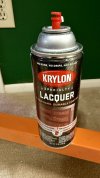
I switched over from a warm gloss MINWAX polyurethane which I brushed on, to a Krylon aerosol lacquer clear coat. Primarily for the much harder finish which lacquer provides. I don’t plan on putting my Craftsman mechanic’s tool box on it, but invariably something strange happens and somehow new damage occurs. Especially with small grandchildren running about! “Grandpa! What’s this piece of metal that looks like it’s surfing on top of the record”? Scratch, Twist, Crunch “UH-OH”!
✌️
Thanks out to everyone who assisted me with this project! Your help and your input has been greatly appreciated!!

IMG_3158.jpegIMG_3157.jpegIMG_3156.jpegIMG_3155.jpegIMG_3160.jpeg
 
Thanks for the update, glad you got it going, it's always a good feeling knowing you brought it back to life. Enjoy!
 
This 48 year old Japanese lady is ready for the red carpet? I think I hear the paparazzi gathering outside in anticipation…(nope. it was just some raccoons getting into my trash can). I do, however hear some Deep Purple playing! Thanks again for all your help! ✌️
 

Attachments

  • IMG_3332.jpeg
    IMG_3332.jpeg
    72.4 KB · Views: 12
  • IMG_3331.jpeg
    IMG_3331.jpeg
    81.4 KB · Views: 12
  • IMG_3327.jpeg
    IMG_3327.jpeg
    84.5 KB · Views: 12
Back
Top Bottom