• The move to the new server is done. There are some software and database maintenance updates in process. This has us passing the hat around to help out. We appreciate any donations. Seriously, even a dollar helps. The payment page may be found here - https://www.audiokarma.org/support.html

Servicing a SONY DAT machine (Pictorial)

Need sony 75es dat machine rotery encoder? Anyone know where to get one?
also called a mode switch......http://www.partstore.com/Part/Sony/Sony/DTC75ES/Sony/Sony/146472432/New.aspx

Out of stock on the sony site/hard to get part........does anyone know of a used parts dealer? I tried ebay to....cant find it......thats all it needs to work.

This seems like a very commen prob with this machine/and if you can fix it your self and find the part/there not to bad.?

Would appreciate any info guys....

Thanks,
Ed

If the rotary wheel is broken and you can still find the 2 parts you can fix it using power glue. The following problem then is to get the wheel back on the pin of the encoder itself. You need some pressure for it and the wheel will brake again. Therefore, a very thin mini-piece of plastic (maybe cut from a plastic folder) can help glued directly on one side in the middle of the wheel giving it more strength. It works fine since the wheel is just driven and doesn't drive anything itself except the encoder (sensor) needing less power.
I did it on 2 DTC-700. The original wheel is a misconstruction, thus a malfunction is implemented after a while: There are 2 tiny holes in the wheel in addition to the main hole for the axis of the encoder, probably to make it elastic enough to be pressed on this axis. However, the remaining material at this location is substantially not enough. The always existing static force will damage this wheel especially after aging. It even can break doing nothing with the unit or just being shipped to an other place. It is always a nice surprise sending out a well functioning and tested unit and getting back a reclamation from the receiver immediately, isn't it ? - Now you know just one possible reason ....
 
Hi guys. I've been reading the entire topic in order to get my sony dtc 670 working again. I bought it faulty because i wanted it to work as a DAC, but now i really want to be able to use for recording, since i love anything that involves moving a tape :). Anyway, i did the following:
-cleaned the heads
-cleaned the plastic wheels that move the arms
-cleaned the gear assembly that drives the spools.
-opened and cleaned the spool motor (didn't change anything).
-mounted a torque adjustment potentiometer (mine didn't have any) and incresead the torque
-reduced the tape tension by unscrewing the little screw mounted on the yellow solenoid.
-cleaned the pinch roller and the capstan.
Now, the transport works almost fine, the playback is ok, the ff is ok, and the rew is a bit slow twords the begining of the tape. Unfortunatelly, the sound isnt's stable. When i power on the machine, for a few minutes there is absolutely no sound. The time counter is working and the start and end markers are read corectly. After a few minutes, the muting relays starts to click and sound comes in and out. I suspect that there might be 3 problems and i need your opinions:
1. the transport isn't quite stable or fine tuned (tape tension, playback torque)
2. the head and the tape are misallinged
3. the head amp capacitors are dead.
Which one do you think is more likely to be the fault? Thank you!!! Btw, this is the best topic on servicing dat machines ever, and it was very helpfull.
 
Hi.

I would say that it could be a bad solder/contact somewhere as the problem evolves with warm up.

If you are able to read markers and if time counter is working (in "abs time" mode !!!) the RF amp is probably not dead.

Personnaly I would:
- remove the foam cleaning roller
- clean the heads again
- check the base of each guide as they tend to get loose, not engaging correctly in their "catcher"

And reducing the back tension without proper measuring tool is not a good idea.
 
Last edited:
Hi guys. I made some crappy videos of the machine in question.

-In the first one the playback speed is ok but every couple of seconds it "skips"...the sound has glitches.
http://youtu.be/sX71OolUNHY

-In the scond one, the sound appears to be in slow motion, possibly sample rate mismatch or transport being too slow.

http://www.youtube.com/watch?v=nnsxrg1r2tM
Any ideas?
I appolgize for the low quality of the video and sound, my phone is old and cheap, and my camera has no sound capability.
 
Hard to see anything with your videos (no offense).

Could you try again, with more light, holding your phone steadily over the mechanism, or, better, filming from rear so that I can see the guides like this one ?

You can also take pictures.
 

Attachments

  • dat_redimensionner.jpg
    dat_redimensionner.jpg
    93.3 KB · Views: 138
Ok guys, i really messed up this time :( . Since last time i posted i did some messing around with the machine and now is even worse. It seemed to me that the tape guides are moving freely and decided to tension the screws that fix them to the tape fitting mechanism. Big mistake, now the pinch roller isn't pressing hard enough on the capstan and the right arm doesn't extend to it's max position. Just for now i'm taking a break since i only managed to do only bad things to the machine. I cleaned, the tension pads but the rew is slow at the begining of the tape. Anyway, for now i'm using it as a DAC and if i may say so...it sounds very good. I will post a good quality picture of the transport, maybe someone can tell me where should i begin.
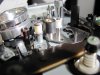
 
Now i've got the transport in working order again, i cleaned the white plastic frame that moves the tape guides and presses the pinch roller. So everything is in working condition, except there is no sound coming out. When i press play the muting relay clicks (muting is off) but there is no sound and the vu bars aren't moving. I susspect that the alignement is too messed up. Can someone tell me how to adjut it without a scope and a test tape?
 
I took some photos of the transport. Maybe someone can spot a problem. Thank you.
 

Attachments

  • IMG_7084.jpg
    IMG_7084.jpg
    66 KB · Views: 189
  • IMG_7085.jpg
    IMG_7085.jpg
    64.3 KB · Views: 176
  • IMG_7087.jpg
    IMG_7087.jpg
    61.6 KB · Views: 176
  • IMG_7088.jpg
    IMG_7088.jpg
    53.7 KB · Views: 175
  • IMG_7086.jpg
    IMG_7086.jpg
    52 KB · Views: 178
I would appreciate a photo with the tape loaded and playing.

Don't touch the alignment, it is a last resort solution.

Is the counter running in "abs time" mode (important) ?
 
Too late, i already tampered with the alignment. No, the time counter is not running in abs mode, and also the start and end markers are not being detected. How can i make a picture of the transport running without the tape loadin mechanism in the way? Thank you.
 
First put the guides back in their former position (i hope you memorized them).

Then clean the heads again

Take the photo the same way that above (post #245).
 
Last edited:
This thread is REALLY useful!

Like I said, this thread is REALLY useful!

Armed with just a couple of screwdrivers, I was able to get into the insides of a Sony Z700 mechanism and bring it back to life. My problem was with the gears pictured below, the white one on the thick shaft (I guess you could call it gear 4 of 5) was very hard to turn as the grease had dried up. I cleaned this and the other gear shafts with Ronsonol, and greased them with some petroleum jelly.

It was really easy to get the transport apart and then back together using these excellent pictures and descriptions. For someone who said that English isn't their native language, I couldn't fault anything.

Thank you Sasi,

Lee.

attachment.php
 
Thanks for your kind words. It's been a few years since I fiddled with these flimsy transports, motivated by the general consensus that these decks are not repairable. The design isn't top notch in terms of reliability but they can perform.

Regarding the reduction "gearbox" you picture, I've found it's best to have it super clean and not greased in any way. For some reason this part of the transport seems to collect dust first and foremost. Any amount of grease, combined with dust, turns into a muddy substance that - IMHO - taxes the miniature motor driving the whole contraption.

The only thing I've ever added to these gears is a very small amount of sewing machine oil to the shafts applied gently with a cotton swab.
 
Hi guys. I've been reading the entire topic in order to get my sony dtc 670 working again. I bought it faulty because i wanted it to work as a DAC, but now i really want to be able to use for recording, since i love anything that involves moving a tape :). Anyway, i did the following:
-cleaned the heads
-cleaned the plastic wheels that move the arms
-cleaned the gear assembly that drives the spools.
-opened and cleaned the spool motor (didn't change anything).
-mounted a torque adjustment potentiometer (mine didn't have any) and incresead the torque
-reduced the tape tension by unscrewing the little screw mounted on the yellow solenoid.
-cleaned the pinch roller and the capstan.
Now, the transport works almost fine, the playback is ok, the ff is ok, and the rew is a bit slow twords the begining of the tape. Unfortunatelly, the sound isnt's stable. When i power on the machine, for a few minutes there is absolutely no sound. The time counter is working and the start and end markers are read corectly. After a few minutes, the muting relays starts to click and sound comes in and out. I suspect that there might be 3 problems and i need your opinions:
1. the transport isn't quite stable or fine tuned (tape tension, playback torque)
2. the head and the tape are misallinged
3. the head amp capacitors are dead.
Which one do you think is more likely to be the fault? Thank you!!! Btw, this is the best topic on servicing dat machines ever, and it was very helpfull.
The symptoms you describe here make me think of a faulty tape/head azimuth. If the azimuth is marginally off, then you get the head to pick up the blocks and decode the timecode - hence show you time - but with severe data errors in the contents, forcing the mute circuit to engage.

Tape azimuth depends on the position of the S and T guides but also on back tension. Zero back tension can cause dropouts at first and read errors at it's worst case.

Officially, you should not attempt to tamper with aligning the S and T guides unless you have a test cassette, a scope and an understanding of the process as described in the service manual.

I have been successful in aligning transports using a cassette recorded on a known good machine, recording pure sine tones of different frequencies, and then playing them back on the transport under alignment.
If alignment is way off, you get no sound and no time codes.
If it's marginal you get time code reading perhaps with sporadic misses
As it improves, you get a more stable time reading and sporadic sound
It's really easy to reach this point provided you have the proper alignment screwdriver and patience.
Once you get to have stable output of sound, you need to view the signal on a scope or - preferably - on a frequency analyzer. I use Cool Edit Pro in frequency analysis mode.
A perfect alignment will give you the pure sine wave recorded on the tape and a single notch at the frequency of the tone with very little distortion (2nd, 3rd, etc, harmonics peaks)
So you need to fine tune azimuth to decrease distortion and kill the harmonics.
That's easy to do with a 1kHz tone and that's how I start. Then move to 2kHz, 4kHz, etc. No point going above 16kHz and unless a transport is in perfect mechanical condition and alignment you will get distortion at these frequencies.
Note that for this to work you need a decent soundcard (even onboard sound cards will do provided they are recent) and a sampling frequency of at least 96kHz.

And - of course - the above are meaningful only if the RF amplifier is working and the head isn't shot. Bear in mind that the DAT format is robust enough that you get some sound even if one of the heads is dead - or at least that's what the experts have to say.
 
Too late, i already tampered with the alignment. No, the time counter is not running in abs mode, and also the start and end markers are not being detected. How can i make a picture of the transport running without the tape loadin mechanism in the way? Thank you.

Time to get yourself another deck for reference. :D
 
It is also an opportunity for me to thank Sasi for this wonderful post which helped me to repair at least 20 decks (55ES/57ES/59ES/60ES/690/ZE700/77ES/1000ES...).

It also gave me directions to repair other brands like Aiwa, Yamaha, Luxman (same as Sony 1000ES), Technics...

If not fully reliable and sturdy the Sony 3 motors drive is very well designed as it is simple and every part is accessible. At the end it is very unlikely not to put back on service a deck. Not to mention that the problems are always the same and are "easy" to fix (hardened grease, lost washers, dust...), except the RF amp smd capacitors.

It is also easy to find the service manuals and a cheap defective deck for cannibalism.

Compared to the Sony, the Technics/Panasonic/Yamaha rely on a single motor for the capstan, the reels and tape loading, use tiny plastic gears that break and are non available anymore, ultra compact and hard to access design...
 
Ok, thank you for your advice; unfortunatelly my alignement is way off, i messed it up and now there is no sound and no time code. Can you please tell where should i begin? I guess i could improvise a scope with my x-fi sound card and a software.
 
Last edited:
The bandwidth of your soundcard is way too limited to use it as an scope for tracking adjusment.

If you do not have a scope here is my method, using a tape recorded on a trusty deck:
1- fully screw both guides
2- unscrew both guides one turn
3- slowly screw/unscrew right guide and memorize both positions where clear music appears and disappears. If clear music is impossible unscrew left guide one more turn.
4- set the right guide in a middle position between the two mentionned above
5- slow screw/unscrew left guide and memorize both positions where clear music appears and disappears
6- set the left guide in a middle position between the two mentionned above
7- Repeat steps 3 to 6 until both positions on both guides are stabilized

You should now have clear music at least on play mode.

A fully aligned deck is able to output clear music (although jerky) in fast-forward play and reverse play.
 
Back
Top Bottom