• The move to the new server is done. There are some software and database maintenance updates in process. This has us passing the hat around to help out. We appreciate any donations. Seriously, even a dollar helps. The payment page may be found here - https://www.audiokarma.org/support.html

Share your amp and speaker building projects with us!

Rob

Super Member
Banned
All,

I have just accepted the honour of moderating this forum. I figured it would be an easy job because there are always more buyers of store bought audio equipment that builders of same, so this ought to be a piece of cake.

We'd love to see photos and stories of speakers you have built. The same goes for amplifiers, especially tube amps, one of my special interests.

I've been an avid builder of electronics all my life and have made a living crafting technology in my own shop. I feel that I am well qualified to look after things here because of my keen interest. You may have seen the full range exponential bi-radial horns I recently completed or the 805 SE amp that I am planning to build now.

I notice that many posts that could adorn this forum end up starting on the Tube or Speakers forums. How about starting those here in the future? Let's make this as good a forum as some of the others here have become. It will be a bit harder after all, you have to Do It Yourselves, but hey, sometimes its worth it!

There's nothing quite like the feeling of satisfaction one gets from crafting something with your own mind and hands, and then showing it off!

Rob
 
Last edited:
Register to hide this ad
OK, I'll jump in here with a little project I did for some subwoofers for my home theater

It was a way to salvage some old cabinets.
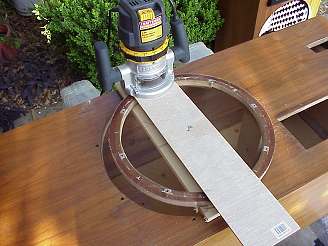
recut them for 18" McCauley ultra sub drivers
cutout_thumb.jpg


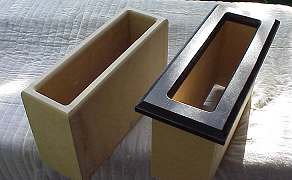
make some tuned radius edge ports
portbuild2_thumb.jpg


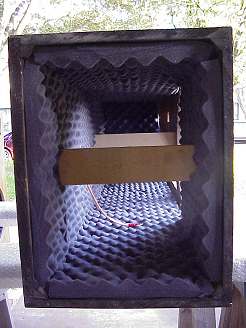
line and brace them
foam_thumb.jpg


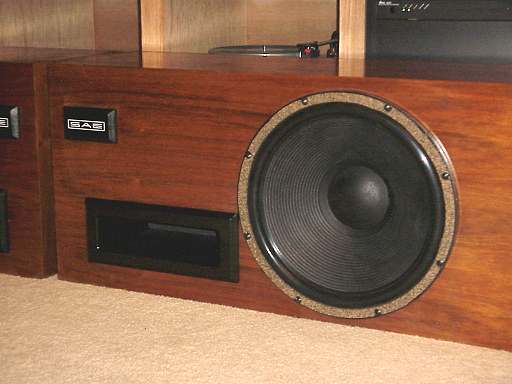
to the finished deal
sub_close.jpg
 
Wards,

Very fine job there. 2 Questions.

1). Did you place the port lengthwise from the woofer to gain bandwidth over the more common, symmetrical placement which would have seen it centered and vertically aligned as per your photos?

2). What made you go with the more expensive open celled poly foam absorber rather than simply stapling pink fiberglass wool insulation inside the cabinet? I use that stuff and find it just fine, and it is inexpensive.

Thanx for sharing.

Rob
 
Well great Rob! I coudn't of thought of a better person for the job myself. Your deep background is gonna come in mighty handy me thinks. As an electrical contractor and an extreamly talented fellow LOL ;) why I can get into about anything but my education and background is not nearly what I wish it would be for this paticular phase of electrical/electronics. HEY, at least I can keep from killing myself in there! (snicker) Having someone like you around to bounce things off of will be pure gold!

You know, I need a friggin digital camera sumpthin bad! I would be shooting pics of my Thorens TT journey through the various mods. Only thing I have on line is the crossovers I built for my main speakers. And shoot, that wern't nuttin... :dunno:
 
WW,

Many thanx for the warm welcome. Nice x-over. Say .. are those interconnects? :)

Rob
 
Rob nothng as grandios as bandwidth optimization. It was making the best of what you have. The cabinets were Klipsh protoypes that used a conventional bass driver and horn loaded mids and highs. Given the size of the opening, I calculated the depth taking into consideraton the final internal port dimensions using 3/4 MDF. The radiused edges were to eliminate "huffing".

As for the egg shell, I get it free from my brother-in-law. He is the regional manager for Victory Packaging. One of the top five corragators in the country. Comes in real handy when I need boxes or any packing material. Otherwise I dought I would use 350# double wall air freight shipping boxes for my Ebay sales. Sure impresses the people when they get their gear. :D
 
Not Amp...Not speaker

But a DIY none the less. Kind of fell into it today. As I was in a buddies awning company welding shop I look in the corner and see a piece of 6" x 6" x 3/8 thick square steel stock. Came up to thigh hieght. Friggin thing must weigh about 80 pounds, ya know. So any way I say to the shop welder. "Hey man, can you cut these big ole lag bolts here down and weld one into each corner for spikes?" He said no prob and before you knew it I had a new turntable stand that would spike through the carpet and couple to the concrete. This is much better than the stand I had and should make for a extreamly ridgid platform for my TT MDF sandwich shelf. I tell ya, once I get the Dynamat and blu tak in the Thorens like it should be why, ummm...Vibration? What's that? ( I really need a record clamp to top this all off! ) :boink:
 
WW,

Heavy Metal normally should belong in the Music Forum, but since it is DIY I'm glad you posted here. That should dampen the ol' vibrations pretty well! :)

As a public service for the members that believe that speaker wires sound different and wish to put in something like this damper plate, I should also suggest to make sure that the metal plate is degaussed or else magnetic earth fields concentrated in the plate could adversely affect the magnetics of your phono cartridge. It is easily shown with nothing more sophisticated than a pocket compass that the plate acts as a magnetic field concentrator, it's absolutely true.

Placed in what is practical from my perspective, I believe that non-inductively run, parallel #16 or larger stranded copper is entirely adequate for speaker cables and that the magnetic fields concentrated in your plate won't cause a noticeable difference in the sound of vinyl over the other pops, scratches and mistracking, etc. associated with that medium. :) However I am certain that if you paint it satin black it will make the sound noticeably better! :D

Rob
 
Last edited:
Hey Rob... I guess I didn't explain it all to well eh? It's not a plate, it is a long 36" square 6"x6" steel tube for the stand. The top TT shelf is two pieces of MDF sandwiched together with rubber inbetween. The heavy metal stand isn't very close to the turntable. I feel confident that I don't have any magnetic earth feild problems but you are right. They would tend to concentrate in metals but the degree is small. I guess if I slammed it with the sledge hammer it would tend to help align the electrons with the earths magnetic field. BUT! I don't plan on doing that LOL

"Heavy metal, music section" LOL cute, cute. ;)

Oh and it will be satin black... (snicker)
 
well, I completly restore my JBL L100's rewired all internal wiring, sand them, stain, polyeurthane etc....

here are a few pictures of before the restore:

well, these pictures were taken with my old IBM NetCamera, so they are not the best, but you get the idea

this is before I ever started, only thing I did AFA doing anything to them was take that one woofer out:

attachment.php


attachment.php


attachment.php


all the wire is now 16ga. RS mega cable

attachment.php


attachment.php


attachment.php


and this is after the resteration, in these pictures I don't think I had re-painted the front baffle black yet, either way, I am real happy wih them:


pdr_0134.jpg


Pdr_0218.jpg


and here is a picture I just took, you can still see the chips, but it isn't bad (kinda cool, lol I dunno) but the stain and polyeurthane really helped it out
 
hmmm I guess they don't like me to link the pictures on their server lol, just right click it, and click propeties, then you can see it (either clck the link or copy+paste)

these are the 4 holes on one of the speakers, the stain really never stuck to the wood putty, but it's ok, its not too bad either
 
ok, so it's not the best picture, but this is after (well just now took it) I repainted the front baffle, looks far better then before.

so this is my little project, it came out real nice, my soldering isn't the best and I had a few problems with it, but it's ok, I just wanna get these things working already.

and in 2 weeks I am going to be starting a DIY rack for my system.
 
Hey there Night Wolf...looks like your starting to get into DIYing...COol...congrats. I know you've done a number of things to your speakers so far...looking good.

I'm just getting into this DIY thing too...and it sure is nice that we have audio sites like this one to help us along...sites like this provide a great place where we can get suggestions from those with more experience than us...not only to help us on our current projects...but for thoese future ones too ;) For me...AK as well as the HE forum at AA (and other individuals) have been extremely helpful to me...and I can't thank these guys enough (thanks again guys:) )


No matter how any of your projects turn out...have fun!


take care>>>>>
 
Last edited:
These are monoblocks I built at the Randall museum last year. They are direct reactance drive designed by Jack Elliano with
modifications by John Atwood. It has SS rectification as it is not
in the output circuit in this design. There were 12 of us in the group doing these. Wish I had taken more "during" pics.
 
Last edited by a moderator:
pictures resized by Moderator

CarlIV,

That's a terrific project. I have learned that fellow AK'er BillF is currently involved in a similar group effort to build 300B monoblocks based on the WE 91 circuit. I think about a dozen amps are being made.

I've resized your images to fit on the page. We strive to keep file sizes and download times manageable. When posters can do this themselves it is appreciated.

Thanx,
Rob
Moderator
 
Thanks Rob, I will learn how to do that for the next time. One of these days I will figure out the avatar trick too.
Carl (The Rookie)
 
Back
Top Bottom