• The move to the new server is done. There are some software and database maintenance updates in process. This has us passing the hat around to help out. We appreciate any donations. Seriously, even a dollar helps. The payment page may be found here - https://www.audiokarma.org/support.html

Shout out for the Hagerman bugle 4

cafe latte

Addicted Member
I bought a Bugle 4 as a back up phono stage as recently my much much more expensive phono stage psu died. Due to my business I need a versatile phono stage to test cartridges so the loss of my phono stage even though it was only for a few days was very inconvenient.
I have a MM and MC on my DNM, but no options to change loading easily or gain which I need.
I did not expect huge things from the bugle, it was bought just as a back up to ensure I am not stuck again, but was I in for a surprise...
Negative points first, the highest gain is 64dB, my main phono stage has over 80dB gain which is great even when I use my transformer passive preamp. 64dB is on the low side for the very lowest gain MC's. Also on the highest gain setting there is a slight hiss which my main phono stage does not do. The hiss is minor and would not get in the way of the music and you will only need the highest gain on quite low output MC especially on a traditional preamp and not a passive one.
The surprise was how good this little phono stage sounds, apart it's mentioned short comings it sounds just as good as my far more expensive preamp and it is way way easier to switch gain and loadings which is something I really need.
It is so good, I am going to set a turntable permanently with it and it won't be a reserve preamp, I expect to use this a lot despite its small short comings as sonically it is very good indeed and it's flexibility will make testing a lot easier.
Chris
 
Register to hide this ad
Hey Chris. The Hagerman products I’ve tried have all been very, very good as compared to their peer group. Jim’s designs have taken heat in some discussions, but my Cornet2 stage just cannot get kicked out no matter how hard I try. The bugle series is remarkable value and performance (I’ve built and had Bugle 2 and 3). The Clarinet, one i have not had but have heard, is a few steps up the ladder in every way. I’m a fan.

For your gain dilemma, you should reach out to Jim, as he may have a component substitution in your Bugle that he can advise which gets you closer to what you seek.
 
Can't you just use a SUT for those carts that have really Low output to overcome that difference. You won.t need a high ratio SUT as you can use it to just give it the little bump to bring it up so the Bugle can take over the duties.
 
I bought a Bugle 4 as a back up phono stage as recently my much much more expensive phono stage psu died. Due to my business I need a versatile phono stage to test cartridges so the loss of my phono stage even though it was only for a few days was very inconvenient.
I have a MM and MC on my DNM, but no options to change loading easily or gain which I need.
I did not expect huge things from the bugle, it was bought just as a back up to ensure I am not stuck again, but was I in for a surprise...
Negative points first, the highest gain is 64dB, my main phono stage has over 80dB gain which is great even when I use my transformer passive preamp. 64dB is on the low side for the very lowest gain MC's. Also on the highest gain setting there is a slight hiss which my main phono stage does not do. The hiss is minor and would not get in the way of the music and you will only need the highest gain on quite low output MC especially on a traditional preamp and not a passive one.
The surprise was how good this little phono stage sounds, apart it's mentioned short comings it sounds just as good as my far more expensive preamp and it is way way easier to switch gain and loadings which is something I really need.
It is so good, I am going to set a turntable permanently with it and it won't be a reserve preamp, I expect to use this a lot despite its small short comings as sonically it is very good indeed and it's flexibility will make testing a lot easier.
Chris

What is your main phono stage?
 
What is your main phono stage?
I have more than one, I have a Sutherland ( loaned out) and an Ultrafidelity and of course the DNM phono stage and some suts and a head amp. The Ultrafidelity is a bit better for testing carts over the Sutherland as the dip switches are on the back not inside, but the number of times I change the settings it and the Sutherland are a pain in the butt in this respect.
I have had the Ultrafidelity set up recently as it is a little easier and I have loaned the Sutherland to a friend as he is thinking to buy it. The Ultrafidelity is quite a bit cheaper and I don't feel it performs any worse than the Sutherland for my ears.
Chris
 
Last edited:
Can't you just use a SUT for those carts that have really Low output to overcome that difference. You won.t need a high ratio SUT as you can use it to just give it the little bump to bring it up so the Bugle can take over the duties.
I can always use my main phono stage. How I have set this up now I have dedicated one turntable to it for testing. That said I have found myself using it for listening too, I keep thinking of records I want to try on it.
Chris
 
I've been pretty thrilled with the modified Bugle 3 with the OPA2210s, and a custom regulated linear power supply.

Audio still has strong pockets of "cottage industry" left, and Jim's commitment is still very evident. That's one of the nicest differences vs buying a heavily massed produced product from China. There's someone upstream who cares about the sound and quality, and is likely to answer the phone if you call. That's essentially the roots of high end audio. :cool:
 
I did not expect huge things from the bugle, it was bought just as a back up to ensure I am not stuck again, but was I in for a surprise...
Negative points first, the highest gain is 64dB, my main phono stage has over 80dB gain which is great even when I use my transformer passive preamp...
The surprise was how good this little phono stage sounds, apart it's mentioned short comings it sounds just as good as my far more expensive preamp
Wonderful to hear the Bugle is performing so well in your system! It's an excellent phono preamp with straightforward mods you can perform to make it sound even better. If you are so inclined, the first two alterations I would suggest are the same as @knotscott mentioned in adding a linear, regulated power supply (an inexpensive and effective one is the Jameco #174879) and popping in two additional OPA2210 opamps. No soldering is required for either of those upgrades.

I agree with @taskerc with regards to contacting Jim if you are interested in upping the gain on the preamp. There is also a longish thread that Jim participates in that might be of interest to you here.

Looking forward to reading more of your observations as you integrate it into your system further.
 
I've been pretty thrilled with the modified Bugle 3 with the OPA2210s, and a custom regulated linear power supply.

Audio still has strong pockets of "cottage industry" left, and Jim's commitment is still very evident. That's one of the nicest differences vs buying a heavily massed produced product from China. There's someone upstream who cares about the sound and quality, and is likely to answer the phone if you call. That's essentially the roots of high end audio. :cool:
Did these mods lower thr noise floor?
My only real grip is a bit of hiss on max gain.
Chris
 
Did these mods lower thr noise floor?
My only real grip is a bit of hiss on max gain.
Chris
In a word, yes when going with the opa2210. @oranda posted up the various upgrades he made to his Bugle build and Jim Hagerman tested the amount that the noise floor was dropped. He saw a 4-6dB drop when using one opa2210 in (I believe) the U2 position. Jim now offers it in his latest Bugle MC version as an upgrade.

I have built my own Bugle using the same mods and 3 opa2210 that Oranda posted up on his Bugle thread. I use a SUT with mc and it is very quiet. Oranda’s power supply suggestion is a very important part of the chain and it’s inexpensive.

I’m currently building a 2nd Bugle using left over Bugle3 pcb off of the Hagerman’s website. I am hoping to post up some pics and results as I go along; onto the big thread that Oranda started. I think you would benefit greatly from adding two opa2210 opamps in the U2 and U3 positions. 6dB lower noise floor is going to be noticeable.
 
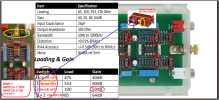
Has anyone made any sense out of this Hagerman chart? If so, please let me in on it.

View attachment 3418560
I am building one from scratch right now. I believe that the gain at 50dB is misplaced w the 60 dB as the loading resistance is dropping. Typo is my guess.

and all off, lowest gain for mm. Next three are quite a jump and I believe they are for low, lower and ultra low mc cart outputs w the 64 dB for ultra low mc. I think it’s straight forward with 0 as all of them off, 1 switched on for next gain of 50dB, just # 2 switch on, 60dB and both 1&2 switched on max 64 dB.

The “or” is probably an abbreviation for others off. As in 1 on, others off.

You will be able to tell by the gain when running the bugle. Set your volume at 9 or 10’oclock and switch them to hear the difference in volume/output.

IMG_2660.jpegIMG_2659.jpeg
 
am building one from scratch right now. I believe that the gain at 50dB is misplaced w the 60 dB as the loading resistance is dropping. Typo is my guess.

and all off, lowest gain for mm. Next three are quite a jump and I believe they are for low, lower and ultra low mc cart outputs w the 64 dB for ultra low mc. I think it’s straight forward with 0 as all of them off, 1 switched on for next gain of 50dB, just # 2 switch on, 60dB and both 1&2 switched on max 64 dB.
Hagerman did say he thought that was messed up but couldn't remember what the issue was or how to correct, also has never made an effort to correct it.

Thank you for the switch explanation, it is great that you are in the process of building one to insure what is correct.
 
Hagerman did say he thought that was messed up but couldn't remember what the issue was or how to correct, also has never made an effort to correct it.

Thank you for the switch explanation, it is great that you are in the process of building one to insure what is correct.
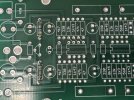
image.jpg

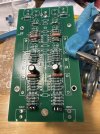
Okay I inserted my dip switches to check what they do. Note that you are counting in binary here with just two switches. Both switches off will be position 0, switch 1 positioned on toggled to the arrow direction is position 1. With switch 1 pulled back from arrow, and the 2 switch toggled on towards the arrow, you have position 2. If both switches are toggled on together towards the arrow, then you have position 3.
In my photo, both left and right channels are toggled to position 3.

Also on the right side, the micro switch has arrows pointing towards the bottom of the pic and when both are up, not down to the bottom, it’s in position 0, and we have 47k ohms of load for the right channel. For my build, the left channel micro switch has to be installed rotated 180 degrees so the switches are engaged when pushed up towards the output rca’s. So position 0 is with both switches pulled down for the left channel.

The first four pairs of resistors are the loading resistors. They can be adjusted independently to accommodate some mc carts that may like a slightly larger load like 553 ohms or less loading like 100 or 85 ohms. Most mm or mi carts will be happy with the 47 khoms loading. That’s why they are separated and on their own at the bottom with both channels having switches.

I believe Jim designed it this way for short traces to minimize noise. One switch for both channels would require a longer tracing. I might be wrong here .. I am a retired mathematician and not an electrical engineer! (Use your best Star Trek voice here w Dr. McCoy, preface it with “Damnit Jim!”

The loading is in order as I measured it with a multimeter. 0 gives 47k. 1 give 553, 2 gives 100, and position 3 gives 85 ohms loading.

If you have a MM or MI cart. Loading should be 47k ohms in the 0 position.

If you have low output MC cart , you should look up what is recommended for the loading. Actually any mc or mi or mm might work best with a different loading so it’s best to look up what you need for your particular cart. Go with the closest.

But if MC, you can always test out your cart starting with 553 or 100 and see how it works for your needs. It’s also easy to change up the loading by replacing the pair of appropriate resistors in the loading section.

Now for the gain. Jim has the first two opamps U2, and U3 for gain (I don’t know what U4 does but Jim can explain) but again 0 position is the lowest 40dB, with the switches in the 1 position you get 50dB gain, and with switch 2 being in the on position you get 60dB gain and with both switches 1&2 in the on position you get maximum of 64 dB gain.

Note, the arrow indicates the direction for the “on” or “engaged” position for the switch es.

Hope this helps and feel free to ask questions.
 
Last edited:
View attachment 3418658

Okay I inserted my dip switches to check what they do. Note that you are counting in binary here with just two switches. Both switches off will be position 0, switch 1 positioned on toggled to the arrow direction is position 1. With switch 1 pulled back from arrow, and the 2 switch toggled on towards the arrow, you have position 2. If both switches are toggled on together towards the arrow, then you have position 3.
In my photo, both left and right channels are toggled to position 3.

Also on the right side, the micro switch has arrows pointing towards the bottom of the pic and when both are up, not down to the bottom, it’s in position 0, and we have 47k ohms of load for the right channel. For my build, the left channel micro switch has to be installed rotated 180 degrees so the switches are engaged when pushed up towards the output rca’s. So position 0 is with both switches pulled down for the left channel.

The first four pairs of resistors are the loading resistors. They can be adjusted independently to accommodate some mc carts that may like a slightly larger load like 553 ohms or less loading like 100 or 85 ohms. Most mm or mi carts will be happy with the 47 khoms loading. That’s why they are separated and on their own at the bottom with both channels having switches.

I believe Jim designed it this way for short traces to minimize noise. One switch for both channels would require a longer tracing. I might be wrong here .. I am a retired mathematician and not an electrical engineer! (Use your best Star Trek voice here w Dr. McCoy, preface it with “Damnit Jim!”

The loading is in order as I measured it with a multimeter. 0 gives 47k. 1 give 553, 2 gives 100, and position 3 gives 85 ohms loading.

If you have a MM or MI cart. Loading should be 47k ohms in the 0 position.

If you have low output MC cart , you should look up what is recommended for the loading. Actually any mc or mi or mm might work best with a different loading so it’s best to look up what you need for your particular cart. Go with the closest.

But if MC, you can always test out your cart starting with 553 or 100 and see how it works for your needs. It’s also easy to change up the loading by replacing the pair of appropriate resistors in the loading section.

Now for the gain. Jim has the first two opamps U2, and U3 for gain (I don’t know what U4 does but Jim can explain) but again 0 position is the lowest 40dB,
Thank you for taking the efforts to sort this out.
 
Thank you for taking the efforts to sort this out.
You are very welcome and I owe you a thank you for asking about it. I didn’t remember which way the switches were aligned and it forced me to figure it out and testing verified! I hate soldering on such a small scale w little room. Errors and re-soldering is a big pain for me. So thank you!
 
Back
Top Bottom