• The move to the new server is done. There are some software and database maintenance updates in process. This has us passing the hat around to help out. We appreciate any donations. Seriously, even a dollar helps. The payment page may be found here - https://www.audiokarma.org/support.html

Sony PS-X4, X5, X6, X7 speed potentiometer adjustment

TonZZ

New Member
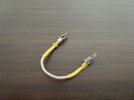
I've recently got a Sony PS-X4. The speed was floating! I cleaned all the potentiometers and adjusted the speed to 33.33 rpm without the jumper wire between the pins 8-9 according to the service manual. I untied the jumper wire, however, I couldn’t tie it back I soldered two small "crocodile-like" connectors (see photo attached) to the wire and hooked them back between the pins 8-9. I turned on the player and the speed, although stable, is 33.25 rpm. I again removed the jumper and set the speed higher to 33.7 rpm and then put the jumper back on, and the speed was still 33.25! What it could be? Is it possible to adjust the speed on a potentiometer when the pins 8-9 are connected by a jumper?
Small update: checked the voltage for RV 101 and it showed 27.5! Adjusting of the pot nothing really changes. Any ideas for this?
 

Attachments
  • 1703019966104.jpg
    1703019966104.jpg
    49 KB · Views: 15
Last edited:
Register to hide this ad
Hi, that is a really nice TT. When I get mine speed was floating up and down, auto return did not work, and strobe was fading in and out, mostly out. I put it in closet at first. After some time I decide to open it up and notice a couple things. Grease is all hard, which explain auto return not working. One of the electrolytic caps is visibly leaking. Since they are all same brand how can I trust the others? So I replace all electrolytic caps, fortunately service manual lists all values. I spritz alcohol on all the mechanical parts, then respray with moly lube. I clean the speed selection switch with contact cleaner as the contacts become oxidized over time which can also impact speed. Finally I remove the wires as you mention and clean pins and wire ends then rewrap the wires onto pins. All is perfect after that, for several years now. Then I discover what a really superb TT this is, one of my favorites! Note I did this in two steps, cleaning the linkages and the pins first. But problems are not fully solved. Not until I complete other steps I describe. If you are nervous about recap process the X4 is first piece I ever attempt to do recap. As long as you have solder wick on hand it is actually quite easy.

Hope this helps. This TT is definitely worth investing effort.

P3270495.JPG
 
Last edited:
Hi, that is a really nice TT. When I get mine speed was floating up and down, auto return did not work, and strobe was fading in and out, mostly out. I put it in closet at first. After some time I decide to open it up and notice a couple things. Grease is all hard, which explain auto return not working. One of the electrolytic caps is visibly leaking. Since they are all same brand how can I trust the others? So I replace all electrolytic caps, fortunately service manual lists all values. I spritz alcohol on all the mechanical parts, then respray with moly lube. I clean the speed selection switch with contact cleaner as the contacts become oxidized over time which can also impact speed. Finally I remove the wires as you mention and clean pins and wire ends then rewrap the wires onto pins. All is perfect after that, for several years now. Then I discover what a really superb TT this is, one of my favorites! Note I did this in two steps, cleaning the linkages and the pins first. But problems are not fully solved. Not until I complete other steps I describe. If you are nervous about recap process the X4 is first piece I ever attempt to do recap. As long as you have solder wick on hand it is actually quite easy.

Hope this helps. This TT is definitely worth investing effort.

View attachment 3066565
Thank you for your reply! Yes, I think recap is a must in my case! I think I'll be able to do it!
 
The electrolytic caps Sony installed into this model are well past their prime, replacing them is really a must. I order mine from Mouser.com, was not expensive. Once this unit is properly restored the speed stability of Xtal system is really superb. I have countless hours of enjoyment with mine. May you have the same outcome.
 
Last edited:
The electrolytic caps Sony installed into this model are well past their prime, replacing them is really a must. I order mine from Mouser.com, was not expensive. Once this unit is properly restored the speed stability of Xtal system is really superb. I have countless hours of enjoyment with mine. May you have the same outcome.
I've started to enjoy it already! Great and stylish TT! Cleaned and lubed several mechanisms. It works fine even without X-Tal system enabled. However, I would like to continue to fix it. Could you please check photo attached? It is a screenshot of the capacitor list from the PS-X4 manual. Do I have to order all of them? In overall there are 27 items. When I choose it in Mouser which voltage rating should be used (VDC or VAC)?
 

Attachments

  • Untitled.jpg
    Untitled.jpg
    108.6 KB · Views: 16
Last edited:
Just the ones that ref elect in right hand column. Total of 11. So not a big job really.

Voltage (DC) is not critical, as long as rating is not less. No issue replacing with next higher rated one, just the capacitance needs to match up. Older caps with higher ratings tended to be physically larger, but modern higher rated caps are more compact so no worries with interference issues with adjacent components.
 
Great! Thank you for your help! For example, Nichicon offers Audio Grade Electrolytic Capacitors. Worth to order, or regular electrolytic caps will be OK?
 
I went cheap and cheery, ie standard. In a speaker crossover circuit or in an amp they may offer an incremental benefit, but for speed control circuit as we are discussing here I persoanlly wouldnt spend the extra.
 
Again dont forget to get a roll of solder wick if you dont have this in tool box already. Difference between easy upgrade versus a pain. Place the wick over the leg, heat joint with your iron, and the wick pulls the solder away, leaving behind a nice clean hole. No wick solder will often flow back into the hole blocking it off. You dont want that.
 
Back
Top Bottom