• The move to the new server is done. There are some software and database maintenance updates in process. This has us passing the hat around to help out. We appreciate any donations. Seriously, even a dollar helps. The payment page may be found here - https://www.audiokarma.org/support.html

Speaker Cabinet Construction

jaymanaa said:
I hear the term "Baltic Birch Plywood", but don't see it at my home store. What they have is basically a cabinet grade birch verneer plywood. Should I search out the Baltic or is the cabinet grade OK.

Baltic Birch differs from "Regular" birch in that it has more plies per unit thickness than "Regular" and because of this it is said to provide greater stability than other Birch plywood. However, in addition to being priced higher because of the construction composition, it also comes in 5x5 sheets as opposed to 4x8 thus possibly leading to more waste, depending of course on what you are building.

You can use cabinet grade but keep your eyes out for some good quality shop grade as it will be less expensive. I picked up some sheets of shop grade last spring that were good enough to tung oil and hang as by-pass doors.

Just remember that grade is less critical with respect to a few splits/small knots in the veneer layer if you are going to paint the cabinets. A little quality filler and you are on your way.
 
You are right. The 13 ply or whatever it is Baltic Birch is fine wood, but is very expensive and difficult to fine. Common cabinet grade birch veneer is easily found everywhere.

If building a complex system, such as this horn or other folded horns, feel free to use less expensive shop grade for the interior folds, back, and other parts. If coating with carpet or truck bed liner, use all shop grade.
 
Could someone please post a pic of some "raw" diy cabs using this cabinent grade ply. I have never personally seen it. I always use mdf heavily braced with corner strips glued and screwed.
 
This is "shop grade" ply

http://colomar.com/Shavano/12S.html

http://colomar.com/Shavano/pa_speaker_project.html

Birch veneer ply has a nice veneer that can be stained and oiled or varnished, and can look quite attractive. You can look at some at your local lumber yard, Lowe's, Home Depot, etc.

Here's a speaker my brother built, finished with black truck bed liner paint, using the texture roller that came in the kit.

attachment.php


Could someone please post a pic of some "raw" diy cabs using this cabinent grade ply. I have never personally seen it. I always use mdf heavily braced with corner strips glued and screwed.

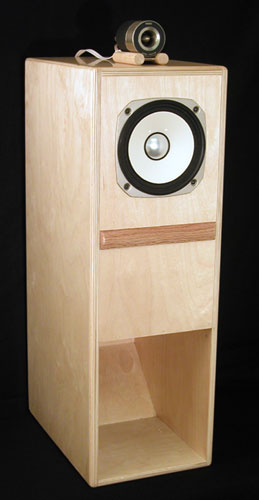
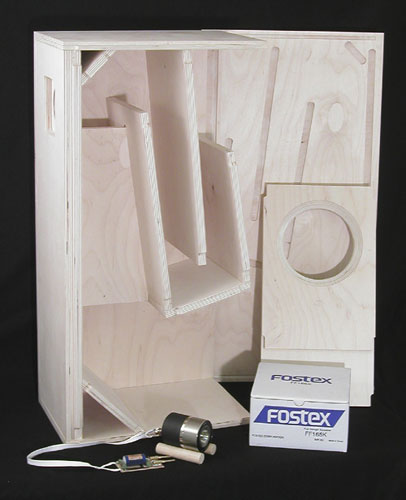
Here's pics from Madisound:

bk16_finished.jpg
bk16_inside.jpg
 

Attachments

  • TruckBedLiner.jpg
    TruckBedLiner.jpg
    120.9 KB · Views: 360
Well, I got wood! :headscrat Pretty good trick considering the next wood purchase was supposed to be for the floor. I figured I needed the space for layout and sawing so it's best to get this done first. Wouldn't want to scratch up the new floor. :thmbsp: If I could ask one more question without being a total PITA. What about mid horns and high for that matter? I know I'm going to want to try these out as soon as they are finished, so I figure I better start looking for the stuff to go on top. Are Altec's pretty much the standard? I see 511's and 811's on epay. Would 300hz be a good cutoff for the mid? I'm pretty lost here, which is most evident I'm sure. I certainly appreciate the vast knowledge which has allready been so kindly shared, and hope I'm not pushing it. Thanks, Jay

Edit- I forgot one. Is there a good trick to cutting pretty circles for the woofers, are is a good quality jig-saw the ticket? I was wandering about using a router. Thanks
 
Last edited:
I use a jigsaw for cutting the woofer cutout, but some guys use a router and a fancy jig.

You have a number of ways to go for the top end. This design (scoop) is not like a regular sub type horn. The woofer is still broadcasting its full range. A simple two-way system is entirely practical.

Your crossover point is more determined by the limitations of the horn and its driver. The 811 and driver, when used with Voice of the Theatre was usually crossed over at 800 hz.

Or you can stack a PA cab (10" or 12" plus horn) on top, and use an active crossover around 300 hz.

Peavey makes a good horn driver, as does Eminence.
 
Paul C said:
I use a jigsaw for cutting the woofer cutout, but some guys use a router and a fancy jig.
I have a jigsaw and a router table/handheld. I prefer the jigsaw for some reason. It takes a little practice to get a smooth twisting action.

Depending on the circumstances I may turn my baffle over, set the jigsaw to 45 degree cut, and chamfer the back of the hole.
 
Jaymanaa, which woofer are you going to use? The EV's or some other woofer?

The Eminence Kappa-15LF's you mentioned would be quite good.

Anyway, before going any further with crossover, etc, I need to know what woofers.
 
Well, I was going to give the EV's a shot and switch to either the Gamma or Kappa if they were not up to the task. However, without the T/S parimeters I'm somewhat confused. I am open to suggestions, Jay
 
Do exactly that... build the scoops, see how the EV's work. You are not going to be pushing a lot of power, you really don't need the Kappa's. The Gammas will do just fine.

As far as the EV's, I would be more concerned with age... how the speaker will hold up. Again, you are not pushing a lot of power through them, so hopefully they will play well.

For the top end, the Eminence PSD-2002 horn driver and H290 horn lens will do well for you. You can just stack them on top, or build a little box for the horn, and make room for the crossover in with it.

----

Edited: You can use a crossover like the one in this thread:

http://audiokarma.org/forums/showthread.php?t=76155

And R1 & R2 can be altered to give the desired level match of tweeter horn to the woofer.

The only parts that would have to be changed for various woofers would be R1, R2, and C5. And C5, maybe, maybe not. And you could place a variable L-pad between the crossover and the PSD2002 tweeter driver, and not change R1, R2.

In fact, since you don't know the SPL of the woofer you have now, nor do you know if or with what you might replace it with in the future, I would be tempted to use values for R1 and R2 with less cut, and insert an L-pad anyway. Then you can just change woofers and dial in the tweeter.
 
Last edited:
jaymanaa said:
However, without the T/S parimeters I'm somewhat confused. I am open to suggestions, Jay

For a horn the main thing you are looking for is that the woofer is suitable for horn use, a stiffer suspension as opposed to a loose, floppy suspension as would be used for a sealed or "acoustic suspension" speaker. Most 15"'s are suitable for horn use, especially MI or pro audio woofers.

The other consideration is designing a crossover. Without knowing Le (voice coil inductance), Re (voice coil resistance) you would have to guess about the zobel. I am going to do an educated guess and say we can probably get away with using the same values as in the thread I referred to above (Billhead's PA speakers with EV 15L-II). Also, 12 db xovers are sort of "self compensating", tolerant to impedance anyway. So, not knowing exactly what the T/S parameters are for your woofer, I'll just say, "Close enough for jazz."

I looked at a number of EV speakers. For most, a zobel of the values I gave for Billhead's PA speaker would kick in between 450hz and 800 hz. That is well below the 1600 hz crossover freq of the schematic I showed. So, that takes care of that.

No other T/S parameters are of any concern except SPL... how loud does this woofer play with one watt input... and how does it compare to the horn?

What I would do is perhaps use the schematic from Billhead's thread, but instead make R1 = 12 ohms, R2 = 20 ohms. This would give less cut from the padding resistors, and then put a variable L-pad between the crossover and Eminence horn driver and simply dial it in. This would also be good to have if you later change woofers.
 
Last edited:
Well, I'm finally getting started. :banana: I am actually building these in the room in which they will reside (the floor is not down yet). You should have seen the WAF plumit when I layed the plywood down and started drawing out the sides. I knew the tape measure wasn't doing them justice. :D Good thing I wear the pants around here. :smoke: Paul, thanks again for the drawings and everything. They are much better than the ones I had (less confusing). Hopefully I will have a progress report soon, Jay
 
You are certainly welcome!

For making long cuts I use a long 1/4" thick aluminum straight edge. Remember to allow for the width of your sawblade. Use a carbide tipped blade, and do not set the depth of cut too deep, less likely to chip the veneer that way.

Observe which side of the ply to be cut is the inside and outside. Cut with the outside down, inside facing up. You can anchor your long straight edge in place with tiny finishing nails not driven all the way through. 4 or 5 spaced along the outer edge of the straight edge will keep it in place. Cut slowly, you are not in a race. Make sure you have plenty of slack in your cord before starting the cut. Have a helper to support the cut off portion of the ply. All of you wear safety glasses or goggles.

With the rear loaded horn screws from the outside (but countersunk) are an unfortunate necessity. But if you are trying for a pretty wood finish you can spackle over the screw heads and then apply another layer of veneer.

After this is all done you can make a simple grill to cover both the woofer and horn mouth if you want.

Remember, do the horn mouth with the 45* piece, not the curved ply. If you insist on doing that portion curved (entirely unnecessary acoustically) I'll tell you how it is done.

Helpful hint, you can't bend 3/4" ply like that... haha! Actually, that is done with three layers of thin 1/4" paneling, the first layer glued and screwed to braces behind it. When that dries, it is all painted with contact cement, and the next layer laid in. Or it is all painted with carpenter's glue, and the next layer screwed to the first with a gazillion wood screws. Then the third layer over the second the same way. But this is really not needed, and a flat piece at 45* angle can be used just as well.

Have fun, and we want photos as you do this... not just the end result, but all along. Otherwise how can all the other AK'ers tell you what you did wrong and what you should have done instead? :D
 
I disagree on the problems with MDF. It does not crumble on me as long as blades are sharp. I have (at 39 years old) built more cabinets than most all of you combined for car audio sub systems, custom panels, fiberglass work, and home speakers. Working with manufacturers like Rockford Fosgate, JBL, Stillwater Designs (Kicker), Boston Acoustics and many others. Not to contradict by saying that MDF is better because it's not. But for the money you can't beat it. Especially with a good veneer on it. OTher hard woods are better, of course, but not for my money. Bracing and rigidity is definitely key. Just don't rule MDF out for being "crumbly". PArticle board...yes. MDF...no.
 
Yeh, I can see where mdf would have it's uses. It is certainly stiff and straight. I've chosen ply for this project for appearance and with the complicated baffles involved with these, extra screw strips and bracing just weren't a viable option. As far as price goes, Birch ply has actually come down since I last checked it a year or so ago. I got all the ply, SS screws, glue, saw blade, tung oil, and sand paper for under 200bux. That and the fact that I had the 15" EVs collecting dust will hopefully make for some pretty nice "for the dough" bass horns. I'll tell you, if it weren't for DIY, my ears wouldn't be near as happy. :music: Jay
 
Well, these aren't very exciting pictures but I can honestly say that I have 4 sides cut and they are exactley the same size. :banana: When I stack them the edges are flush. :banana: This was done by following Paul's instructions to the letter. I used a 60 tooth thin ultra finish blade which made my guide edge exactly 1.5 inches after taking the kerf into the picture. I am working on the floor with a sacrificial piece of OSB under the Birch ply. That way I don't need an assistant. My assistant isn't going to go out of her way to help on this project, trust me. :no: Like I say, these aren't thrilling but I'm just happy to be started. Getting started seems to be the hardest part for me sometimes. More tomorrow, Jay :D

BTW- Notice us pipefitters keep our drawers pulled up. :D

http://i15.photobucket.com/albums/a384/PaulCoats/stackowood.jpg
 
All the tops, bottoms, sides, and backs are cut. Now the tricky part :scratch2: Here's the baffle layout transferred to one side. One point of note here: When cutting the backs and baffles take note of the "actual" thickness of your material of choice. The plans of course assume 3/4" but mine was a tad thinner. Glad I checked, as it will make a difference on how nicely everything fits during final assembley. Back to the saw for me :D
 
Yeah, buddy! :D

Thanks for the photos! Keep them coming!

When you glue and screw various panels together, the carpenters glue will ooze out. Wipe away excess with a damp rag, rinse and repeat until no oozing. That way, in an area you plan to stain, the wood will take the stain and not show a light spot there.

How are you going to finish it?
 
I'm planning on a few coats of tung-oil. I've had good luck with it on gun stocks I've redone. I guess I should add a few tips while they are fresh in my mind. I found that when cutting all the angles, a very thin kerf sharp blade works best. I used a coated Diablo designed for wet lumber, and it cut like a lazer. All the cuts are easily made with a circular saw as long as you take care and use a good straight edge. I had a nice thin piece of straight poplar from a previous project that worked well. For the measuring I used a 5 foot Johnson AL straight edge and mechanical pencil. Once I figured out the offset for my saws fence it went pretty quick even though I tried to be as fussy as possible. I allways have to shoot for perfection to end up with pretty decent. :D I used a small palm sized piece of flat hardwood to "flush" the rule with the ends of the ply. The only really tricky part was the smallest angled brace near the middle. The angle on the front edge of this piece was way more than the 45 my saw would adjust to. I tacked a 1.5 inch thick piece of scrap down to tilt the saw fence further which worked out fairly well. I've decided to go with new woofers as the old EV surrounds were awfully brittle. I'll be using the Eminence Gammas that were suggested. :yes: All in all, this has been a lot of fun (and some hard work). I guarantee that anyone who can run a skill saw can build some nice speakers at home for a fraction of the cost of store boughts. All it takes is some time and lots of AK advice. :thmbsp: Here's a shot of a big pile of wood that I wouldn't sell for 500 bux :D Jay
 
Well, you've done the hard part! Now the fun begins!


Tung is great. It penetrates into the wood well and hardens the surface.
 
Back
Top Bottom