

I have always been sort of a lurker on these websites. But as I approach retirement and get more younger people asking me to repair their dad's stereos or something they bought off eBay to start listening to vinyl with I figure it is time to start passing on a little knowledge and experience to the younger crowd. Too few people venture into electronics much less audio equipment these days so I am hoping to inspire or motivate some of you younger folks to dig into these wonderful but needy machines.
This post is about that pesky AWM-089 filter board on the SX-1250 and 1050.
It is the board with the 30Hz/8kHz filter switches and the FM Multipath/Muting Off switches.
These are pretty notorious for getting grubby and because they are near the end of the preamp stage they can create a lot of problems from noise to no sound from one or both channels. The opinion seems to be it is because they rarely get used so they just site there.
This particular SX-1250 came to me from a friend of a friend. He bought a Kenwood 4400 to learn how to repair and recap receivers, bought a kit off eBay, and went to town. After successfully recapping the Kenwood he was ready to tackle this SX-1250. So he bought a kit off eBay and went to work. Well, after everything he did nothing worked so it sat for a few months until his wife asked me if I could look at it. There were a lot of transistors in backwards, and few capacitors that were not correct, and about a quart of Deoxit everywhere, would not come out of protection, and blew a few fuses. Progressing through all the boards and circuits I got to the preamp boards including this WM-089 filter board.
Here are the symptoms.
Pushing in either the 30Hz/8kHz filter switch results in no sound from either channel. Pushing in the FM Muting Off switch and the right channel goes out and the left channel only makes sound if you jiggle the switch. I called the owner and asked him what he had done with this board. He said he had replaced transistors and capacitors and popped the covers off the switches and sprayed Deoxit in them and worked them in and out a few dozen times. This is always sort of a Eureka moment with these switches for me.
To really fix these switches you need to remove them from the board for a total disassembly and reassembly. This is done by de-soldering all the pins from the board and removing the metal frame with all switches attached. Each switch is held to the frame with four bent over tabs. Straighten the tabs and carefully remove the switch.
To disassemble the switch remove the white clip and remove the cover. The switch will pretty much come apart at that point. You can do this with the switches still attached to the board but I always find it easier to remove them. You don't have to twist the boards around potentially breaking wires and you can give everything a good cleaning. When reassembling you can move the switch in your fingers and get good angles on everything. Again, just my preference.
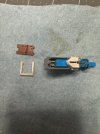
Note that the attached pics are of both the blue 6 pin and white 18 pin switches but the concepts remain identical.
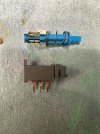
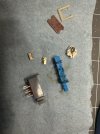
And here are the problem pics. This is after a good dose of Deoxit by the way.

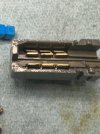
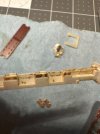
So here is what's happening. These connectors are supposed to slide over the pins inside the switch and make contact with spring tension. These ones are very corroded, despite the gobs of Deoxit, and are spread way to far apart to guarantee contact. Without use they tend to stay expanded and then just stay that way eventually losing good contact. Also, when people remove the cover of the switch and spray Deoxit they tend to just hold the switch and push it in and out a few dozen times. If the switch internals rock up and you push them back down these small sliding contacts get caught and mangled. Some of these were totally smashed and I had to dip into my parts bin. I have seen this several times on different machines. So if you are going to remove the cover while the switch is still on the board makes sure the internals don't rock out and displace these small contacts. If it does rock out, make sure that these contacts are still snug in their little nooks.
Here are a few pics of these slide contacts.
Here is a bad one:

And here is a good one:
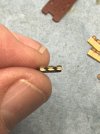
To remedy this you need to very carefully bend these back into shape. I insert a dulled x-acto blade held against the edge and gently push in with my finger. Toothpicks work well also. These are very delicate parts so leave out the pliers and stuff. Take your time and gently mold these back into shape. It does not take much force.
Clean up everything with contact cleaner or 100% alcohol - leave out the Deoxit for now.
To clean the contacts in the switch I use an eraser and slide it back and forth after using contact cleaner or alcohol.
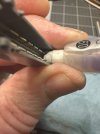
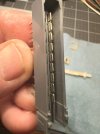
With all the slide contacts straightened out, the pins cleaned, and all the goop cleaned out we are ready to reassemble.
This will be the subject of the next post..
This post is about that pesky AWM-089 filter board on the SX-1250 and 1050.
It is the board with the 30Hz/8kHz filter switches and the FM Multipath/Muting Off switches.
These are pretty notorious for getting grubby and because they are near the end of the preamp stage they can create a lot of problems from noise to no sound from one or both channels. The opinion seems to be it is because they rarely get used so they just site there.
This particular SX-1250 came to me from a friend of a friend. He bought a Kenwood 4400 to learn how to repair and recap receivers, bought a kit off eBay, and went to town. After successfully recapping the Kenwood he was ready to tackle this SX-1250. So he bought a kit off eBay and went to work. Well, after everything he did nothing worked so it sat for a few months until his wife asked me if I could look at it. There were a lot of transistors in backwards, and few capacitors that were not correct, and about a quart of Deoxit everywhere, would not come out of protection, and blew a few fuses. Progressing through all the boards and circuits I got to the preamp boards including this WM-089 filter board.
Here are the symptoms.
Pushing in either the 30Hz/8kHz filter switch results in no sound from either channel. Pushing in the FM Muting Off switch and the right channel goes out and the left channel only makes sound if you jiggle the switch. I called the owner and asked him what he had done with this board. He said he had replaced transistors and capacitors and popped the covers off the switches and sprayed Deoxit in them and worked them in and out a few dozen times. This is always sort of a Eureka moment with these switches for me.
To really fix these switches you need to remove them from the board for a total disassembly and reassembly. This is done by de-soldering all the pins from the board and removing the metal frame with all switches attached. Each switch is held to the frame with four bent over tabs. Straighten the tabs and carefully remove the switch.
To disassemble the switch remove the white clip and remove the cover. The switch will pretty much come apart at that point. You can do this with the switches still attached to the board but I always find it easier to remove them. You don't have to twist the boards around potentially breaking wires and you can give everything a good cleaning. When reassembling you can move the switch in your fingers and get good angles on everything. Again, just my preference.
Note that the attached pics are of both the blue 6 pin and white 18 pin switches but the concepts remain identical.
And here are the problem pics. This is after a good dose of Deoxit by the way.
So here is what's happening. These connectors are supposed to slide over the pins inside the switch and make contact with spring tension. These ones are very corroded, despite the gobs of Deoxit, and are spread way to far apart to guarantee contact. Without use they tend to stay expanded and then just stay that way eventually losing good contact. Also, when people remove the cover of the switch and spray Deoxit they tend to just hold the switch and push it in and out a few dozen times. If the switch internals rock up and you push them back down these small sliding contacts get caught and mangled. Some of these were totally smashed and I had to dip into my parts bin. I have seen this several times on different machines. So if you are going to remove the cover while the switch is still on the board makes sure the internals don't rock out and displace these small contacts. If it does rock out, make sure that these contacts are still snug in their little nooks.
Here are a few pics of these slide contacts.
Here is a bad one:
And here is a good one:
To remedy this you need to very carefully bend these back into shape. I insert a dulled x-acto blade held against the edge and gently push in with my finger. Toothpicks work well also. These are very delicate parts so leave out the pliers and stuff. Take your time and gently mold these back into shape. It does not take much force.
Clean up everything with contact cleaner or 100% alcohol - leave out the Deoxit for now.
To clean the contacts in the switch I use an eraser and slide it back and forth after using contact cleaner or alcohol.
With all the slide contacts straightened out, the pins cleaned, and all the goop cleaned out we are ready to reassemble.
This will be the subject of the next post..
Attachments
Last edited:

