• The move to the new server is done. There are some software and database maintenance updates in process. This has us passing the hat around to help out. We appreciate any donations. Seriously, even a dollar helps. The payment page may be found here - https://www.audiokarma.org/support.html

SX-1250 Recap

A little side note, I've been using a JIS screwdriver (I love it) for all my Pioneer servicing. I originally purchased it for service on a Kawasaki motorcycle that has all JIS screws, which the previous owner reminded me what happens if you use a standard phillips head screwdriver on. Lots of rounded screw heads. Using this type of screwdriver on this Pioneer gear fits like a glove, I have yet to skip a beat turning any screws. I haven't really seen it mentioned here.

The only difference between a standard phillips and a JIS head is the JIS isn't as pointed. If you do not have one, I suggest you pick one up. The one I am recommending is excellent, it is my go to all the time. If you notice some screw heads have a small dot near the female phillips head. That signifies (from what I understand) a JIS screw. Some do not have this however depending on their size.

Screwdriver: https://www.amazon.com/gp/product/B000W9FN92
More info on the topic: http://rtstools.com/jis-vs-phillips-screwdrivers-and-where-to-buy-a-jis-screwdriver/


Looking good. You are way ahead of me. I got side tracked cleaning up and painting the shield covers for the tuner drum, tuner and equalizer board. They were a mess. Thanks for the pictures. It helps seeing the work in progress.

Nothing wrong with that. That's neat, you are painting the covers? I'd like to see how that turns out, lets see some photos :) Mine are tarnished a bit, looks like someone had used a polish or something on mine and I can see waves/indications of a towel wiped across it from many moons ago.

Did you place any Mouser order yet? Only been able to verify the Power section, but so far so good. I'd recomend to grab ring terminals too (at least 8, grab some extras): https://www.mouser.com/ProductDetail/538-19203-0099

Nice work... yes the bypass caps go across each main filter cap. The SX1250 (I have found - and the whole line of SX-xx50) are service friendly.

Your filter caps should come with the necessary hardware. Keep up the good work.

Thanks for the photos! Glad to see it was done right, great idea using a ring terminal on them. I might order some and update the film caps with them. The filter caps include screws+washers but the ring terminals are a smaller diameter on the original filter caps. Still could have cut the factory ones into a spade connector if I didn't have the terminals. These are the ones I used (#10): https://www.mouser.com/ProductDetail/538-19203-0099
 
DSC01036.JPG

Once I started trying to clean up the shields it became impossible to get them to match. I started by using Simple Green and a Scotch pad which took away the grime but left scratches. I then wet sanded with 600 grit paper and lime juice to knock down the corrosion. Still scratched. I wet sanded with 1500 grit to knock down the scratched metal. The finish on all three shields was inconsistent.

DSC01255.JPG


Gave them a final pass of the 1500 grit and wiped them down with acetone to remove particles and finger grease. Let them off gas for an hour than rattle canned them with a metal primer followed quickly with can spraying of bright coat Metallic Finish by Rust-oleum. No runs, no drips no scratches.


DSC01263.JPG


My girlfriend just shakes her head after she asked me, "Who is going to ever see those covers?" I had to answer, "Just me and maybe someone else in 30 years."

I did make my order and have gone through it to separate the items in easy to find piles. I think I can source the eye terminals locally but they will be for the by pass resistors. I will use a round file to enlarge the original terminals.

I only have worked on the power supply board AWR-107-0. I thought I made a mistake as the relay would not kick under dim bulb power. Check and double check, still no click. Duh, I need a bigger bulb. 75 watts is not going to cut it.

Might order one of those screwdrivers soon. Placing heat shrink on the shaft would make it a great tool.
 
Last edited:
That looks fantastic. Great job. Definitely worth it, looks much better now. Who knows, maybe you'll run it occasionally naked without the wood.

I did something similar with the DBT. I was trying to set the offset to 65VDC and I couldn't get it passed 50V. Shaking my head, I'm like "Oh I did it now". Then I realized the dang DBT was the reason. I'm using a 150w bulb, I believe 100w is the recommended minimum. On a youtube video the guy said this receiver draws about ~65 watts just at idle.

PS. When working out the two output boards, I desoldered the temperature diode that was attached to the heatsink as MTF said they are fragile (they look like it). Forgot to re-install it and the DBT lit up like a Christmas tree indicating a short (Part 2 of "Oh I did it now..."). I figured out quickly my mistake but thought for sure something else was the reason.

PS #2 - Along the lines of the screwdriver (which is awesome), I found that this desolder wick makes the job a lot easier. There is flux in the core which helps speeds things along. https://www.amazon.com/MG-Chemicals-Clean-Desoldering-Length/dp/B00424MWHO
 
So to all of you lovers and rebuilders of Pioneer --- I have a line on a SX1250 that has been serviced/rebuilt..... i cannot verify that it was rebuilt to your discriminating standards- but the owner has a "bag" of all of the stuff that was replaced as supposed evidence ...... curios what the market value of this is - just looking for an opinion. Assuming it was a decent rebuild and that it works and sounds great at the present time ? What say ye ? ( excuse the thread hijack). But was reading through for information ......
 
In a decent size city, if the cosmetics are excellent and decent evidence of a quality (& knowledgable) restoration around $1,500.

Cosmetic issues (not severe, but scratches and nicks) working properly with a minor service (from cleaning and adjusting to a standard "recap" usually not including the four large black power caps) around $900-$1,200.

Can go all of the way down to $400 or so if in a very small market, significant cosmetic damage, functional issues, but it sounds like this one is working properly and should be in nice shape cosmetically.

I'm not a buyer of un-known service as I'm a little obsessive, would need to pay un-serviced price knowing I'll probably need to go in and do it all correctly.

Very rebuildable if the price is right. One nice thing about the SX-1250 is they made a lot of them, so I always recommend waiting for the right one if you're planning to keep it.

There are many people here who "flip" this gear, their prices/values will be different and if that's your intent my opinion is more useful on the selling end.
 
In a decent size city, if the cosmetics are excellent and decent evidence of a quality (& knowledgable) ...... working properly with a minor service (from cleaning and adjusting to a standard "recap" .....
There are many people here who "flip" this gear, their prices/values will be difhoseferent and if that's your intent my opinion is more useful on the selling end.
I am not one of those guys...the "flippers"...'lol.....thanks for the feedback....I'm thinking of buying it to use as my daily driver....just dont want to overpay. Guy's asking $1650.... and he "'is" a flipper.
 
Last edited:
I would agree with SaturationPT - In Chicago they don't advertise a price lower than $1,500. They usually sit for a while. Like any high dollar item, the owner usually knows what they have and haggling isn't an option. I've seen low priced SX series receivers get snatched up real fast (same day of posting) if the price is low enough. $300 for an 850, $350 for a 950 etc so people are actively searching for them. On the other hand, there is a sx-1250 on craigslist that is beat to crap (broken glass), the guy want's $800 for it, refuses to allow you to power it on before the sale. SX-1280/1080 and SX-1050/1250 are in their own class of their own, I have yet to see a bargain price on one.
 
Bargain prices happen, but they're like catching fireflies, it's there and it's gone. The two I've bought I was fortunate enough to see just when they listed, immediately replied with an offer significantly higher than asking and a photo of the Benjamins so that they didn't slip away for another hundred. If it's really nice, that's about the going rate I'm afraid. More on that big auction site.
 
Bargain prices happen, but they're like catching fireflies, it's there and it's gone. The two I've bought I was fortunate enough to see just when they listed, immediately replied with an offer significantly higher than asking and a photo of the Benjamins so that they didn't slip away for another hundred. If it's really nice, that's about the going rate I'm afraid. More on that big auction site.
Appreciate the thoughts and i am not too overcome at the thought of possibly shelling out 15 or 1600 for a nice 1250..... it is what it is.....and i couldn't catch a firefly ...or should i say', the odds of me being the guy to stumble on a sleeper deal are slim to none.... i generally buy high snd sell low -- ;-)
 
Nice work... yes the bypass caps go across each main filter cap. The SX1250 (I have found - and the whole line of SX-xx50) are service friendly.
Your filter caps should come with the necessary hardware. Keep up the good work.

Some Examples Below - I buy these 10-20 at a time.
xwNG1ri-FaB9ZYmIx5Sp4pNt94Xx37YZtEZtx9y86RTpeqoq2Ko1TNg0LUZH-RV2fhskbVnuO72pQhOLkEMC7Pp-YbbA3yqp68cEdAsW0KRl0bL1m0cly_mnk6IjFS9G-Gy6wZrotxo6vMii5MKsIpVfzq1sNzKliN07hrDyaMKuFMHYnzME5FWcxCULk2P-6rqnuj6UuSACU3pCSU1lny7m7ZNERrAb_epR-GOkX6_AqeArLrBDqazZlqJm_Bebo5jm-ylFodYwfJ_XurmwZgOCH-C5-zSC57KmUaTio1rDS2TxeV8WxO6d1Yj25Cl6YJ7vHj2DezGowrTPyQ6STQWcAKZdIU1nO9FLpIz4hQt64cXUTfD77cCs9mPtWr-POImP9EuAC6_kjiJy4uLt13dwGlQAgFB0ru3-flKbXso1LB8evLNuSubFOBTs9NNIXZpHphLE_bX5GCbJ_fZbLTePOHap1KM62gV4sk6EGqHBv0sdl5yc8t6nN_gS9rQDBuxf6u3vVd2XNbXrlhgDJoTqNgFKBp257T_VjPom3e7m4OChpTflxyEacCWXaKUTEjxk-nMZD6p6_XcvV7MQgtVnNzTaJnSUp1DB3IOSb0Mq_LrxyDR7tyy3xlULhfNkiutgxUqSWqX-SSRIeTtu9PbYbXrSwdyZHEi0iT77UPlfT4STnx3rzrndFwZqbjgAMAl3xtQf2e2Vvpol3fRrFP3-=w1147-h861-no

oem7LErZVC1Xoi5kLP7sgL7m3e32sWAMfLFSaOuFeu7KbO_7Gio2snQM1M0zmOcvqkM1pe1Gap-hmb7EC0BpC2jf7kcxUHG_bJWrU6eQ_NTRejQUtxX9Uv3wdDuRrRX-64a5csXq2L7Wejeu0t7_WjOpO_fdlNK9XRLAC9V9eBHMXExp3wrDlemopuQ6K-xMZtYcNbcMGVim_jV1zpVYYaI46Qkw9jURLxPdERpFWZ96J7BM2PNz-d3KReDp1h8-af8yN-dNFHYDCV1SMWlneeOJGyc7c8CQ4W5qeVQNL__s8D7bSJ3aA6TvrXSmIS8MN0RBqaaTa8tlaI566GYA8NmxwTIS_-OamiZEWKo-Tvi9isI8B2lSjT9FapbTQqO4YTUw03JVCKDFnjkTFtajpu6tcgRXuWsvXXYHTkFP8_0M3F-m0WKsG4I17VNO20nw1r2aRiGhjRO6cnLmHZ5riDONqxjRUcQ6E-oAjh0Ip_mHaXDn5u_9KteHYZ2JUBZ9kOlLvqGSpk6Mwc797rNWHrBA8Az6f6O9kV9rsR4CypnDowjBS0j-dnS9Zux_GWQHVYvMQgE53k-ZMcLG6WMlo2ffTTNd8iH9p11sqJ-HyFBn8WLLsY1SLu3C4etSkkqQIBTRQirbuuFpDU9Ot75Ux13aGRSX0W5dCOq-ZIgCWN8Cqr3Gedng2hUgESCwsMZSSnwk8OQCC7QDpvU9S8TVJJSe=w1147-h861-no

Kjne_jKjCmGZH2QGXKmOPETdFU6vMXsaMkZs8sMhWmsyC5C_xt44Ehga2r-4VYl7iQG6HAAUTrPfXirnWIInjoG0YhyfDPIqz3qBl8KhDMbo1GA1Rrfja9Nyqw2AHgJjJ1B63vMABGlvFIYpuJtH3EuJRo3TflnvNdo-24KSR34bJibftHzJSy4QjRcB-ocE6HRGRpHCp2XIrU3rxNFzE-JC2NxgbMeHh0y1A-PaE38yEEIMGxZ0wGzrEdwMLACRWKidj_u9sNF_PSLAfnvENk_HLajDgmHoNtVeiqvN1kfT6tolDBPrwx4fjpqKb8YyIbZr6tX2hQWrpx-NuLm2n_0uV5grniVT_xuV5H5jjzvkczrpNo7mp_-8zdvcT96vsriyyGhCYYyVZvaJfvGN7ITyQUyzIUKNHYgXciAza-wVYy5gNZq0n9uofCOtAQ70uTfFalLkBjL6EZnBPWKe8Di6AWoWGtCuRKPffe3pPULMcOYkXPQjDvnY-Yz4opZnrR6RPLBDngo-4TrN1vH-as33KAVwthMorYEHCK6DKDzpFOqIHzSQo1GDSe2o2b-9yWWpYDFUUZrFsNr2ac2JBYks9XfkhGr_qxYbjdKltA2F9iOTANhVpFLZpVWEkSmO82EV2mX6x3CfFLOXyyOj710RXWqT6XTb_NnGLUK8NqEyQ57-YD1i7jhJMePzjGMOMok0uNmUn5D1kjFuldOgcPyC=w1147-h861-no
What is the purpose of these bypass caps? I've done a few 1250s and I don't recall seeing these before....
 
Last edited:
Restore will continue this Friday.

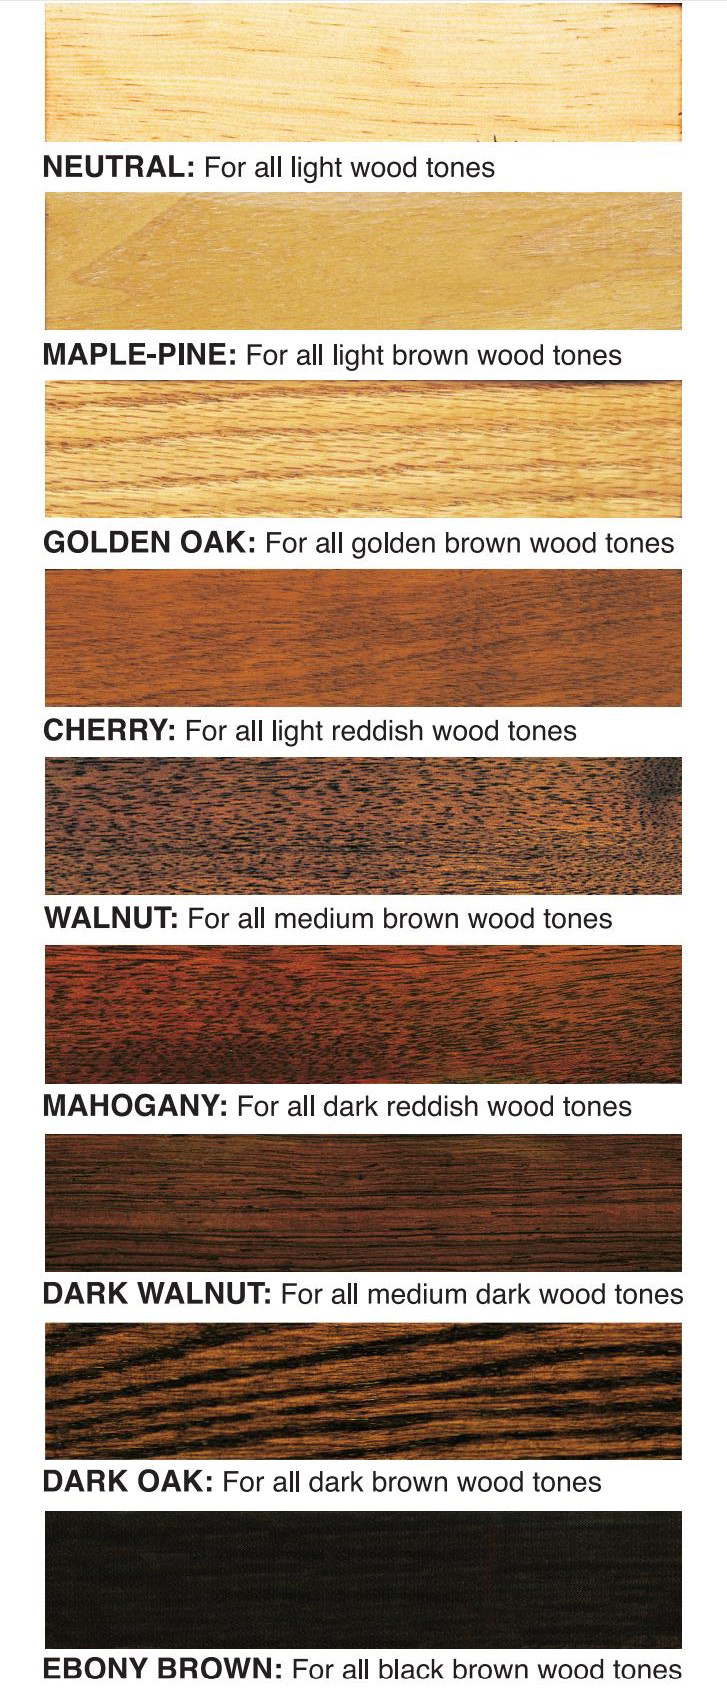
I've been looking into the topic of conditioning/restoring the wood cabinet. I've learned the process can be as simple as some lemon oil and a rag or a multiple day project. I am just looking for something simple to add a bit of life to it. Not looking for a piano top mirror finish. Been looking at Howard’s Restore-a-Finish and Feed-n-Wax with some Extra fine scotch brite type pad (reccomended at the wood store). Any suggestions? Thinking of going with Neutral color to avoid adding any pigment.

Restore: https://www.amazon.com/gp/product/B000C02BIC
Wax: https://www.amazon.com/gp/product/B001BKQYGW

For example, this is how Hudson Valley's came out with: http://hudsonvalleyhifi.com/pioneer-sx-1250

IMG_3705.jpg
 
A scotch pad might be too aggressive and might cause color inconsistencies. Howard's is a great product but I would get rid of the years of spray wax and dirt first. I used a one to one mix of white vinegar and warm water with just a dash (small dash) of dish soap. The vinegar is the active ingredient. Spray bottle and clean cloths. Rub with grain, New cloth across grain then new cloth with grain. Might take several times to loosen the wax. You know you are done when you can feel the grain. Wipe dry, wait a day. Follow Howard's application instructions. That's the easy way.
 
A scotch pad might be too aggressive and might cause color inconsistencies. Howard's is a great product but I would get rid of the years of spray wax and dirt first. I used a one to one mix of white vinegar and warm water with just a dash (small dash) of dish soap. The vinegar is the active ingredient. Spray bottle and clean cloths. Rub with grain, New cloth across grain then new cloth with grain. Might take several times to loosen the wax. You know you are done when you can feel the grain. Wipe dry, wait a day. Follow Howard's application instructions. That's the easy way.

Good idea - What color would you pick? I'd like to not add any pigment so I am thinking neutral (thats what guy at the store suggested too)

RAF%20color%20chart.png
 
I would go with the neutral. You are right not to want to add pigment. It would darken the color and take away the beauty of the grain. What you're after is to take away the dull and make the wood "pop". Stay away from using too heavy of a coat. Two thins better than one heavy.

The end caps are a whole different story. I have never had luck trying to get those to match in color. Always too dark. I take them off the face plate, marking right and left plus bottom on the screw side of the wood. Sand with 120 then 180 or 220. Sand the top end grain to higher grit to close the grain. Two light coats of neutral danish oil, five day dry, then two coats of wipe on or spray polyurethane. Very light sanding or steel wool between coats.
 
Last edited:
MIJ - Question for you. What month and year was your SX-1250 manufactured?

The reason I ask is because I just got around to the Equalizer Amp board and found out that instead of an AWF-021-A, it looks like my board is a AWF-021-B. Its hard to make out but it looks like a "B" . My SX was manufactured in November of 1977. The only difference I have found is that the D6 Zener diode was changed to what looks like a 5k resistor and the board is marked for the same.

I was just curious.

The stamping on the inside indicate February 1st 1976 according to my brother translating the Japanese calendars.

I finished the recap minus this board. Worked on it all day yesterday and by the end of the night i ran out of time. I'm not sure about which board it is, it's sealed up at the moment.

There is an error on the tuner board. There is a 1uf cap that calls for a 4.7uf replacement. I didn't replace that one.

I did spend a decent amount of time comparing the fity to a 1280 :) more about that later.
 
Depending on what time of the year Pioneer did their production change over, it looks like you have one that is during the first couple months of production and mine is during the last couple months of production. Pioneer had some overlap in production years gearing up early on some models and finishing the production line after the first of the next year. So far, the only difference between the two that I have found is the Zener diode on the Equalizer board.. I'm guessing the first two letters of your serial # are WB for year and month.

I'm working on the flat amp now and still have to install the filter caps and the soft start relay, The tuner board will be my last board. I will keep an eye out for the 1 uf instead of the 4.7 uf cap when I do the tuner board. Looking at your parts list (very well done by the way) I'm guessing the 1uf cap is C26. I would like to get the FM tuner aligned, but my Goggle search has failed to find anyone in the Central Florida area that does that work. I'm sure they are out there, somewhere.

Your BOM list and pictures in this thread have been a big help to me. Thanks.
 
Recap is 95% complete - Al that left for me to do is the Phono board. Going to do this in the near future but that didn't persuade me to not perform the final cleaning/testing. Here are some more photos:

Button switches (not toggle) got some contact cleaner sprayed in them. No deoxit. They function perfectly. I did not clean/deoxit any pots. They all work perfectly, I did not want to screw anything up by messing with something that wasn't broken.

Flat Amp Board. Muting, Loudness, and Mode select (stereo mono) removed, dissasembled and cleaned.

20190810_093252.jpg
20190810_124626.jpg
20190810_093301.jpg
20190810_124648.jpg

20190810_125746.jpg

Function Switch (So much trouble to get it out for 1 cap)

20190810_130103.jpg
 
Last edited:
Back
Top Bottom