• The move to the new server is done. There are some software and database maintenance updates in process. This has us passing the hat around to help out. We appreciate any donations. Seriously, even a dollar helps. The payment page may be found here - https://www.audiokarma.org/support.html

TECHNICS SUV-85A Scratchy volume pot restoration

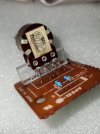
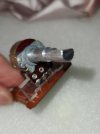
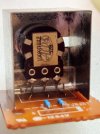
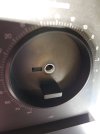
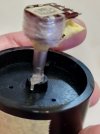
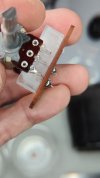
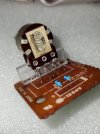
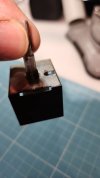
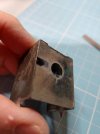
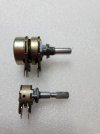
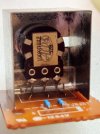
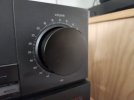
Well this is nothing new but I thought I will showcase a proper pot restoration that is factory like, I promise, no headshrink material or connecting plastic tubes. Some pics first. It retains the D profile, everything is the same but i removed the front square piece of foil since the EMI shield box is used. In fact I ditch the plastic insert in the volume dial because it fitted so well and still retain the same depth. ALPS original pot was used 100k ohm B linear type. It's incredibly small compared to the Technics OEM pot. If anyone is keen how it's done, I will start another thread. It sounded so good after I fire it up on a CD. I still have one new Alps pot.
 

Attachments

  • 20261005_221455.jpg
    20261005_221455.jpg
    102 KB · Views: 27
  • 20261005_195243.jpg
    20261005_195243.jpg
    89.5 KB · Views: 26
  • 20261005_195303.jpg
    20261005_195303.jpg
    48.7 KB · Views: 22
  • 20261005_204340.jpg
    20261005_204340.jpg
    90.9 KB · Views: 17
  • 20261002_172628.jpg
    20261002_172628.jpg
    59 KB · Views: 15
  • 20261005_222437.jpg
    20261005_222437.jpg
    58.3 KB · Views: 19
  • 20261005_225338.jpg
    20261005_225338.jpg
    94.3 KB · Views: 27
Last edited:
Register to hide this ad
I know that @leesonic has messed with these amps and he told me that he just bought another one the other day. In fact I think he may have even changed out a volume pot on a previous unit.
 
Well this is nothing new but I thought I will showcase a proper pot restoration that is factory like, I promise, no headshrink material or connecting plastic tubes. Some pics first. It retains the D profile, everything is the same but i removed the front square piece of foil since the EMI shield box is used. In fact I ditch the plastic insert in the volume dial because it fitted so well and still retain the same depth. ALPS original pot was used 100k ohm B linear type. It's incredibly small compared to the Technics OEM pot. If anyone is keen how it's done, I will start another thread. It sounded so good after I fire it up on a CD. I still have one new Alps pot.

Why not just add to this thread, since you already have it here?

I would be interested in this, since as @coonmanx stated, I just bought another one. Here is a link to my previous restoration thread :

https://audiokarma.org/forums/threads/technics-su-v85a-amplifier-restoration.963896/
 
Why not just add to this thread, since you already have it here?

I would be interested in this, since as @coonmanx stated, I just bought another one. Here is a link to my previous restoration thread :

https://audiokarma.org/forums/threads/technics-su-v85a-amplifier-restoration.963896/
The pot shaft

First we need to fill up the Alps slot with I mm aluminium material. This was JB weld on. Then make a precision ring to fit the Technics faceplate and 6mm Alps shaft. The height of this part is 3.2mm. Outer diameter is 6.9mm, inside diameter is 6mm.This part is to perfectly center the volume pot. I think you can get away with this but the Alps will be a bit fiddly. While the glue is cross link curing, we need to make a half clamp with a 5.5mm hole. This part helps to clamp the pot safely without destroying it. Pics are there to show the 1mm and half clamp. I don't know how others can work on the pot safely without destroying it. Remove the excess material after the glue has cured. And check the diameter for exactly 6mm. This part is important as the volume dial is exactly this dimension.

The D profile

The D profile is exactly 4.5mm from the flat to the opposite curve part of the shaft. More for a tight fit, 4.55mm. Then shorten the shaft by exactly 4.5mm in length. Test fit with volume dial.

The Polycarbonate piece

Make a polycarbonate rest to support the pot against the pcb. The dimension is 26.87mm width by 10.1mm height by 5mm thick. It needs a recessed groove to clear the wires later at the front behind its cleared. This plastic also gives rigidity support to the pot when the EMI shield box is soldered back on. The width is a bit bigger than the opening of the EMI metal box. Remember to shrink wrap the pot, you want zero chips and diry going in there.

The enamelled wire

The alignment of the Alps pot relative to the Amp's face plate and the shield box resulted in the 6 pins very close to the small PCB . Using wires is not possible. You know these vintage mods hurdles need to be solved on the go approach. I used 0.6mm enamelled wires, its overkill for signal that is only microamps or just milliamps but that's what I have and it was surprisingly stiff when all six were soldered.Scrape off enamelled coating using a very sharp blade all around the wire that needs to make good solder contact with the six pins. Make a loop then soldered it flat against the exterior part of the pin since the polycarbonate is in between the rows of 3 pins. Do for all 6 pins. Check for continuity and cold solder joins using scope.

The EMI shield box

File the shield box a little only 2mm to allow the anti rotation tab of the Alps to just protrude out and make contact with the box. This is important as it grounds the pot to stop humming noise. The box is important as it acts as a Faraday cage against unwanted signal from the transformer. I saw another post that did not put this box back, I wonder if I was wrong about this. You want to file it carefully so that it's a snug fit use a set of good needle files. Test fit the box and it should sit proud slightly over the front of the pcb and not touching any of the 3 pins in front. It will short the whole board if it did. Mine was way far off. I didn't take a pic to show this part. When its done it looks like this. See pics attached. Oh yes scrape the wires then solder to the board. Then solder back the 5 ribbon cable. I ditch the original wires and used sillicon ribbon cable, gave it extra length do its not straining on the small pcb. Then put the pot into the faceplate and secure with a nut. Tighten a bit will do, then push the volume dial back and connect back all other connectors. Dim bulb connected just in case. It glows then fades off immediately. The scratchy sound is gone at minimum volume, the sound is amazingly good, I played on CD a similar music I listen to very often and could hear a significant difference, the musical instrument could be vividly identified easily, or is this a placebo effect? If you have questions on this restoration, I will try to answer them. Its not easy if you want to do this, a lot of planning ahead and foresight but I just had to do it. The old pot was measuring higher than the other side at min which explains why it never zero out the sound.

 

Attachments

  • 20261003_202014.jpg
    20261003_202014.jpg
    38.1 KB · Views: 12
  • 20261002_172628.jpg
    20261002_172628.jpg
    59 KB · Views: 9
  • 20261003_130646.jpg
    20261003_130646.jpg
    79.9 KB · Views: 9
  • 20261004_161114.jpg
    20261004_161114.jpg
    88.4 KB · Views: 9
  • 20261005_002057.jpg
    20261005_002057.jpg
    68.9 KB · Views: 9
  • 20261005_165308.jpg
    20261005_165308.jpg
    98.6 KB · Views: 12
  • IMG-20261005-WA0013.jpeg
    IMG-20261005-WA0013.jpeg
    38.6 KB · Views: 6
  • IMG-20261005-WA0007.jpeg
    IMG-20261005-WA0007.jpeg
    42.6 KB · Views: 6
  • 20261005_195243.jpg
    20261005_195243.jpg
    89.5 KB · Views: 5
  • IMG-20261005-WA0017.jpeg
    IMG-20261005-WA0017.jpeg
    53.9 KB · Views: 6
Last edited:
Filing the shield box and check the antirotation tab is cleared thru, you want to check the pot shaft is exactly centered in the shield box, that's the sweet spot! There are very few B type dual gang pots in the market, most of the Alps are A type and those B types are huge and won't fit into this restoration. I am left with one more new Alps pot at my desk.

I have given a good starting dimension to avoid the tedious measuring with callipers, just don't remove too much material if you are not sure. I kept the plastic insert at the volume knob, its not needed as the fit was so good and tight enough not to drop out on its own
 

Attachments

  • IMG-20261005-WA0000.jpeg
    IMG-20261005-WA0000.jpeg
    39.6 KB · Views: 17
  • 20261005_014012.jpg
    20261005_014012.jpg
    48.8 KB · Views: 13
  • 20261005_012845.jpg
    20261005_012845.jpg
    55.8 KB · Views: 19
  • 20261005_225338.jpg
    20261005_225338.jpg
    94.3 KB · Views: 15
  • 20261005_221455.jpg
    20261005_221455.jpg
    102 KB · Views: 13
  • 20261005_204340.jpg
    20261005_204340.jpg
    90.9 KB · Views: 17
  • 20261005_222437.jpg
    20261005_222437.jpg
    58.3 KB · Views: 8
Last edited:
Back
Top Bottom