• The move to the new server is done. There are some software and database maintenance updates in process. This has us passing the hat around to help out. We appreciate any donations. Seriously, even a dollar helps. The payment page may be found here - https://www.audiokarma.org/support.html

Trouble Removing CS-99’s Back Cover

angelaudio

Super Member
Hello fellow AK’ers

I am having trouble getting the back cover off my newly acquired CS-99’s

The cover is made of some type of fiberboard which has become somewhat brittle it seems so I am hesitant to apply too much force to it for fear of breaking it.

The cover seems to be on pretty firmly as I have tried inserting a thing hanger wire and lifting from the screw holes but that did not work. Over the years it seems the wood has settled in very snugly against the cabinet frame.

Any ingenious methods of removal would be greatly appreciated. Thanks in advance AK’ers

Have a happy day3A3301C1-0A75-4420-AAFE-5675AA3A7AF3.jpegAA2BD679-9127-4A09-860E-DCFC93967304.jpeg67F906B0-CB03-4E6A-AAEE-69039AFEE950.jpeg
 
Register to hide this ad
I had the same problem. Get a larger screw and screw it in about a 1/2 inch and grab it with a pair of pliers.Do it slowly and you may have to move it around to different holes. Do it gently as the back board is fragile .
 
Last edited:
I had the same problem. Get a larger screw and screw it in about a 1/2 inch and grab it with a pair of pliers.Do it slowly and you may have to move it around to different holes. Do it gently as the back board is fragile .

You might also try tapping with a rubber mallet while you are trying to loosen it up.

I wonder if the particle board back had some moisture exposure and swelled up slightly? Once you get it out, you may want to gently sand the edges of the back piece to allow for a snug, but removable, fit in the future.
 
I had the same problem. Get a larger screw and screw it in about a 1/2 inch and grab it with a pair of pliers.Do it slowly and you may have to move it around to different holes. Do it gently as the back board is fragile .
Not working. Not sure if they have been affected by water damage but they sure don’t want to come out! Ahhhhh
 
Are the grills made to come off? Held on by Velcro or screws? If the woofers are mounted on the front of the front baffle you could re move the woofer and try pushing the back panel off from the inside. Or tap it out with a mallet.
 
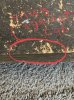
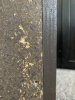
From your picture it looks really tight at the bottom and there seems to be a gap around the top. I would concentrate on the top. Mine were tight and it took a while to wiggle it loose. Particle board will absorb moisture like a sponge. Don't give up it will come off.Try 1 screw on each side of the top and pull together.Have someone hold it from the front.
 
Are the grills made to come off? Held on by Velcro or screws? If the woofers are mounted on the front of the front baffle you could re move the woofer and try pushing the back panel off from the inside. Or tap it out with a mallet.
From your picture it looks really tight at the bottom and there seems to be a gap around the top. I would concentrate on the top. Mine were tight and it took a while to wiggle it loose. Particle board will absorb moisture like a sponge. Don't give up it will come off.Try 1 screw on each side of the top and pull together.Have someone hold it from the front.
I managed to get them off:banana:
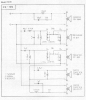
But now I see at least two blown caps and one that’s on the verge of blowing! Ahhh! @audio-ed Would you happen to know how to go about replacing the caps? Is there a schematic online?
 
I managed to get them off:banana:
But now I see at least two blown caps and one that’s on the verge of blowing! Ahhh! @audio-ed Would you happen to know how to go about replacing the caps? Is there a schematic online?

I'm sure there is info on replacing the caps somewhere on this forum. I've only done speakers that had simple crossovers .

What does the xover look like? Photos please. I've never seen the xover in these, so I have no idea how complex they are.
Replace the caps with the same values. The values should be marked on the caps.
 
You would think you could disconnect one leg of the cap and spin them enough to see the value on it somewhere. Personally, I wouldn't spend much more than the price of the Dayton 5% caps for the crossovers. They will make about as much difference as anything....but won't help with the low bass (lack of).
 
You would think you could disconnect one leg of the cap and spin them enough to see the value on it somewhere. Personally, I wouldn't spend much more than the price of the Dayton 5% caps for the crossovers. They will make about as much difference as anything....but won't help with the low bass (lack of).
That’s what I thought too but the darn things aren’t labeled :dunno:
 
I managed to get them off:banana:
But now I see at least two blown caps and one that’s on the verge of blowing! Ahhh! @audio-ed Would you happen to know how to go about replacing the caps? Is there a schematic online?
You could’ve just unscrewed the crossovers after taking out the drivers, instead of destroying the back. That’s how it is with most vintage speakers.
 
You could’ve just unscrewed the crossovers after taking out the drivers, instead of destroying the back. That’s how it is with most vintage speakers.
Actually managed to keep the back intact without any damage. I think it had just snuggled up against the Can because of warm weather. Once I got it into an air conditioned environment it freed up
 
Interesting.... Maybe the writing just eroded/faded over time. Who knows. Or maybe they never had it and they just tested them with a meter.
Yeah I’ve never seen anything like it in my ~3 months of tinkering with audio o_O I’ll just study the schematic and sort everything out. It might take me a while since I just started reading and learning schematics but I’m confident I’ll get it...sooner than later hopefully :music:
 
Back
Top Bottom