• The move to the new server is done. There are some software and database maintenance updates in process. This has us passing the hat around to help out. We appreciate any donations. Seriously, even a dollar helps. The payment page may be found here - https://www.audiokarma.org/support.html

Why flooding speaker et al switches may not work well

Mike Sweeney

Well-Known Member
Dribbling DeOxit down a Marantx speaker switch or one of the many others is a time honored tradition for us that restore these beasts. But, if you take one apart, you will find that is probably not the best way to fix them. That is assuming that A: you have a newer switch and B: you don't mind very tedious work with dangerously small parts.

The older switches are glued together so taking them apart is problematic. But they have the same issue as the newer ones.
IMG_6717.jpg

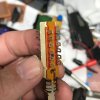
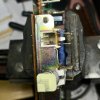
The issue is how the switch is made on the inside. It's is two parallel rails with two or four sliding clips face down on the rail. I have never seen any kind of grease/lube or whatnot inside of these yet. What I have seen is where the very tiny contacts have corroded because they are not moved very often and they have been in less than optimal environmental conditions. No amount of dribbling DeOxit will clean these. Even flooding or what you think is a soaking flood may not actually get into the contacts since they are upside down. You can see the construction method prevents a good soaking without a bit of luck. Not to say it wont work, it will in a pinch and I've done it successfully but I've used the D100L which has the needle applicator so I can precisely target the application around the shaft. And it takes patience to let enough wick into the switch to be effective. This did NOT work on the three I've mentioned with corrosion issues. Those had to be manually burnished clean.
IMG_6709.jpg IMG_6709.jpg IMG_6716.jpg

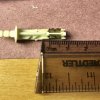
I put a ruler so you can see the scale we are working with here. I cannot strongly enough suggest buying some spares for parts if you decide to take one of these apart. I've had to do this three times now due to a missing clip ( no click) and due to crappy contacts. In each case, I take them apart and scrub the contacts with DeOxit and a wooden shaft QTip then use a dab of DeOxit non-conducting grease to A: hold the bloody clip in place and B: Provide constant cleaning/lube from now on.

The easiest way was to remove the switch boards ( two were speaker boards, one was a filter switch) then desolder the switch from the PWB and operate on it. I did this at my kitchen table with strong lighting vs my cluttered bench and the part eating concrete floor :)
 

Attachments

  • IMG_6713.jpg
    IMG_6713.jpg
    64.9 KB · Views: 72
Register to hide this ad
While what you show is correct - it is also a dangerous thing to recommend for most owners of vintage equipment.

The majority of owners do not have the patience or skill required to do as you show. Their attempted service will likely lead to lost parts and non-functional switches. Since there are really no direct replacement switches available, this type of extensive servicing has a very high risk-to-reward factor.

Never underestimate peoples lack of understanding for what seems like a simple task, offered up by someone who has worked through all of the details of the job at hand - Chris
 
My post wasn't geared to the neophyte or even mid tier tech. It was strictly observations as to why a certain suggestion may not work as well as hoped. I did preface that this has as I put it "dangerously small parts" and I also said not to try this without spares around.

I'm trying to work out how to get the glued ones apart now ;) I've seen people drill holes which I think is a terrible idea given the odds of a piece of plastic shaving getting inside and jamming up the works.

Like you say, there are not any direct or even somewhat indirect replacements available so exploring all the options such as disassembly if you are inclined and have the skills is a good thing. I'm just sharing my own adventures and mis-adventures along the way :) That and it keeps at home and out of the bar :D
 
I have cleaned those out via disassembly before. It can be the only way sometimes.

I got a free receiver once that had been worked on by a tech years earlier, but the owner said it was "never the same" afterwards.

The tech had taken them apart to clean them and had re-installed the moving contacts backwards, and with their slight offset, two inputs were being selected at the same time. Since it was a dual buss reciever, the same was done with the record out selector, making the thing even worse to use.
 
I think there are quite a few issues resolved on AK by folks that can do the work and then documented getting folks that don't remember which end of the soldering iron to hold to jump in and attempt a repair. Frequently leads to a thread on how to fix a blown up unit, sometimes leads to complete success. It is really up to the reader to decide what they can and can not do and to let those qualified do the work that they decide they don't want to attempt. Everyone that works on this stuff has broken something, physically or electrically, while making repairs. It is part of the learning curve. But a wholesale comment about it being dangerous to mention this repair to most owners is nonsense. These are just switches, just easy small mechanical work. It ain't like he is recommending prodding around inside a tube amp with a metal stick. That will kill you when some mistakes are made. This may just leave a unit doorstopped, no big deal. But then this kind of work is something I would do, if needed. The Yamaha C-4 preamp has a pair of switches like these with 3 or 4 sliding contacts for the phono loading options. They were harder to desolder than to open, clean and replace.

If we stopped showing things like this folks wouldn't know how to do some of the many repairs that have been documented on AK. It is up to the reader to decide if it is something they should attempt.
 
Last edited:
Hey ... I'm a "people!" and a successful survivor of my first " Blind Monkey with a screwdriver" approach to "restoring" my vintage, Heathkit, AA-40 amp! A loud Bang and Smoke ... is mostly likely not good??? I was a "victim" of the "old I think I know what I am doing?? But do your really understand what you think you know??" But hey ... "Plan B,"worked," "it's sometimes "Better to be Lucky than Good!" So the "next" time ... I'll follow my own advice "RTFM!" Which I now have. :)

If the caps were not bad uh 18 years ago?? Most likely they were after that?? But now sigh ... I'll have to add "How to check" Output and Power Transformers ... for shorts! Oh well live and learn ..if your "lucky!"

And as for this post in particular, I can appreciate the degree of craftsmanship required, but as the saying goes ... "A man's got to know his limitations." Thanks for sharing
 
These switches are available new. Direct replacements. This is really cool when there is a broken shaft, because the shafts on these fit the original switches perfectly. Or when I lose one of those tiny springs behind the contacts.

Desc Mfg # DigiKey
1 pr contacts F2UEE 401-1223-ND
2 pr contacts F4UEE 401-1226-ND
3 pr contacts F6UEE CKN966-ND

switches.jpg
 
I think there are quite a few issues resolved on AK by folks that can do the work and then documented getting folks that don't remember which end of the soldering iron to hold to jump in and attempt a repair. Frequently leads to a thread on how to fix a blown up unit, sometimes leads to complete success. It is really up to the reader to decide what they can and can not do and to let those qualified do the work that they decide they don't want to attempt. Everyone that works on this stuff has broken something, physically or electrically, while making repairs. It is part of the learning curve. But a wholesale comment about it being dangerous to mention this repair to most owners is nonsense. These are just switches, just easy small mechanical work. It ain't like he is recommending prodding around inside a tube amp with a metal stick. That will kill you when some mistakes are made. This may just leave a unit doorstopped, no big deal. But then this kind of work is something I would do, if needed. The Yamaha C-4 preamp as a pair of switches like these with 3 or 4 sliding contacts for the phono loading options. There were harder to desolder than to open, clean and replace.

If we stopped showing things like this folks wouldn't know how to do some of the many repairs that have been documented on AK. It is up to the reader to decide if it is something they should attempt.
LOL, yep words to the wise! Successful "Vintage Repair" should not include the words ... "I survived??" :)

But yeah ... I now see the value to those "Orange Plastic" screwdrivers that I have and "choose not to use???" Aw well live and learn ..."if your lucky." And with my next "attempt" to get my "Doorstop" up and running ... "I'll be on here!" :)

Me and my AA-40 are poster childs for the lucky! Screwing up a "switch and losing one of them tiny freaking springs!" Is just a "PIA!?"
 
New? Hot damn. I'll have to order some and check it out. That would be easier than chasing the bloody clip across the floor :)
 
New? Hot damn. I'll have to order some and check it out. That would be easier than chasing the bloody clip across the floor :)
Yes but ... if you actually "see" it running away, you still got a chance! :)

Drop a freaking "nut" in the engine bay of a "951" (turbo 944) and that's an hour or two of your life you won't get back!! And disassembling parts (on anything) and having "tiny springs" fly out of nowhere, is pretty much a common "mechanical disassembly" ... Booby Trap???

It does not involve Death, but it can seriously mess up your day!! :(
 
Yes but ... if you actually "see" it running away, you still got a chance! :)

Drop a freaking "nut" in the engine bay of a "951" (turbo 944) and that's an hour or two of your life you won't get back!! And disassembling parts (on anything) and having "tiny springs" fly out of nowhere, is pretty much a common "mechanical disassembly" ... Booby Trap???

It does not involve Death, but it can seriously mess up your day!! :(
Oh yeah.. there was a late Friday when I had to take apart the neutral start switch on my car because the damn thing died at 530 PM.. just as I got the case apart ( no user serviceable parts inside.. right) a friend walked up and watched all the springs and copper bits go flying.. he took a look and said " we need at least a six pack" and went and got one while I hunted for all the parts in the alley. The beer was good and I found all the parts and was able to fix the stupid switch. The contacts had carboned up from arcing and a simple file job with some new grease, good to go :)
 
These switches are available new. Direct replacements. This is really cool when there is a broken shaft, because the shafts on these fit the original switches perfectly. Or when I lose one of those tiny springs behind the contacts.

Desc Mfg # DigiKey
1 pr contacts F2UEE 401-1223-ND
2 pr contacts F4UEE 401-1226-ND
3 pr contacts F6UEE CKN966-ND

View attachment 1317062

I had lost my cheatsheet,
Thanks for this!

Tom
 
Back
Top Bottom