

You are using an out of date browser. It may not display this or other websites correctly.
You should upgrade or use an alternative browser.
You should upgrade or use an alternative browser.
Your favorite DIY trick
- Thread starter birchoak
- Start date


Another twist on storing screws when removing them is to have an old egg carton handy. Just place the lid screws in the first cup, the next set of screws removed in the next cup and so on. When putting the unit back together, reverse the order.
I've seen egg crate foam used similarly.


Goldie99
Super Member
I often (masking) tape screws, nuts, washers, even removed components, to sheets of A4 paper, making any relevant notes or diagrams next to them. The pages are numbered as I make them, and filed in a zip-lock bag until needed - there's never any doubt as to what goes where, even months later.
With the pages numbered, the exact reassembly sequence is obvious as well - just the reverse of removal.
With the pages numbered, the exact reassembly sequence is obvious as well - just the reverse of removal.

I don't know if there is a standard for this,but when I'm using zip-cord,my practice has been to use the lead with the molded-in tracer as the positive:
''If it's got something on it,it's got something on it''
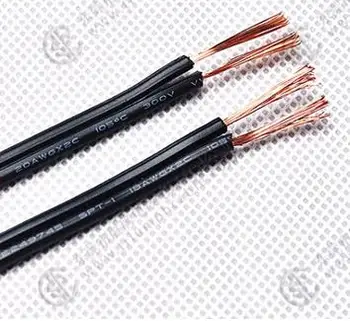
I've tried relying on that as well, but my crappy eyes have issues spotting that writing on the wires when the light levels are less than optimal (all the time?). Because of my wife and daughter, my house is full of colorful washi tape. I take a length of it and wrap it around the positive wire, just enough to be easily seen or felt.
What is washi tape?
https://www.sheknows.com/home-and-gardening/articles/951617/what-is-washi-tape

OMGCat!
Super Member
I fry naked. Makes me feel alive.
I welded while wearing a pair of cutoff shorts once. I was wondering why my legs were warm until I realized it was because I was currently on fire.

crispycircuit
Super Member
I'll think of it later...........

birchoak
Hi-Fi Nut
I use one, too--they are fantastic. A no-brainer.Magnetic dish to hold all screws and nuts removed. If I don’t use the dish a few screws or nuts will never be found. Just like the missing stocks thet get lost in the dryer.
birchoak
Hi-Fi Nut
I used to do that--don't know why I stopped. Muffin tins work, too, and are harder to knock over if you're clumsy like me.Another twist on storing screws when removing them is to have an old egg carton handy. Just place the lid screws in the first cup, the next set of screws removed in the next cup and so on. When putting the unit back together, reverse the order.
birchoak
Hi-Fi Nut
Way more organized than me! I bet you fold your socks, too.I often (masking) tape screws, nuts, washers, even removed components, to sheets of A4 paper, making any relevant notes or diagrams next to them. The pages are numbered as I make them, and filed in a zip-lock bag until needed - there's never any doubt as to what goes where, even months later.
With the pages numbered, the exact reassembly sequence is obvious as well - just the reverse of removal.
birchoak
Hi-Fi Nut
Here's another one: ever try to read the value on an old cap in a densely populated board? Often, the side you need to read is facing away from you and you cannot get your head near the far side because---well, if I have to explain further then this has never happened to you. Anyway, I bought a small, angled dental mirror (about $5 on Amazon) so I can read the "far side" of caps.

petehall347
the brandy coffee man
funny you just say this as i just bought a nice kit to fix my own teeth but cant do it so thought best use is for electronics repair toolsHere's another one: ever try to read the value on an old cap in a densely populated board? Often, the side you need to read is facing away from you and you cannot get your head near the far side because---well, if I have to explain further then this has never happened to you. Anyway, I bought a small, angled dental mirror (about $5 on Amazon) so I can read the "far side" of caps.

pdm4606
Super Member
I started having a hard time lifting the arm at the end of an LP.
Got harder every day. Also got to be 74 last Oct. So I says say I, How about a little help. Finally fixed the problem by putting an eye bolt (1/4") into the ceiling at 2 spots.
I then ran up some carpenters nylon string that started around 2 feet from the arm at the ceiling. Then it went over to another eye directly over the arm. The carpenters string was super flexible but not enough. It sort of looked like it was pulling. So to solve that, I made the last 12" of string going to the arm a piece of .006 fish line which is super flexible and offered no resistance. It all works nice now. I can easily lift the arm with no pop at the lift. Am I brilliant or what?
Got harder every day. Also got to be 74 last Oct. So I says say I, How about a little help. Finally fixed the problem by putting an eye bolt (1/4") into the ceiling at 2 spots.
I then ran up some carpenters nylon string that started around 2 feet from the arm at the ceiling. Then it went over to another eye directly over the arm. The carpenters string was super flexible but not enough. It sort of looked like it was pulling. So to solve that, I made the last 12" of string going to the arm a piece of .006 fish line which is super flexible and offered no resistance. It all works nice now. I can easily lift the arm with no pop at the lift. Am I brilliant or what?

ConradH
Lunatic Member
This is hard to describe because there can be different variations, but when I work on the back of a board, say for a recap, I want a drawing that both matches the orientation and shows the parts. I may start with drawings in the service manual, or I may just photograph the thing. Then I use a photo editor to combine the images, mirror them and make a print. Sometimes I'll draw part outlines on the print by hand if necessary. End result is I can do a lot of desoldering without having to move the board and stress the wires, because I know right where everything is connected..
pdm4606
Super Member
I started having a hard time lifting the arm at the end of an LP.
Got harder every day. Also got to be 74 last Oct. So I says say I, How about a little help. Finally fixed the problem by putting an eye bolt (1/4") into the ceiling at 2 spots.
I then ran up some carpenters nylon string that started around 2 feet from the arm at the ceiling. Then it went over to another eye directly over the arm. The carpenters string was super flexible but not enough. It sort of looked like it was pulling. So to solve that, I made the last 12" of string going to the arm a piece of .006 fish line which is super flexible and offered no resistance. It all works nice now. I can easily lift the arm with no pop at the lift. Am I brilliant or what?
Here are some photos of my tone arm lift. Enjoy.....


hemiram
Active Member
Don't solder in your underwear.
Don't solder in bed either! Yes, I used to do that a lot when I was home sick from school, and I was sick a lot. If you are a total nightowl and you can't go to sleep easily until 4-5am, school is a nightmare, and due to lack of sleep alone, you will be sick constantly. Anyway, one afternoon, I was home with the flu and I decided to put together the little switchbox I had recently bought the parts for. My wastebasket was full of kleenex and after about 10 joints, I wiped off the tip of my iron, put some solder on it, and "flicked" it into the wastebasket to get rid of the excess. About a minute later, flaming kleenex came floating out onto the big rug I had next to my bed that the dog slept on, setting it and my slippers on fire. I kept my cool and soon put it out, but I had to explain the scorched rug and the smell when mom got home. "NO MORE SOLDERING IN BED!". Well that didn't last long. When I was recovering from almost dying from a blown appendix, I started up again and continued until I got out of high school, and with the exception of a double feature of the flu in the winter of '75-'76, I didn't get sick much anymore. I keep the lead exposure to a minimum these days, and do all my soldering on the kitchen table I never eat off anyway.

birchoak
Hi-Fi Nut
Ha ha! I love it! Good for you, man! Anything to make the music happen!Here are some photos of my tone arm lift. Enjoy.....View attachment 1216284 View attachment 1216286 View attachment 1216287
birchoak
Hi-Fi Nut
That is brilliant! Why the hell didn't I think of that? I can't wait to try that.If you need to solder two wires together and don't have "third hand" you can use an old plastic spray can lid. Cut a notch in each side and place wires in notchs. Solder.