If only she knew how much they are going for on Ebay... That is crazy. Was it fully operational at that price?I bought my SU-V8 at a garage sale around the corner from my house. It was sitting on top of a trash can and it had a $1 price tag on it. The lady having the sale said it would have been in the trash can at the end of the day if I hadn't bought it.


You are using an out of date browser. It may not display this or other websites correctly.
You should upgrade or use an alternative browser.
You should upgrade or use an alternative browser.
A couple of Technics SU-V8
- Thread starter Zether
- Start date
I owned three of the amps in that line... The SU-V2 was my very first integrated amplifier and it did a wonderful job for me until I parted ways with it. Then about thirty years later I got an SU-V6 and also an SU-V4. I treated the SU-V6 a bit badly one day and it seems to have developed some issues. So I sent it to lessonic in case he could figure it out and get it working again. I don't know if he has done anything with it but he knows his stuff and had previously rebuilt an SU-V6. The SU-V4 took its place and then also developed issues, where it started going into protection.I had the V6 for a while, absolutely incredible phono stage (with MC option built in) not sure if that is shared with the V8 or not.
Long story short... the only Technics amp that I still own (besides an MCS 3842) is a nice SU-V707. That one was a bit of a project since I got it in fairly bad condition from an electronics recycler. But the SU-V707 is a nice unit and I do plan on doing a little bit of work to it so that I may enjoy it for years to come... It is also way more power than I need at 90 WPC.
I went through an NAD phase before coming back to where I started out, with Technics. I don't miss the NAD at all...

OMGCat!
Super Member
Oh poo… I must have muddled that up… the V8X uses those trimpots
3362P-1-102 Would have been more likely to be a drop in for the V8
I just bought in 30 pairs of 2SA1494/2SC3858 power transistors from an authorised SanKen supplier…so I will be doing a few more builds soon…
I prefer new class A myself… much more unstrangled than the class AA - I find the computer drive era particularly good… moreso to do with the stabistor loaded output stage rather than an ICQ controller-
it’s a tough call to pick a fave integrated in that lineup… harder to pick than a broken nose… these are all stellar performers…
The A3MK2 however is in a league of its own.
I bought about 2 dozen pairs when I got the EOL notification from Mouser a while back. I've got a few Yamaha amps that use the same subs so figured I need to be prepared just in case. I've also got probably 6 pairs of the original Toshiba outputs and drivers as well.
Expensive but they'll keep and I feel like I'll be glad I stocked up when they are impossible to find in a few years .

RE Bourns trim pots....
To my eye, looking at the 2nd pic in post #11 of the new trim pot after the leads were bent to fit, that footprint appears to match Bourns model 3386F.
Bourns has many model numbers varying in pin spacing, adjustment screw placement, etc. It can get confusing, but the datasheets have all of the information. The 3386F is a frequently used replacement in vintage amps, is one that I am very familiar with and have used many times, and indeed just put a couple on an order last night (after consulting the datasheet).
https://www.mouser.com/datasheet/2/54/3386-776606.pdf
Good luck on your projects. Those V8s are impressive! And SVI2004A is the man for Technics....
To my eye, looking at the 2nd pic in post #11 of the new trim pot after the leads were bent to fit, that footprint appears to match Bourns model 3386F.
Bourns has many model numbers varying in pin spacing, adjustment screw placement, etc. It can get confusing, but the datasheets have all of the information. The 3386F is a frequently used replacement in vintage amps, is one that I am very familiar with and have used many times, and indeed just put a couple on an order last night (after consulting the datasheet).
https://www.mouser.com/datasheet/2/54/3386-776606.pdf
Good luck on your projects. Those V8s are impressive! And SVI2004A is the man for Technics....
Last edited:

audio-ed
Well-Known Member
Worked perfect and cosmetically almost perfect.If only she knew how much they are going for on Ebay... That is crazy. Was it fully operational at that price?
That is nuts. They go for big bucks on the Bay. You sure lucked out on a great amp.Worked perfect and cosmetically almost perfect.

Zether
New Member
Finally got round to fixing the high frequency filter switch which was making a strange scratchy sound when being toggled and did not stay too well in the top position.
I had ordered a couple of Technics SLL1 (SSL121/SSL123) switches from eBay as they were the only type I could find. The SU-V8 uses SLL2 (SSL145) switches for all the lever type on-off switches other than the straight DC switch and the power switch. I was hoping to either use the internals of one of those switches to resurrect the original switch or to replace the entire switch with a SLL1 switch.
The most obvious difference between SLL1 and SLL2 switches is the height (5 mm difference), but as I later found out the metal lever has a slightly different profile (though the plastic knob still fits and goes on) and SLL1 lever has more travel. After trying it out I decided that it was probably easier to resurrect the SLL2 than to rebuild the SLL1 to have a similar travel as the other knobs (it really stuck out). To get the switch to the correct height I 3D printed a base for it.
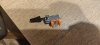

As that did not really turn out perfect, I went back to resurrecting the original switch. The actual issue with this switch was that the metal "C" shaped thing had broken (the lever has a metal ball which is supposed to be supported by this "C" in the SLL2 switch and the responsibility of this is to keep the switch in its position and to provide the nice tactile snappy feeling when flipping the switch).
Interestingly the SLL1 used a completely different support for the metal ball on the lever and I decided to mimic the design of the SLL1 lever support but modify it to be suitable for the SLL2.
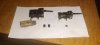
The metal one on the right is the original support part in the SLL1 and the two black ones on the left are the 3D printed ones for the SLL2.
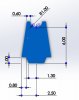
The 3D printed support does not have the exact same click sound (as it is made from a different material) and the feel is also a bit lighter when switching, but all in all not bad and still feels snappy enough. Not sure of the lifespan of this though (I bet I have switched it a hundred times for testing purposes, so it looks promising), but it is my least likely switch to be ever used so unlikely to become an issue for me. Perhaps when I get a CNC machine I will revisit this. Anyway, if someone needs to fix a SLL1 or SLL2 latching issue you can try by 3D printing these parts, I have attached them here as well.
I think this means I can call one of my SU-V8s sorted. Need to muster energy to tackle the other one now.
I had ordered a couple of Technics SLL1 (SSL121/SSL123) switches from eBay as they were the only type I could find. The SU-V8 uses SLL2 (SSL145) switches for all the lever type on-off switches other than the straight DC switch and the power switch. I was hoping to either use the internals of one of those switches to resurrect the original switch or to replace the entire switch with a SLL1 switch.
The most obvious difference between SLL1 and SLL2 switches is the height (5 mm difference), but as I later found out the metal lever has a slightly different profile (though the plastic knob still fits and goes on) and SLL1 lever has more travel. After trying it out I decided that it was probably easier to resurrect the SLL2 than to rebuild the SLL1 to have a similar travel as the other knobs (it really stuck out). To get the switch to the correct height I 3D printed a base for it.
As that did not really turn out perfect, I went back to resurrecting the original switch. The actual issue with this switch was that the metal "C" shaped thing had broken (the lever has a metal ball which is supposed to be supported by this "C" in the SLL2 switch and the responsibility of this is to keep the switch in its position and to provide the nice tactile snappy feeling when flipping the switch).
Interestingly the SLL1 used a completely different support for the metal ball on the lever and I decided to mimic the design of the SLL1 lever support but modify it to be suitable for the SLL2.
The metal one on the right is the original support part in the SLL1 and the two black ones on the left are the 3D printed ones for the SLL2.
The 3D printed support does not have the exact same click sound (as it is made from a different material) and the feel is also a bit lighter when switching, but all in all not bad and still feels snappy enough. Not sure of the lifespan of this though (I bet I have switched it a hundred times for testing purposes, so it looks promising), but it is my least likely switch to be ever used so unlikely to become an issue for me. Perhaps when I get a CNC machine I will revisit this. Anyway, if someone needs to fix a SLL1 or SLL2 latching issue you can try by 3D printing these parts, I have attached them here as well.
I think this means I can call one of my SU-V8s sorted. Need to muster energy to tackle the other one now.
Attachments
walteritaly
New Member
Finalmente sono riuscito a riparare l'interruttore del filtro ad alta frequenza che produceva uno strano suono graffiante quando veniva attivato e non rimaneva troppo bene nella posizione più alta.
Avevo ordinato un paio di interruttori Technics SLL1 (SSL121/SSL123) da eBay poiché erano l'unico tipo che riuscivo a trovare. L'SU-V8 utilizza interruttori SLL2 (SSL145) per tutti gli interruttori di tipo a leva diversi dall'interruttore CC diritto e dall'interruttore di alimentazione. Speravo di utilizzare l'interno di uno di quegli interruttori per resuscitare l'interruttore originale o di sostituire l'intero interruttore con uno SLL1.
La differenza più ovvia tra gli interruttori SLL1 e SLL2 è l'altezza (5 mm di differenza), ma come ho scoperto in seguito la leva di metallo ha un profilo leggermente diverso (sebbene la manopola di plastica si adatti ancora e continui) e la leva SLL1 ha più corsa. Dopo averlo provato, ho deciso che probabilmente era più facile resuscitare l'SLL2 piuttosto che ricostruire l'SLL1 per avere una corsa simile alle altre manopole (stava davvero fuori). Per portare l'interruttore all'altezza corretta, ho stampato in 3D una base per esso.
[ALLEGARE]2515775[/ALLEGARE] [ALLEGARE]2515776[/ALLEGARE]
As that did not really turn out perfect, I went back to resurrecting the original switch. The actual issue with this switch was that the metal "C" shaped thing had broken (the lever has a metal ball which is supposed to be supported by this "C" in the SLL2 switch and the responsibility of this is to keep the switch in its position and to provide the nice tactile snappy feeling when flipping the switch).
Interestingly the SLL1 used a completely different support for the metal ball on the lever and I decided to mimic the design of the SLL1 lever support but modify it to be suitable for the SLL2.
The metal one on the right is the original support part in the SLL1 and the two black ones on the left are the 3D printed ones for the SLL2.
View attachment 2515781
View attachment 2515788
The 3D printed support does not have the exact same click sound (as it is made from a different material) and the feel is also a bit lighter when switching, but all in all not bad and still feels snappy enough. Not sure of the lifespan of this though (I bet I have switched it a hundred times for testing purposes, so it looks promising), but it is my least likely switch to be ever used so unlikely to become an issue for me. Perhaps when I get a CNC machine I will revisit this. Anyway, if someone needs to fix a SLL1 or SLL2 latching issue you can try by 3D printing these parts, I have attached them here as well.
I think this means I can call one of my SU-V8s sorted. Need to muster energy to tackle the other one now.
walteritaly
New Member
Hi,
I'm new to the forum, I bought 2 SU-V8s a while ago and now I would like to restore them to make them work better,
I adjusted the currents according to the manual, but they continue to vary ...
an amplifier no longer works, the protection relay is disconnected when I connect the speakers.
I would like to replace the capacitors, the trimpots, any transistos and what is needed to bring them back to their former glory.
can you help me and advise me on what and where to find the necessary components?
thank you very much
Walter.
I'm new to the forum, I bought 2 SU-V8s a while ago and now I would like to restore them to make them work better,
I adjusted the currents according to the manual, but they continue to vary ...
an amplifier no longer works, the protection relay is disconnected when I connect the speakers.
I would like to replace the capacitors, the trimpots, any transistos and what is needed to bring them back to their former glory.
can you help me and advise me on what and where to find the necessary components?
thank you very much
Walter.

Did you use this for all six VR or just a couple?3362P-1-102 Would have been more likely to be a drop in for the V8
Zether
New Member
Hi,
I'm new to the forum, I bought 2 SU-V8s a while ago and now I would like to restore them to make them work better,
I adjusted the currents according to the manual, but they continue to vary ...
an amplifier no longer works, the protection relay is disconnected when I connect the speakers.
I would like to replace the capacitors, the trimpots, any transistos and what is needed to bring them back to their former glory.
can you help me and advise me on what and where to find the necessary components?
thank you very much
Walter.
I had a similar issue with the voltages not "sticking" - every day different results and this was fixed by changing the trim pots. You could also try using a contact cleaner and working the pots.
The other simple but sure improvement to sound quality is cleaning all the switches, especially the sliders on the phono board.
I can try finding which trim pots I ended up using on my other SU-V8.
For caps I mostly used Nichicon Muse series. Modern capacitors are generally smaller in size, so you can select capacitors withstanding higher voltages and still be able to fit them nicely.
Main caps were 12000uF Cornell Dubilier Electronics 382LX123M080A082, these seem to be in stock at DigiKey currently.
Zether
New Member
Did you use this for all six VR or just a couple?
VR601 - VR604 are 1k Ohm and VR301 - VR302 are 5k Ohm.
I used a mix of Bourns (3386F-1-102LF) and TT Electronics (72PR5KLF) trim pots as everything was out of stock when I needed them. Having said that I do not think these are the best options to go with, if direct drop in options are in stock.
I think if I would need to do this again I would also have a look at whether I can source multiturn trimpots as they make the adjustments much easier.

MusclesMouse
New Member
Glad I found this thread. I just rescued one from a yard sale for $75. I tested it before I bought it, and everything works outside of the lightning in the pots and intermittent switches, and dirt on the inside, it works great.
Been listening to it for over an hour now with my Andrew Jones Pioneer SP-BS22-LR and Spotify and it sounds great. Can't wait to feed it some hi-res audio and vinyl and hook it up to my big PSB's.
Will be cracking it open to check the adjustments over the next few weeks.
Finally, I've scoured the Internet and can't find a copy of the Owners Manual. Does anyone have a link to one? Plenty of places to download a copy of the Service Manual.
This one's a keeper.
Been listening to it for over an hour now with my Andrew Jones Pioneer SP-BS22-LR and Spotify and it sounds great. Can't wait to feed it some hi-res audio and vinyl and hook it up to my big PSB's.
Will be cracking it open to check the adjustments over the next few weeks.
Finally, I've scoured the Internet and can't find a copy of the Owners Manual. Does anyone have a link to one? Plenty of places to download a copy of the Service Manual.
This one's a keeper.
Zether
New Member
That's a lot of amp for $75, great find. You have quite a bit of margin there for fixes/restoration and still sell it for profit if you ever decide to part ways.Glad I found this thread. I just rescued one from a yard sale for $75. I tested it before I bought it, and everything works outside of the lightning in the pots and intermittent switches, and dirt on the inside, it works great.
Been listening to it for over an hour now with my Andrew Jones Pioneer SP-BS22-LR and Spotify and it sounds great. Can't wait to feed it some hi-res audio and vinyl and hook it up to my big PSB's.
Will be cracking it open to check the adjustments over the next few weeks.
Finally, I've scoured the Internet and can't find a copy of the Owners Manual. Does anyone have a link to one? Plenty of places to download a copy of the Service Manual.
This one's a keeper.
Sadly I have never been able to find the owners manual either. Quite strange really as I would rather expect the opposite.
Any chance you could share the full list of capacitors needed for a single amp?I decided on Nichicon Muse series caps and for the filter caps selected 12000uF Cornell Dubilier Electronics 382LX123M080A082 (in real life they ended up being ~10800 uF) as they were the exact same dimensions, pin out etc as the originals. I also got the necessary 6,3 V, 250 mA bulb.
Zether
New Member
Hi @pieterv1,
I am afraid I do not have the list as it was quite some time ago.
If you do not have various capacitors laying around already, I would suggest dismantling it a bit so you get access to all the boards and making an inventory like that.
It would allow you to check the dimensions and lead spacing. The list of components and their values is available in the service manual
I am afraid I do not have the list as it was quite some time ago.
If you do not have various capacitors laying around already, I would suggest dismantling it a bit so you get access to all the boards and making an inventory like that.
It would allow you to check the dimensions and lead spacing. The list of components and their values is available in the service manual
Thanks! That's what I usually do, but since I don't have the unit at my place yet, I based myself on the parts list from the service manual. Hoping I counted everything rightHi @pieterv1,
I am afraid I do not have the list as it was quite some time ago.
If you do not have various capacitors laying around already, I would suggest dismantling it a bit so you get access to all the boards and making an inventory like that.
It would allow you to check the dimensions and lead spacing. The list of components and their values is available in the service manual