

You are using an out of date browser. It may not display this or other websites correctly.
You should upgrade or use an alternative browser.
You should upgrade or use an alternative browser.
across the bench [season-2] the electron strikes back
- Thread starter sae-7125
- Start date


Thanks for creating this interesting thread. Adding this to my thread watch list.

sae-7125
Super Member

another power resistor upgrade, full leg length for thermal isolation (or at least an attempt)

some initial thermals and then see where things go from there. make/model reference mugshot.
multiple modz sessions across various photo sessions, the photo notes archive is a mess.


sae-7125
Super Member

another hot spot

with the tall positioned upgraded power resistors (5w shown) the board is suffering from slightly less heat soak. ideally using chassis mount or heat sink capable power resistors under the main board would help. a half inch or one inch (13-25mm) lift kit for the belly pan could greatly improve thermal management options vs circuit idle inferno syndrome (factory edition).


sae-7125
Super Member

not as hot vs original resistors but its still up there

this system has a few hours on it over the years, enough to discolor the board... on the opposite side of the component inferno.
that should do it for round-1 of the au-d55x, still a few more updates in the photo inbox. to-be-continued


sae-7125
Super Member

*interesting test procedure numbers on page 16
the 802's being bench tested are doing so without the external eq. amazing how sansui (d55x) loudness and tone controls can fill in the gaps when testing full spectrum. the end experiment involves 100hz and lower, it was enjoyable...

sae-7125
Super Member

bass ports easy to remove, three screws for each driver also not bad. some foam directly behind the 8 pack of 4.5 inch 1 ohm woofers of mass destruction. note the surrounds on each woofer and guess as to the peak to peak excursion capability. less excursion = less distortion.

authentic bose sticker, 1987?


sae-7125
Super Member
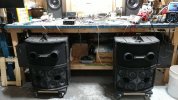
much better testing position

the series/parallel rats nest of cabling connected to the stereo-in mono-out osd brand sub amp. some of its interior modz were posted in season-1. good chance the amp aint harming the 802's with an earth-shattering 80-100w output. drum solo tracks were enjoyable.

created one of each type of cable, if needed for future demo or similar testing
that should do it for the bose experiment, the dynamic power and articulate nature when exercising x32 4.5inch drivers to the beat of an unhinged drummer. low excursion surrounds and low cone mass definitely a plus although bass port chuff/turbulence is noticeable (drinking straw mod?). definitely know when the speakers are at peak loudness which is good for driver health and safety.
one idea would be to connect both exhaust pipes into another enclosure with passive radiators on parallel sides. perhaps an 18x6x12 box and a pair of 8 or 10 inch low profile passives. 802 on its back with vibration absorbing legs (ports pointed up) and the umbilical pipes going into the 6inch width side of the second box. shark-fin mod or something, just a random thought.
for optimal bass response, might want to trim/cut the caps in the interior mounted crossover.
sae-7125
Super Member

quality control check for the heavily updated cj pv5 tube preamp (2nd mod unit in season-1, single nut lift kit). and overall thermal health review after a few hundred hours in the showroom as the reference tube pre on deck.
try not to be distracted by the marantz with its top shelf photo-bombing.

pv5 with friend, which is a recently updated mcintosh 2100 (sorry no meter based eye candy)
the 2100 is one of those "set it and forget it" type of amps hidden behind the bar running 24/7/365 without a care in the world.


sae-7125
Super Member

the 2100 has some warmth but there is lots of mass to saturate before the heat generated can be seen

better side shot, the hot spot on the back panel near mains txf is the fuse
side profile looks so much healthier when there isnt a low voltage rectifier screaming away around 200f. normally positioned between tall caps and txf.

not much to see on the other side of the 2100


