• The move to the new server is done. There are some software and database maintenance updates in process. This has us passing the hat around to help out. We appreciate any donations. Seriously, even a dollar helps. The payment page may be found here - https://www.audiokarma.org/support.html

AK Design Collaborative - Insignia-Class Economy Speakers (a.k.a Indignia)

Comparison to Insignias: After affixing the Indignia nameplate on the front, and contemplating what the rear serial number plate should say ("Engineered at Zilchworks (and spa?)", I put on a Brian Eno's Another Day on Earth with an Indignia on the left and and Insignia on the right, with the MA230 integrated set to Mono.
Much as I'd like to claim title to the Indignia design, they are truly an AK Design Collaborative effort; I did the developmental measurements and held everybody's feet to the fire, mostly. Your own pair were built by RobieWorks, of course, and should say so. ;)

As much as I like my $40/pair "stock" Insignias, the Indignias best them in every category, except price. No contest. The Indignias have much more detail, air and bass. The Insignias, while polite and listenable, sound congested and somewhat muddy compared to Indignias.
I doubt we'll ever see $40 Best Buy Insignias again, but even if so, it would appear from your listening evaluation that Karma Indignias represent substantially enhanced performance value.

Total cost of my Indignias:
I figure I have about $170-$180 invested in my Indignias, all told ($25 was for paint and I now have enough polyester batting and hook up wire to last a lifetime).
Your next several pair will be somewhat cheaper, then.... :p:
 
Much as I'd like to claim title to the Indignia design, they are truely an AK Design Collaborative effort; I did the measurements and held everybody's feet to the fire, mostly. Your own pair were built by RobieWorks, of course, and should say so. ;)

Well said, Z. I think there were at least 4 different people massaging XO's and a whole heap involved in picking out drivers. I think AK Indignia fits well for the design and as stated above, manufacture is all you.

Kudos to Z for being the design manager! Now, are you going to summarize everything into 1 post so the folks who haven't followed from the beginning can build without devoting an hour catching up on the reading? (my laziness is showing)

Ray
 
Now, are you going to summarize everything into 1 post so the folks who haven't followed from the beginning can build without devoting an hour catching up on the reading?
I've linked to the current information in the first post of the thread, and will update that with details of crossover layout and construction, perhaps yet this weekend, to complete the "package." :thmbsp:
 
Excellent! I was hoping I wouldn't have to do it. :thmbsp:

That was my weak point in the corporate world. I loved doing designs, hated doing all the followup paperwork.

Ray
 
Jimbofish,

Perhaps the term "plate" was a bit of an overstatement (see below).

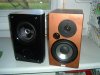
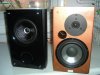
Also posting a few pics of my Indignia along side an Insignia.

Indignia A.jpg Indignia B.jpgIndignia4.jpg Indignia 5.jpg
 
Hey Bob,

Looks like you've got those running in the cave. Have you taken them out to the big system to give them a workout?

Ray
 
Hey Bob,

Looks like you've got those running in the cave. Have you taken them out to the big system to give them a workout?

Ray

Not yet Ray, but they sound great through a 1963, 30W hybrid tube integrated, the MA230. They are "loosening up" a bit. Great detail but not edgy. Listenable is the word I keep going back too. They do no obvious wrong and are very balanced.

Yeah, didn't mean to short anyone who contributed to this design. Y'all should be proud. Clearly the best under $200/pair speakers (new) I've ever heard. If anyone needs a nudge (like me) just do it. They are hard not to like. The fact they sound so good after I practiced on my first build is really rewarding.

After comparing them to the EPI 70Cs, my next step is the "big system." I'm sensing they want to be on stands and while they are not inefficient, they do like some juice.

Zilch, I also keep coming back to "cool" as a way to describe the whole experience. Of course now with nothing else to do, I'm wondering about Thetas.
 
I think you'll be impressed. Mine are currently perched on another set of speakers (I have a few) as stands. My room is similar in size to your listening room and these little guys will fill it. I need to throw that Eno on and check it out. I haven't done that one yet.

Oh yeah, you need to update your sig. :yes:

Ray
 
I think you'll be impressed. I need to throw that Eno on and check it out. I haven't done that one yet.

Oh yeah, you need to update your sig. :yes:

Ray

Track 2 for an image test. :thmbsp:

Sig modified too.:D
 
Zilch, I also keep coming back to "cool" as a way to describe the whole experience. Of course now with nothing else to do, I'm wondering about Thetas.
I'm sure as more Indignias get built, there'll be "enhancements" suggested and tried by others. That comes with DIY territory, and we have some mighty clever members here on AK. Thetas would be one good option, and I might work out a premium charge-coupled version of the crossover. All of that is largely a matter of how much additional investment a builder is willing to make. I think Ray's going to work up adjustable attenuation for the HF, for example:

http://audiokarma.org/forums/showthread.php?p=1369693&#post1369693

If we do a write-up for a PE "Featured Project," I'm sure their designers will want to build and measure a pair as part of the acceptance process, and some additional suggestions may arise from that. I also asked Zaph to take a look, since he's well familiar with these drivers from some of his own two-way project designs.

For now, I'm perusing the cooling rack departments with tape measure in hand.... :D

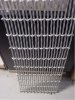
Edit: I forget where I scored this deliciously textured stuff; IKEA, maybe. Also, a single bunged-up S99 fretwork grille could be reworked to finish off a pair of Indignias nicely. Stock PE magnetic-mount fabric grilles are available separately, as well.
 

Attachments

  • Wire Grilles.jpg
    Wire Grilles.jpg
    55.4 KB · Views: 181
Cool! So how did you finally get the speakers flush in the baffle? (It looks like they are flush in the pics)
 
Prototypes remind me of $1000 Sonus Faber Concertos...cant await for all the info to coalesce. Sounds like a fruitfull project for the dark dreary times ahead(I mean winter)...
 
Jimbo: My speakers are just surface mounted on the baffle. I suppose I could try to use a chisel but not sure how well it would work with MDF.

Zilch: Those would look wild with metal grilles.

Played mine all day yesterday and they seemed to relax a bit as they break in. Still very, very nice sounding. As Ray said above, they have no trouble filling a medium large room.

http://audiokarma.org/forums/showthread.php?t=160535

Drivers sale priced through 7/31/08 only, so order soon.... :yes:
 
My first suggestion for improvment is to make it a large floor stander with a side firing 15" active woofer. Call it the Shindignia.
 
I glued and used dowels for all joints.

Getting started: After all the panels are cut:

To join top to bottom in a simple butted joint: Start by drawing a line along the side of the top of the top panel indicating the 3/4" thickness of the side wall beneath that side of the top (Call it the left side). Draw a matching line on the along the right side of the top of the top panel. Then drill dowel holes centered in the areas marked by the pencil lines through the top of the top, but without the sidewalls beneath them.

These holes centered in the left and right 3/4" areas through the left and right side of the top provide a template for drilling matching holes in the top of the side wall you want to attach underneath that side of the top panel.

Apply glue where the underside of the top meets the top of the side wall. Using a corner clamp align the top to the first side wall so that it is square (90 degrees). Then drill through the holes through the top into the top of the side walls beneath them so the dowel holes align. Then pound glue coated dowels into the holes.

Then using that same technique, work your way around the cabinet. Clamp the top, bottom and sides until the glue dries.

To attach the rear panel: Draw a line around the perimeter of the outside of the back, 3/4" from all edges. Drill holes centered in that 3/4" outermost area through the back and into the back of the sides, back of the top and back of the bottom. Pound glue coated dowels into the hole and clamp. When the glue is dry, sand/fill all dowel holes.

Reinforce the back corners: To reinforce the inside of the back corners, glue small triangles of scrap MDF to the back, side and bottom (and side and top) corners.

Horizontal brace: I also used a single horizontal brace between side walls in the middle of the cabinet.

For attaching the front baffle to the cabinet: Glue small triangles of scrap MDF into the insides of the front corners so they are flush with the front. These small triangles provide an anchoring point for screws through the front corners of the front baffle.

PM me if these instructions don't make sense.


Dowel construction is a pretty simple method for making rigid boxes. :thmbsp: I've used it for making utility drawers and re-enforcing nailed drawers that were coming apart. Was there a reason you drilled template holes in the pieces first as opposed to drilling them into both pieces at once?

Did you glue the front on or is it just held on by the screws?

Was that hammered copper paint the spray stuff by Rust-Oleum? :scratch2:
 
Was there a reason you drilled template holes in the pieces first as opposed to drilling them into both pieces at once?

Just easier to keep the bit straight. Busted through the inside of the sidewall with the bit on some of the first attempts. I found it easier to drill perpendicular going through just one piece at a time. Corner clamps help hold the pieces square.

Did you glue the front on or is it just held on by the screws?

They're just screwed in but with a closed cell weatherstrip gasket. I put a bigger diameter hole through the front panel so the screw only bites into the cabinet beneath it. I counter sunk the screws and used gold anodized drywall type screws. A good bite with a screw in MDF doesn't always work.

Was that hammered copper paint the spray stuff by Rust-Oleum? :scratch2:

Yeah, it's Rust-Oleum. Kind of hard to find the copper in hammered though. Menards always seems to have it though. I was going to use pewter but thought the aluminum cone woofer looked good with the copper.
 
Back
Top Bottom