

You are using an out of date browser. It may not display this or other websites correctly.
You should upgrade or use an alternative browser.
You should upgrade or use an alternative browser.
AR TA single motor build; following the legends
Hmmm, my limited experience the well disc comes out easily.
So after the disk has dried you used a small dab of super glue on a dowel and let it sit on the disk for a few minutes to set up before lifting?
Might also try using a straw, slide it into the shaft until it rests on the disk, suck the air out of the straw to create a vacuum and making sure not to lose the vacuum lift it straight up

audi0n00b
Active Member
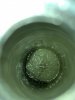
So I’ve soaked the disc for a few hours and it’s not budging. At this point it looks like it may have shrunk but it’s stuck to the bottom. I’ve tried prying it without damaging the well, again no success. Seems I’m stuck.
Can I use a new disc over the old? Thoughts on grinding it out? No idea how I’d do that.
Last resort I guess I’ll need a new chassis. Any spares around?
Can I use a new disc over the old? Thoughts on grinding it out? No idea how I’d do that.
Last resort I guess I’ll need a new chassis. Any spares around?
Attachments


Bsharb
New Member
I just did this a few weeks ago and I ended up using a teeny screwdriver and an old dental pic to pry it out (maybe not the best idea) and it worked fantastically fast after I soaked it for a day or so in some degreaser. I gotta admit, I was pretty frustrated, so brute force was my fallback.
To clarify, I stabbed the slightly curvy end of the dental pic into the disk and pried upward and once I got it to budge, pried the upward angled side up with the screwdriver.

audi0n00b
Active Member
Tried grabbing it with a pic also. I seriously think the disc and bottom of the well are one and the same now.To clarify, I stabbed the slightly curvy end of the dental pic into the disk and pried upward and once I got it to budge, pried the upward angled side up with the screwdriver.
May soak it for a long time and see if it matters.

Tried grabbing it with a pic also. I seriously think the disc and bottom of the well are one and the same now.
May soak it for a long time and see if it matters.
Are you sure you dint super glue it to the well? Looks like a lot of dried super glue in this pic.
Use acetone soak to loosen up the super glue . then flush the hell out of it and
see if you can get it out after .
audi0n00b
Active Member
I don’t think the super glue is the issue, I used so little of it, but I’ll try acetone.Are you sure you dint super glue it to the well? Looks like a lot of dried super glue in this pic.
Use acetone soak to loosen up the super glue . then flush the hell out of it and
see if you can get it out after .

audi0n00b
Active Member
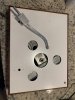
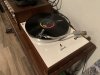
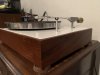
After several months away I’m pleased to say I have completed my rebuild.
I’d like to thank several AKers for helping me out along the way.
@Hose53 for arranging a meetup and assist from @marcmorin on the chassis. I was looking dead in the water and in need of a new chassis till José offered his help. He and Marc worked on the chassis wells and polished the inner platter spindle. Based on a previous recommendation from Marc I asked @sfrost for help with the arm. Steve performed a full arm rebuild/mod.
I finished the top plate with a combination of self-etching primer > sanding primer > gloss white > frosted pearl topcoat. It’s tough to see the pearl finish in pics but it turned out great. As mentioned before, I added wood to the underside of the plate to reduce reverberation based on posts by Marc and replaced the rubber grommet for the tonearm wire to pass through. Lastly, I replaced the original tonearm support with an aftermarket version. I chose the version without the lockable top due to the clean visual, but now wish I’d gone the other way. I’d like to have the confidence a little bump doesn’t ruin my stylus.
I left the wood as is, just took some 0000 steel wool to the whole surface and finished it off with Howard’s Feed and Wax. My original plan was to install new RCA jacks in the base, but ultimately decided to reuse the wire tree and original RCA cables. This was mostly due to wanting to get the table back in operation and this was the quickest solution.
I wasn’t sure about the condition of my old springs and didn’t have the knowledge or materials to mass load. So, I purchased a set of original springs and rubber spacers, picked through both sets to find what I thought were the best three. I subbed wing nuts for the originals to allow for easier tuning.
After scouring AK for recommendations on cartridges I settled on a Grado, purchasing a re-tipped Black cart. I’ve done some light listening over the last week and this table now sounds amazing. I’m not sure how to describe it, except it’s much more vibrant than I remembered prior to starting this project. When I first fired it back up I had noticeable hum in quiet passages and with no record and was prepared to tear it apart once again to add separate RCA jacks with direct connections to the tonearm. I gave it another spin and found the position of the tonearm wire above the plate was the culprit. After changing position of the wire it is dead silent.
Attachments
-
 DE78A27B-546C-40DB-A5BF-05AB4A846CDF.jpeg53 KB · Views: 69
-
 D363F84B-5ABD-45A1-B64D-E33AD3930992.jpeg63.1 KB · Views: 71
-
 E30D1F5D-D2D7-46E5-8AA5-A3630D6DB50B.jpeg69.2 KB · Views: 69
-
 7D1F3589-B1DD-49CB-BF1D-01CD6045059B.jpeg75.5 KB · Views: 68
-
 29F1CE26-F6AD-4114-A7EE-4D06BB454644.jpeg69.4 KB · Views: 66
-
 9760CDB0-2AA3-4B49-8643-86791DED184E.jpeg62.4 KB · Views: 67

Very nice work , hope you enjoy it for many years to come .After several months away I’m pleased to say I have completed my rebuild.
I’d like to thank several AKers for helping me out along the way.
@Hose53 for arranging a meetup and assist from @marcmorin on the chassis. I was looking dead in the water and in need of a new chassis till José offered his help. He and Marc worked on the chassis wells and polished the inner platter spindle. Based on a previous recommendation from Marc I asked @sfrost for help with the arm. Steve performed a full arm rebuild/mod.
I finished the top plate with a combination of self-etching primer > sanding primer > gloss white > frosted pearl topcoat. It’s tough to see the pearl finish in pics but it turned out great. As mentioned before, I added wood to the underside of the plate to reduce reverberation based on posts by Marc and replaced the rubber grommet for the tonearm wire to pass through. Lastly, I replaced the original tonearm support with an aftermarket version. I chose the version without the lockable top due to the clean visual, but now wish I’d gone the other way. I’d like to have the confidence a little bump doesn’t ruin my stylus.
I left the wood as is, just took some 0000 steel wool to the whole surface and finished it off with Howard’s Feed and Wax. My original plan was to install new RCA jacks in the base, but ultimately decided to reuse the wire tree and original RCA cables. This was mostly due to wanting to get the table back in operation and this was the quickest solution.
I wasn’t sure about the condition of my old springs and didn’t have the knowledge or materials to mass load. So, I purchased a set of original springs and rubber spacers, picked through both sets to find what I thought were the best three. I subbed wing nuts for the originals to allow for easier tuning.
After scouring AK for recommendations on cartridges I settled on a Grado, purchasing a re-tipped Black cart. I’ve done some light listening over the last week and this table now sounds amazing. I’m not sure how to describe it, except it’s much more vibrant than I remembered prior to starting this project. When I first fired it back up I had noticeable hum in quiet passages and with no record and was prepared to tear it apart once again to add separate RCA jacks with direct connections to the tonearm. I gave it another spin and found the position of the tonearm wire above the plate was the culprit. After changing position of the wire it is dead silent.
Audiofreak71

WaynerN
Addicted Member
Here are a few photos of my mod.


Basically I added adjustable feet to level the table, changed the stupid arm post so that the arm can be secured, added the safety block to prevent dropping the stylus on the plinth and added anti-skate via the dead-man weight (works great).
The plinth is not painted, rather a self sticking vinyl overlay has been applied. The RCA interconnects have been removed and replaced by RCA jacks, and the power cord has been removed and replacded by an IEC power outlet.
Equipped with a Grado wood body (the reference master or the master reference...stupid name), the one that sold for $1000. Platter mat is mine that I had tooled up. Its .09" thick EPDM open cell sponge, 50 durometer.
Single Haydon motor version with new split phasing cap, new noise suppression cap on switch. New thrust bearing (Delrin).
Modified wire exit location from tonearm. Original suspension.
Removed idiotic bosses from headshell and made slots so that cartridge can be properly aligned. Several mods have been done to the pivots of the tonearm.

audi0n00b
Active Member
I used Rustoleum Painters Touch Gloss WhiteWhat paint did you use for the base coat, that looks really really good?


Hello,I need closure, how did you get the disc out.
If I may, are you talking about the getting the Delrin thrust plate out of the wells? There are a few methods that Marc showed us. If the disc is not stuck in the well and table is still all assembled, Marc used a straw. Put it down into the well, create suction by sucking out the air in the straw and lifting up while maintaining the suction.
Stuart likes using duct tape at the end of a chopstick. sticky side down and adhered to stick with a bit more tape. That works really well.
Marc also used a tiny drop at the end of a dowel, let it sit on the disc for a bit and pulled it out.
He also used Brakleen, the one in red can and squirted into the well and let it sit as long as needed. Eventually the disc would free up and float to the top. Have to be patient and do this in the garage, fumes are nasty. Again be patient, recently it took repeated overnight soaking, more than 7 days, until discs finally released in one T-bar.
Good luck!

noisefreq
Super Member
Hello Reyhifi, I have used charcoal lighter fluid and also isopropyl alcohol to thin the oil enough to get the thrust pad to release from the bottom of the well. You may have to lay the tonearm on the top plate and secure it with painters tape or rubber bands so you can turn the table on its side or even upside down to finally remove the discs from both wells.
And don't lose that ball!
And don't lose that ball!