You are using an out of date browser. It may not display this or other websites correctly.
You should upgrade or use an alternative browser.
You should upgrade or use an alternative browser.
ca-1000 channel imbalance
- Thread starter jkvw
- Start date
Semi-victory. I didnt dissassemble the whole thing but luckily the one pot I was able to open is the one that was lower resistance. Pin 1 to 3 was about 1.5k lower and pin 1 to 2 the same 1.5k lower in the first half of the sweep. In the second half of the sweep (higher volumes) the difference became erratic, sometimes as high as 12k higher on either channel.
I'm not sure I'd recommend this to anybody else, but based on a youtube video i gently scraped around the outer sidewall of the resistive material. Not enough to see or even generate dust, but it succeeded in balancing the resistance from pin 1 to 3 on the two volume pots. In the first half of travel it is now fairly well balanced. In the second half of travel it is still pretty erratic.
You can see in the screenshot my imbalance is gone now at some points in the dial. But as I sweep the pot the left and right channels alternate being slightly higher and lower.
It is certainly not perfect. If I could do it again I would scrape more uniformly. I tried too be too tricky and mostly scraped at the upper range. I think thats why the channels alternate being higher now. Probably not as smooth of a taper.
Most importantly though I cant hear the pronounced difference in sound any more. For the first time since I have owned it I hear a "center stage". Will listen more tomorrow to decide if I did good or made it worse.
Attachments

With the imbalance (sort of) solved, I decided to move forward with other recommended improvements. I tested the fusible resistors mentioned in bobdod's post and all checked out. I have the snap switches in my mouser cart. My power bulb is out so that needs to be replaced. I've ordered replacement caps. While I wait for the switches and caps to arrive is there anything else I can check, clean, or replace?
Oh, also any insight on removing the power amp boards from the heatsink? It looks like the transistors could be desoldered from the board side to separate the board without removing the transistors from the heat sink? But in bobdod's thread it looks like he removed the transistors entirely.
The amp is so clean that I think it got very little use before me. Probably because of the problems with channels dropping and being weak.

Do not desolder... Unscrew and remove from the heatsink. There in frick'n plug in sockets.. Besides they could probably use some fresh thermal compound.It looks like the transistors could be desoldered from the board side to separate the board without removing the transistors from the heat sink?
Trimmers on the main amplifier boards.replace?
Do not desolder... Unscrew and remove from the heatsink. There in frick'n plug in sockets.. Besides they could probably use some fresh thermal compound.
Well glad I didnt go in desolder gun first then...
Ok on the pots. They were weird last time I tried to set bias.
Explain " weird "They were weird last time I tried to set bias.
Prefer multi-turn types, pay the extra $1-, yamaha would have used them had they been available in the day.Trimmers on the main amplifier boards.
652-3296P-1-502LF
Currently on back order at mouser
I prefer these single turns .. They are easy to mount on the boards. And easy to adjust in this model.
You need 8 ea. 4.7KΩ@500mw
https://www.mouser.com/ProductDetail/Bourns/3386G-1-472LF?qs=sGAEpiMZZMu7u4aXTvZ%2Bj89PqHIs2OKchtRkiaHCtY4=
But in the end its your project..
You need 8 ea. 4.7KΩ@500mw
https://www.mouser.com/ProductDetail/Bourns/3386G-1-472LF?qs=sGAEpiMZZMu7u4aXTvZ%2Bj89PqHIs2OKchtRkiaHCtY4=
But in the end its your project..
Explain " weird "
before i answer that i want to check again and make sure i am accurate.
i have the function board out waiting for caps, can i follow adjust procedures with it out? i'd rather not reinstall so i dont bother the pins unnecessarily.
There are two for bias.. They interact with each other.. One is for class B and the other for class A. Set both to Full CCW ( zero bias) -- adjust class B first.To (47mv)..Then adjust class A to (940 mv).. Go back and recheck class B -- adjust as necessary. Now recheck class A -- adjust as necessary. Repeat as needed. Until you don't need to adjust either one any further. When switching from class A to class B or vice-versa , allow time for the bias to stabilize before making adjustments...What is weird about that ?They were weird last time I tried to set bias

Probably not..I have never tried it.i have the function board out waiting for caps, can i follow adjust procedures with it out?
While you have the function board out... Remove , and disassemble the function and record out switches and clean them properly.. I guarantee they are tarnished black just like the photos in this thread.
https://audiokarma.org/forums/index.php?threads/real-dirty-pictures.244784/
Last edited:
I take that back. I was able to follow adjustment procedures with no problems. The current pots seem ok. What I remember from weeks ago was that turning in either direction had the same affect on the value But it was probably a late night mistake. Or maybe they improved after I cleaned them with deoxit.
What do you make of this? Is it factory work or did somebody work here before? I am not very confident that if I desolder this thing that I could put it back like this. Seems like some pins are jumped and some arent soldered at all? Does anybody have a picture of the solder side of these switches?
Attachments
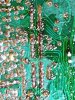

Boards/solder looks original to me, could certainly use a clean up with alcohol. fyi, there are at least 2 versions of the function board


Removing the function selector switch is not that difficult, I get by with a solder pump, also resoldering back in is quite easy.
Dismantling/reassembly requires some care. Bass turnover, a little dirty

Sadly, all such switches on the CA-1000 will need to be stripped down and cleaned. My experiance is that the bass turnover, mute and coupler always cause trouble, the others are not far behind, ie, mostly cause trouble. Suggest you start on something easy like the coupler.I am not very confident that if I desolder this thing that I could put it back like this.
Removing the function selector switch is not that difficult, I get by with a solder pump, also resoldering back in is quite easy.
Dismantling/reassembly requires some care. Bass turnover, a little dirty
While the CA-1000 is a PITA to work on it's a nice (=V Good) amp amd worth the effort
That has been my experience (other than the imbalance).
Are the pads on the function switches joined like the solder? To be clear I am not worried about taking apart, putting together, or desoldering the switch. I am more worried about soldering it back on because it just looks like a mess to me. Some pins have globs of solder that connect the pins. It looks to me like in some areas at least 4 of the pins are soldered together. Some might have enough solder to have a continuous connection but it's hard to say. I wouldnt be worried if it was 40 distinctly soldered pins.
At least , maybe more.. Clean up the board with acetone to get rid of all that excess flux,dust and dull looking conformal coating so you can see the copper traces and solder pads.It looks to me like in some areas at least 4 of the pins are soldered together.
At least , maybe more.. Clean up the board with acetone to get rid of all that excess flux,dust and dull looking conformal coating so you can see the copper traces and solder pads.
I cleaned it up a little and the good news is that what i see on the board, what i see in the picture in the service manual, and what i test with my meter all match. The picture in the service manual clearly looks like the pads are connected as well underneath the solder. So I'm a little more confident that I can solder it back in. These switches have never given me any trouble in the year i've owned it so I may punt on the switches though. Leave it for future me to deal with.
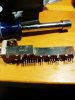
Curiosity got the better of me. I dont see much to clean except one end which almost looks burnt?