• The move to the new server is done. There are some software and database maintenance updates in process. This has us passing the hat around to help out. We appreciate any donations. Seriously, even a dollar helps. The payment page may be found here - https://www.audiokarma.org/support.html

Dahlquist DQ-10 Rebuild issues and tech questions

hlc

New Member
Does anyone know the secret to removing both the woofers and midranges from a DQ-10? Even after removing all screws, they won't budge. I've heard that there might be adhesive holding them. If that's the case, will using a stiff putty knife do the trick without damaging the fiberboard? Is there a special technique?

I found this site for replacement parts. Does anyone have any experience, good/bad? http://dahlquistonlinestore.com/?reqp=1&reqr=

I've been silently using this site as a cornucopia knowledge for all of my audio questions which I must thank you all for contributing.
 
Register to hide this ad
A 1" or 1-1/2" putty knife should do the trick. Be patient and carefully work your way around the rim of each driver. Unless someone has been in there before you and they used adhesive to affix the drivers, it's probably just hardened gasket material that's the problem. Sometimes that stuff can be pretty stubborn. Can't help you with the Dahlquist store other than to say those sites can be pretty expensive.
 
It doesn't look like someone has been in before me, so I'm hoping it's just hardened gasket material. I thought the same about the site, very pricy stuff.

I'll use a putty knife and take my time. Thank you homebrew!
 
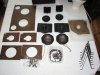
Baffle Parts.jpg

notice the glue on the upper left piece of hardboard.
The lower one is the glued padding shown in the bag,
the upper one is the glue holding the drivers in place. It is a hard setting glue.

The woofer probably has dum-dum type of non-hardening seam sealer to prevent air leaks.
 
Great visual. To get the midrange out, it looks like I'll also need to remove the carpet padding from the back. Is that correct?

It also looks like everything is hard wired. I'll need to solder in wire connectors, something like this, after re-foaming?
 

Attachments

  • Wire Connector.JPG
    Wire Connector.JPG
    11.3 KB · Views: 3
Well hard wiring would be better but the wire connectors will work although they are susceptable to corrosion.

And yeah, the insulation behind the mid will have to be removed. You could try to save it, but replacement felt is available from places like Amazon. Re-attach with 3M #77 spray adhesive. Be careful to keep the adhesive off the driver itself.
 
Right, corrosion. I'll hard wire. I thought that if another issue were to happen it would be easier to quickly disconnect.

Good call on the 3M #77.
 
The padding is pushed in around the magnet but it is not attached to the speaker in general. There might be some spots with the matting glued to the driver. It could remain on the hardboard when you pull the midrange. But this just makes it a bit more difficult. I just used regular contact cement to put the matting back.

The speakers I dissected were from a smoker's home and this allowed complete cleaning, replacing the quarantined matting in the bag. Everything got cleaned, woofer cones got Febreeze and the smell was gone. This also allowed me to mirror-image the pairs I had at the time.

The midrange does have a bead of that gray hard glue. The two boards are front and back. The original, larger, shows the glue better.

I would hard wire because the driver connections will break if subjected to a crimp on-push on connector. Additionally, the clips will be a different size.
 
All came out without issue.

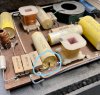
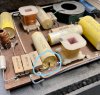
I got a closeup look at one of the crossovers. Looks like a capacitor leaked. I haven't done a site search yet, but anyone have suggestions on brand(s). I've used Dayton and Jantzen in the passed. Does anyone have values for each of the capacitors? 5 are marked Dahlquist 1060 (2), 1065, 1085, 1016. One is blue that's marked 80 uF. I don't think it's necessary to charge. Thoughts?

I'd like to get physical sizes close to original.
 

Attachments

  • Capacitor.jpg
    Capacitor.jpg
    170.7 KB · Views: 35
Last edited:
I have another post on the removal of the woofers and midrange. While doing that, I got a closeup look at one of the crossovers. Looks like a capacitor leaked. I haven't done a site search yet, but anyone have suggestions on brand(s). I've used Dayton and Jantzen in the passed. Does anyone have values for each of the capacitors? 5 are marked Dahlquist 1060 (2), 1065, 1085, 1016. One is blue that's marked 80 uF which I don't think is necessary to charge. Thoughts?

I'd like to get physical sizes close to original.
 

Attachments

  • Capacitor.jpg
    Capacitor.jpg
    170.7 KB · Views: 23
The capacitors in the crossover (with the exception of the blue cap in the woofer circuit) are all film types so they cannot leak electrolyte. As long as the voltage rating of new caps is pretty close to the original, sizewise they should be the same. I'm not fond of the Dayton caps so I'd stay with the Janzen, or go with Mundorf or Audyn. Consider replacing the beige sand cast resistors (especially in the tweeter circuit) with the Dayton green 1% resistors.

Crossover schematic: http://www.syer.net/images/DAHLQUIST_DQ10Schems.jpg
 
Last edited:
The 80 is the only one that MUST be changed unless one of the others is damaged. The 80 is a nice old electrolytic that is tired. I just the other day replaced my 80s with some Clarity Cap film caps. When I move the DM6 pregnant penguins out of the way, I'll give the DQ-10 a listen. This is an upgrade from a newer 80µF electrolytic bypassed with a film cap. Doubt I'll hear a difference but I will know the crossover is the best it can be. Freddymac2 says it makes the mid-bass driver sound better. You can see on the diagram linked above that the 80µF feeds the mid-bass unit.

Your caps have the value of the last two digits.
6.0, 6.5, 8.5, 16 and they are film caps. A replacement would be fine even though film caps don't normally need to be replaced. Get some good sounding ones. Lots of choices.

There were other values used in the DQ-10 over the years. Here is results of some research I did showing the values for the 8 different caps I have found.

Caps in the 10s.jpg
 
Searching ak or the www for the DQ-10 will bring up days of reading enjoyment and pics of crossovers updated with different cap choices.
 
Thanks homebrew. If it can't leak, what's the gooey looking stuff in the picture? Did it melt?

What's the tolerances for the resistors in case I can't find exact matches. What about the capacitors? ex. Would a 6.8uF work to replace a 6.5?
 
It looks like as I was typing Blue was answering! Silly me for thinking the blue doesn't need replacing! Shows how much I still need to learn.
 
hlc, the OP has started a thread on his impending recap. No reason to duplicate efforts. I posted in that thread before seeing this one.
Dahlquist DQ-10 Capacitor replacement | Audiokarma Home Audio Stereo Discussion Forums

So I'll move this discussion along in a different direction.

Do you have the serial numbers for your 10s? Are they mirror-imaged with the top superstructure swapped side to side? Many have done this upgrade themselves.

up to about 21000 serial number the speakers were supplied with electrolytic caps except the two small ones for the tweeters. Mirror-imaging came along about 27000. Numbers go up to almost 50000.

What about stands? Did you get the 3" legs, the three-post stands or the monolith upright stands with the speakers?
 
Last edited:
I'm sorry for duplicating.

Sounds good.

Serials numbers are 47808 and 47809

If that capacitor (yellow) can't leak, what's the gooey looking stuff coming out of it? Did it melt?
 
Oh I didn't say it can't leak. It is just plastic (mylar, polyethylene, polypropylene and such) caps don't usually go bad over time the way electrolytic caps do.

I would do a recap on these speakers and at the very least replace the 80 and that 6.0 on both speakers. But since the DQ can be a keeper set you can go in once and do a nice recap and enjoy the results.
 
Thanks homebrew. If it can't leak, what's the gooey looking stuff in the picture? Did it melt?

What's the tolerances for the resistors in case I can't find exact matches. What about the capacitors? ex. Would a 6.8uF work to replace a 6.5?

The melted end is a sealant for the cap internals. I would definitely replace that cap. Mylar caps are susceptible to moisture and that melted end indicates that the seal may be compromised.

Those caps are polyester (PET) film caps (commonly known by the trademark Mylar). Those caps are inferior to polypropylene and other types of film caps. I am currently recapping a Genesis II speaker and I am replacing the PET caps installed by a previous owner with Audyn Q4 metallized polypropylene caps.

As for tolerances, I prefer to use exact values if possible. Sometimes I need to use two capacitors in parallel. I sometimes use different values if I can get within 2 to 3% of the original value. For resistors, I would always use the exact value. Resistors typically attenuate the signal, and changing the value will affect the driver balance. If you are changing out components to obtain better sound quality, why would you accept changing the values?
I found this link informative regarding decoding the DQ cap numbers: https://audiokarma.org/forums/index.php?threads/dq-10-cap-values.892697/#post-13257595
 
Back
Top Bottom