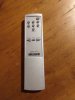
Update on the remote control saga.... just found this on the Bay and took a chance. It's actually a very nice and solid universal remote control. Machined out of solid aluminum and the buttons appear to be metal. You can get it in silver or black. So far, I have programmed it to replace the little remote that can with my Schiit Freya+ preamp. It has much better range than the little Schiit remote. I am going to see how many other devices I can incorporate into this one remote...
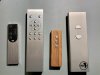
My current audio remotes: Schiit (left); new universal remote (2nd from left); Audiocubics Walnut remote (2nd from right) Rogue Audio remote (right)
Programming is pretty easy - I am going to copy the instructions here, since it did not come with the remote and I had to do a little googling around to find it:
Learning Remote Control
The new all-aluminum remote control with learning function. Good hand feel and strong texture. Powered by 2pcs AAA batteries, remote control distance is long and easy to replace.
Material: The buttons and shell are precision processed with aluminum alloy precision code numerical control equipment.
Buttons: 13 buttons.
Power supply: 2pcs AAA batteries. (default are not include this batteries)
Appearance: length 167mm x width 47mm x thickness 17mm.
Process: The surface of the shell is brushed, the silver characters are silk-screened black, and the black characters are silk-printed golden. (Different batches may have process color difference, subject to the actual product)
Remote control distance: unobstructed environment> 10 meters.
Learning method:

①. According to the figure above, switch the fixed code/learning code conversion jumper to the learning code mode (the factory default is the learning code mode). - IT IS SOLDERED IN THE LEARNING MODE
② installed with AAA batteries , and the master remote controller to be learned is prepared and the battery is installed. At the same time, it must be ensured that the master remote controller is in normal use and encoded in NEC format to successfully learn.
③. Long press the SET button, the LED will light up at this time and then turn to highlight, indicating that the remote control has entered the learning state.
④. Use the female remote control to compare the transmitter head of this aluminum remote control to about 2cm, and press the key to learn on the female remote control, wait for the LED of the aluminum remote control to flash, indicating that the data of the female remote control has been successfully received ; Then press the button on the aluminum remote control that needs to save the key value, wait until the LED stops flashing and keeps on, indicating that the remote control code of this button has been saved successfully.
⑤. Repeat the learning action of step ④ until you have learned all the keys that need to be learned. After pressing the SET button again, the LED light will go out and the learning state will be exited.
⑥. Test all the learned keys. If there is any one key are not successful learning, then re-learn this keys. It is not necessary to re-learn all the keys.
The learning keys is on the PCB back side. as following photo show. not the remote facade "Set" key.





.jpg)