• The move to the new server is done. There are some software and database maintenance updates in process. This has us passing the hat around to help out. We appreciate any donations. Seriously, even a dollar helps. The payment page may be found here - https://www.audiokarma.org/support.html

JBL L65A restoration

nasinn

New Member
Hi all,

This is my first post here on Audiokarma and I am looking forward to hearing your thoughts on this.

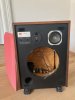
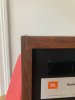
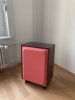
Late last year I acquired a set of L65As in goodish working condition, the cabinets were a bit rough around the edges so I did the following to get them living room worthy (from a looks perspective!):
  • Filled chipped corners with wood paste and cleaned up the veneer
  • The base particle board was a bit shot so tht needed a bit of sanding, filling & painting
  • The grilles were dirty and had holes so I replaced those with (crazy colored) acoustic fabric. I did that with velcro strips in case I get tired of the color. We ordered 50 colored samples so that could change in the future... In the process the grill frame broke, but it was relatively easy to epoxy butt-join the split as the metal frame holds it nicely together.
With that done I have been enjoying them for a few weeks but there are still some things bugging me, hopefully the attached images get through to give you a feeling for the project.

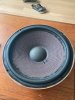
So that brings us to the current state and the to-dos. The previous single owner had done a pretty bodged woofer refoam (at least in my opinion, keen to hear your thoughts). It was done with a rubber piece and it has been glued on the outside of the cone in what seems to have been a hurry + there are no gaskets. The woofers work okay but this bugs me and I have been thinking about the following options:
  1. By an aftermarket refoam kit then try to cut off this rubber piece and make it look proper again - I fear damaging the cone getting off the rubber
  2. Buying an aftermarket recone kit and replacing the cone, maybe keeping the voice coil original, but I am really keen to hear your thoughts on this. I am looking at the 122a kits on Simply Speakers / The Speaker exchange.
Other than that I might also replace the rear connectors as one has some chipped plastic, but still works, so ideas what I could replace those with would be nice. Then a future project will be some slightly taller stands to get them a bit off the ground as the bass is a bit overwhelming the room they are in.

I would really appreciate your input,
Jonas
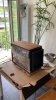
1 (1).jpeg 5.jpeg 4.jpeg 3.jpeg 2.jpeg 1.jpeg
 
Register to hide this ad
Welcom to the forum!

Yeah, they did a really "lovely" job to the Woofers! There might be the small chance of replacement foams, but I might guess too much damage was previously done, and would likely suggest as you surmised, complete new aftermarket Recone Kits from such like Simply Speakers.

I;d likely go this route myself. Might be wiser to replace all, Voice Coils-everything..

Of course Simply Speakers are in USA, but that's not a problem, just might cost additional shipping charges, and about a week or so to get. Then have the kits installed at your location by a competent tech familiar with JBL.

If that is the new grill covers, they look OK. Lots of choices as to colors and materials out there.

https://www.simplyspeakers.com/jbl-recone-kit-aftermarket-jbl-122a-RK-JBL122a.html
 
Last edited:
Welcome Jonas, and I agree with @markd51. Both he and I are or were L65A owners. It is my opinion that the L65A version is the most desirable, being the higher power handling 122A and the new baffle layout, but still with favored AlNiCo magnets. Of course the 077 tweeter is the big value in these, especially if original blue diaphragms are in good condition.

It will be difficult to save the woofers if you “re-foam” replacing the surrounds with new foam. The problem is removing all of the rubber, but none of the pulp. The rubber and adhesive don’t cut easily but the pulp does, at best you’ll be cutting the boundary layer of pulp cone away with the rubber and the embedded adhesive leaving a damaged cone with altered mechanical properties.

One option would be to source replacement used 122A drivers and re-foam those, then sell the ones you have as-is. Another is of course the re-cone direction. Simply Speakers would be my choice, there are also good re-cone sources here in the US who will provide the service better than most of us are able to. Also watch ebay, I’ve seen many many NOS JBL cone kits go through there, and sometimes at reasonable prices. This will likely take much patience and they might never show up. If they do another advantage is that JBL has already mounted the surround, spider, and coil/former to the cone on their factory jigs, it is much better and easier to achieve proper alignment.

If they are bass-heavy sitting on the floor as designed, you might first consider moving away from side-walls and even the back wall. They are however designed to fire toward a seated listener, if you are not seated then they will be too low and certainly could need more height and/or tilt. The tilt is complicated with the glass top open in the back however.

Also consider the crossover, most important is going to be the L-Pads. Even if all drivers are operating, dirty L-Pads will change the sound, be sure they’re working properly.

Last is the ugly truth that all speakers can be designed flat in an anechoic chamber, even in large rooms with floor-effect, but in a real room with corners and placement near a rear wall they can’t. Too many variables from home to home. The easy answer is to get a good parametric equalizer & mic, measure and adjust. A good quality DSP and mic will do wonders also, ... for around $200 USD.

Best of luck and enjoy.
 
Hi and thanks markd51 and SaturationPt,

Lovely job they did indeed! Thing is they sound pretty decent despite it, so if there is potential with some more work I'd be even more happy with them :)

They are indeed the 122A, so I guess I am lucky as I picked these up on a bit of an impulse when I was looking around for something like the 4410s my dad has back in Iceland, but these seem to a bit of a different beast compared to those.

As for the recommendations, I agree that it is pretty far fetched to get the original cones back to a presentable state, so that rules that out. Regarding the options you suggest SaturationPt on replacements on ebay and NOS JBL kits I think I lack the patient for that + the complications of being on the European continent with most the listings in the US. So I am glad that you both are positive on the Simply Speakers kits. Some years ago I had to replace both the cones of the 4410s at different times, the first time around JBL had stock of the original kits, then the second time they were all out of stock so I had to use something like the Simply Speakers kit (might even have been from them), so I embrace the challenge of reconing these, so I'll report back on how that all goes!

With regards to the L-Pads, reading a bit on it here is the recommended way to do it by getting deoxit somehow in to the pads from inside the cabin? Also on the crossovers is that something worth exploring in terms of replacing components?

In terms of the room mine is very far from being perfect so I'll live with some compromise, I had been looking at something like REW + one of the mics they recommend on their site to get a bit more objective in terms of placement with or without stands etc. but one thing at time. I will play a bit around with getting them a bit further away from the corners/walls, lets see how far I can creep them in to the living room before someone notices...

Thanks for the input
 
Hi, Yeah, there's a way to de-ox-it them without removal, but it is not an easy task.

You'll need a light, the aid of a small Mirror, and 3 hands. It's quite testy and requires patience and a plan.

Some may suggest Caig Faderlube, and not deoxit, seems to be the safer alternative for many Pots.

In the instance with the L-65A, what looks easiest to me, is removal of both Woofer, and 077 Tweeter to gain easier access to the 2 L-Pads. Insure you make note of wiring when disconnecting any drivers.

As you can imagine, the first part of any proper re-cone job will be removal of all old components piecemeal, and then the Frame Basket has to be fully cleaned. This can take some good amount of work to do properly-neatly, and with previous makeshift hack fixes, they might need more work than usual. That might equate to extra dollars spent perhaps, in labor.

I might guess today and here in USA, a tech with these Simply Speakers Kits in hand might say about $150US plus-minus per Driver (plus parts). Gluing on Dust Covers on Cones appears easy, but it is easy to do a buggered job and then look amateurish.

If thinking about changing the Push Pin Speaker Terminals on back, yes, I've heard of some doing this.
I know on the original L-65 Jubal, the pair are attached to the Crossover Board, so again such can be a bit work intensive, and there might be space limitations, at least for certain types of Binding Posts.

I am well aware that even cheap examples of halfway decent 5-way Binding Posts are light years ahead of what's stock. Such can give greater versatility to choice of speaker Cables.

As for crossovers, yes, again caps are no doubt due to be replaced if original. All depends upon how far you want to go, and your abilities, or another's?
 
Last edited:
Here's a vid to enjoy of the L-65A's thought you'd like to see.

My 4 Jubals are in this physical shape, but unrestored "cosmetically". And I did re-do the Foam Sheets underneath the Glass Tops on mine, had to, the foam was crumbling-flaking.

All original drivers, but internals were all upgraded. Had become a necessity after almost 40 years.

These stands are nice, one example, just to show you.

 
Ah yes I have seen these before, they cabinets on those look completely remade or mint condition. The foam sheet on mine are not in a great condition, but I will probably replace those at some point along with the glass tops as one of them has a small chip in the corner.

I will try contact cleaner then on the L-Pads as well, maybe I can use a foot to substitude the 3rd hand.

On the repair side of things maybe I am too confident in my own ability, so lets see how it all goes with the cones. For work I have had to solder some 0402 resistors and other crap for consumer electronics prototypes so the crossover looks a bit agricultural (probably why it still works after 40 years, which is the beauty of these things) and it should just be an exercise of finding the suitable replacement parts. So I will definitely look in to that if I don't screw up the woofers!

For the binding posts I think they are on flying leads off the crossover which sits at the bottom (sort of visible on one of the pics above), so should not be too difficult, but it is all working now so maybe it is a case of if it ain't too broke don't fix it.

Long list of things to do it seems, but that is why it is a hobby :)

Cheers
 
The A model had those crappy twist-lock terminals IIRC, don’t know why JBL did that on their speakers.
 
If I was in your place, I'd look for two 128H-1 woofers as replacements. They'll look the same but sound better. :dunno:
 
IMO you might as well have a go at releasing the dreadfull resurround job. Try a small bottle of Acetone , if that doesnt work try MEK which is dry cleaning fluid.
Using cotton buds gradually work your way round the cone / surround and see if it loosens. Should do with one of them. Give the solvents time to work on the adhesive.
With care the cone can be rescued. The solvent will not damage the pulp of the cone if you are gentle.
 
Good suggestion @Macaroonie

Here in the states these are available in a product called goof-off, also 3M Adhesive Remover. I don’t know what the environmental laws are there and availability (and these are both high VOC so might be reformulated in the EU).
 
One aspect of note with replacement surrounds I've seen for the JBL 12" drivers, is a variety of sizes they come in due to different size cones.

This might be tricky selecting the correct size.
 
Good suggestion @Macaroonie

Here in the states these are available in a product called goof-off, also 3M Adhesive Remover. I don’t know what the environmental laws are there and availability (and these are both high VOC so might be reformulated in the EU).

So is aviation fuel. The US govt seems content to use lots of that. Hmmmm

Nah you can get neat acetone easily and could prolly get MEK from a dry cleaner.
 
Hi all, yesterday I pulled the trigger on a set of Simply Speakers recone kits, so I think I'll give that a go, good hint on the 128H-1 but its just a pain to source these over here (I guess.

I came to the same conclusion as BMWCCA that even if I manage to do get the rubber surround off the cone in a "nice" way it will for sure leave a scar which will bug me since the surrounds are supposed to go on the back, but yeah maybe I try to remove the cone in a nice way in case I royally screw things up and have to go back to the old one.

Lets see if USPS can get it over here, I cheaped out and did not take UPS, 300$ was a bit steep, so the 100$ USPS seemed like a bargain. (:
 
Simply Speakers is pretty cool in that they do have a number of tutorial videos, and some may be of help to you if you attempt this by yourself. There's lots of vids on Youtube as well.

Does this kit come with both Glue for the Surround, and as well the correct glue to glue on the Dustcap? I'll take a peek. (I looked, no)

A competent experienced Speaker Repair Tech will have such Glues on hand.
 
Yeah I will take my time and study their instructions. I ordered the kits + a glue kit with the 4 different adhesives for the various interfaces, so hopefully all covered on that front if I manage to get the right ones on the right bits!
 
This is a very good video to watch and study intensely. It's not the 122A Bass Driver, but will be similar in many respects of the entire process and guidelines to follow.

And, it's from Simply Speakers.

One difference, the 122A Cone Replacement Kit will come with a Foam Surround, not Cloth. So no need of painting with a sealer, which is shown in the later re-assembly steps.

Yes, a Soldering Iron is required, if you have none they're not very expensive, make sure you have correct Solder on hand as well. The rest is basically all small hand tools.

Do keep in mind, this Video of course has been edited-shortened, there's the time needed for adhesives to correctly dry per each process of the re-build-etc.

A person such as myself, I might say such would take me some long hours, and might even split such a job into a two day process, Likely strip-clean-prep both Driver Baskets the first day, and do re-assembly the second. As they say, Rome, wasn't built in a day..........and neither was Syracuse!" LOL

 
Back
Top Bottom