• The move to the new server is done. There are some software and database maintenance updates in process. This has us passing the hat around to help out. We appreciate any donations. Seriously, even a dollar helps. The payment page may be found here - https://www.audiokarma.org/support.html

Received my Rotel RA-1312 today!!!!

richiem46

Retired and enjoying life and music!
Subscriber
I have posted in Bartertown looking for a Rotel RA-1312 several times. I am Happy to report I received one today along with a Rotel RT-1024 Tuner as a bonus!

The RA-1312 badly needs a cleaning but does work. I adjusted the bias and it plays well but lacks the "magic" that my Rotel 1412 has after being restored. I just put in a mouser order for capacitors that it will need, lots of "blue Blobs" and shoot-on-site transistors that need to go. It looks like it lived in a non-smoke-free home so lots of cleaning ahead of me. I will start on the cleaning while I wait for the parts to arrive.

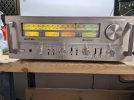
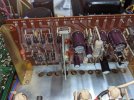
Here are a few pictures of the RA-1312 in it's current state. It looks to be all original but will know more in a few days once I start to dig deeper.....

I am very excited about restoring this unit. I will post some pictures of theRT-1024 tuner in a day or so.

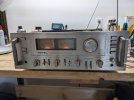
PXL_20240307_213942501.jpg

PXL_20240307_222231998.jpg

PXL_20240307_213948367.NIGHT.jpg

PXL_20240307_222202601.jpg
 
Register to hide this ad
Here is a picture of the RT-1024 Tuner. It is working but connectors and switched are in need of a serious cleaning. The dial lamps look uneven so will look to replace them when I open up the tuner.

PXL_20240309_201412085.jpg
 
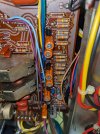
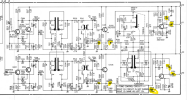
While I was putting together a cap list for the RA-1312 I saw six 10UF 25V electrolytic caps that are in the signal path. They are the orange caps shown in the picture below. I have some 10UF 25V Nichicon caps on hand so will use those to replace the orange caps pictured. My Mouser order will arrive on Tuesday and I will re-build the power supply board and replace the main filter caps. I will also replace the main rectifier diodes with modern high-speed equivalents, not strictly necessary but seems like a prudent thing to do.

The bulk of the small signal transistors are either 2SC1222's which I will replace with Onsemi KSC1845 transistors and 2SA750's which I will replace with Onsemi KSA992's as both transistor types have a reputation for becoming noisy over time. The output Transistors are NNEC 2SD3888's which I remove and test and if necessary replace with MJ21194G's which I used when I restored the RA-1412 and they worked well.

More to come as things proceed forward.

PXL_20240309_201456041.jpg


Screenshot Rotel RA-1312 tone amp.png

Schematic with 10UF 25V caps highlighted.


Orange colored caps are usually low leakage caps. Probably best to replace accordingly.
ditto for tantalums.

replace with films or Nichicon UKL altho, xraytonyb is no longer replacing orange low leakage caps with UKL.

he recently did a unit and replaced orange low leakage with UFG. i questioned him and he replied that the UFG will do the job fine.

just relaying info here, i'm sticking to UKL or film.
 
I plan on replacing all of the "Blue Blobs" with Wima film caps, most of which I have on hand.

Tonight I replaced all of the Electrolytic caps on the Power supply board as well as the relay. Things went relatively smoothly though removing the old relay was more difficult than I thought it would be due to the mounting tabs being bent over against the foil.

The amp plays well enough but it doesn't have the "magic" that it should have. As with the Ra-1412 I restored, I suspect that as I replace the old caps and the noise-prone 2SC1222's and 2SA750 transistors I will hear the "magic" return to the sound of the RA-1312 as well.

Here is a picture of the power supply board after I replaced the Capacitors and relay.

PXL_20240312_013106617.jpg


My mouser order arrives tomorrow so I should be all set to continue with the restoration. We have company coming tomorrow evening for a few days and well as a ST. Patricks Party on Friday so I will have a few distractions this week.
 
I have posted in Bartertown looking for a Rotel RA-1312 several times. I am Happy to report I received one today along with a Rotel RT-1024 Tuner as a bonus!

The RA-1312 badly needs a cleaning but does work. I adjusted the bias and it plays well but lacks the "magic" that my Rotel 1412 has after being restored. I just put in a mouser order for capacitors that it will need, lots of "blue Blobs" and shoot-on-site transistors that need to go. It looks like it lived in a non-smoke-free home so lots of cleaning ahead of me. I will start on the cleaning while I wait for the parts to arrive.

Here are a few pictures of the RA-1312 in it's current state. It looks to be all original but will know more in a few days once I start to dig deeper.....

I am very excited about restoring this unit. I will post some pictures of theRT-1024 tuner in a day or so.

View attachment 3140963
She’s a beauty. Love the toggle switches
View attachment 3140966

View attachment 3140964

View attachment 3140965
She’s a beauty. Love the toggle switches
 
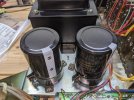
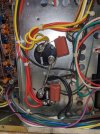
Yesterday I replaced all eight of the rectifiers on the power supply board with modern high-speed 3A 1000V equivalents. Not strictly necessary but thought it a good idea anyway. I also replaced the old 15,000 UF main filter capacitors with 22,000 UF modern replacements, I also replaced the bleeder resistors and installed bypass capacitors as many believe they improve the sound of the amp. There is a lot of lively discussion online on this subject.

After replacing the main filter caps I noticed a big improvement in the sound of the RA-1312, much better dynamics, definitely a much stronger sound. Before I replaced the caps you could see the LED work light over my bench flicker momentarily from the surge when I turned on the RA-1312. After the caps were replaced the work light no longer flickers even though the new caps were significantly larger. I do not have a cap tester but suspect the old caps had seen better days.

Here are a few pictures of the power supply after the upgrade:


PXL_20240315_144426346.jpg

PXL_20240315_144442938.jpg

PXL_20240315_145058960.jpg
 
Is it just me or do those filter cap terminals look scary close to chassis ground? I understand the neg. sides are tied to chassis but the other two? Man, that would freak me out. Those caps shift just a tiny bit in their brackets and sparks will fly. Otherwise, work looks great.
 
Is it just me or do those filter cap terminals look scary close to chassis ground? I understand the neg. sides are tied to chassis but the other two? Man, that would freak me out. Those caps shift just a tiny bit in their brackets and sparks will fly. Otherwise, work looks great.

That concerned me also, there is slightly more space on the Positive side and the brackets are tightened firmly, Should be ok.
 
It wouldn't be too big a deal to remove the caps/brackets and use a chassis hole punch to make that hole a lot bigger. Looks like there's plenty of room. Then you wouldn't have to worry about it. Just my unsolicited $.02 playing monday morning QB. haha
 
It wouldn't be too big a deal to remove the caps/brackets and use a chassis hole punch to make that hole a lot bigger. Looks like there's plenty of room. Then you wouldn't have to worry about it. Just my unsolicited $.02 playing monday morning QB. haha
i'd bag it and spend 60 seconds with a dremel if it was me.

he's doing a nice job to a nice unit. i wouldn't cut it that close personally.
 
Fortunately they are screw terminals so easy to undo electrically. I do not have a hole punch but will ponder other methods of widening a bit without a lot of vibration.
 
That tuner is a beast! Got one myself, along with a RA-1412 which is non-operational unfortunately.
I have a thread on the RA-1412 I restored. That amp is amazing, I use it to play vinyl at our Michigan house. 110WPC of effortless power. If you can, get it restored, you will not be disappointed.
 
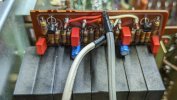
I had visitors here in Florida for the last 2 weeks so my work on the RA-1312 slowed down a bit. I upgraded the Volume control amd board replacing all of the transistors Electrolytic and coupling caps with modern replacements. The board was relatively easy to work on once I unscrewed the front panel and unbolted the volume control to tilt it to make access easier. A picture of the refurbished board is shown below:

PXL_20240325_002632198.NIGHT.jpg
 
There is some slight scratchiness in the detent volume control. It looks like a sealed unit so gaining access to clean it looks to be a bit tricky. I remember reading in a thread about someone dismantling one to clean it. I will have to do some more research on that before I attempt it.

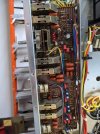
In the meantime I am in the process of refurbishing the Tone control board. Lots of caps and transistors to tend to and I am almost finished. Here is a picture of my progress to date on the board. Only a few more components to be replaced.

The RA-1312 is sounding better now, less muddy with an improved soundstage. The main amp board will be next which looks to be challenging in that physical access appears difficult. I am looking at various ways to access the board and also the output transistors on the heat sink. It will probably take some significant disassembly to access the components that need attention. There are several 2SA750 transistors that need to go along with some capacitors so it must be done.

PXL_20240325_002836253.jpg
 
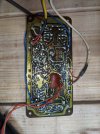
I decided to refurbish the phono board on the RA-1312 before doing the power amp boards. I had o really look to even find it but I did, tucked in behind the power amp and heatsinks. I had to undo the rear panel to get access to the phono board and then unscrew the four screws that held it to the rear panel. fortunately I only had to undo two wires to the power supply to get access to the board and the remaining signal wires had plenty of slack which made positioning the board on the bench pretty easy. The RA-1312 was not from a smoke-free home and I guess the convection currents drew smoke across the Phono board because it was a gooey MESS! I spent over an hour cleaning up the foil side with alcohol and Q-tips before I began working on the board. A before picture of the board is shown below:

PXL_20240325_233224929.jpg
 
Back
Top Bottom