

You are using an out of date browser. It may not display this or other websites correctly.
You should upgrade or use an alternative browser.
You should upgrade or use an alternative browser.
Reproduction Fisher Knobs
- Thread starter ncwalz
- Start date


It will be nice to have an option other than seeing people selling originals for crazy high prices on the auction site.I think it gets easier with some experience and practice. I can machine a length of brass pipe to the correct outer and inner diameter sufficient for about five rings. Then it's just two tool changes: first to bevel and second to part the ring from the pipe: about five or six minutes at present.
Next step is obtaining an Anycubic Photon Mono 4 3D printer of my own. My son has made the reproduction plastic prototypes with his printer up to this point.
Should be able to print a complete set of receiver knobs at one go, so they should all match exactly in colour.

Small Update:
I really would prefer to be able to fabricate all the parts that make up the Fisher knobs in my own garage in case the eBay supply of brass caps dries up. My son Matthew, has access to a large metal lathe which a friend is storing in Matthew's garage. He made a cap prototype out on some aluminum stock he had lying around:
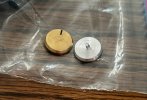
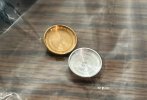
These look pretty good, but are difficult for me to replicate with my much smaller lathe and a beginner's skill level. We knocked this around a bit and noticed that if the topmost bevel of was removed from a plastic reproduction knob, a brass cap with a completely flat back would fit. There is a small outer ridge of plastic sitting proud of the knurled or ribbed part of the plastic knob that would keep the brass cap centered.
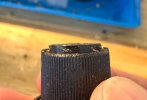
This is a damaged stock knob I keep on the bench for fitting my brass rings and caps. Most of the outer ridge has been broken off, but there is a bit left at the top right and top left edges of the knob.

Front
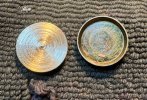
Back
The cap on the left is a brass knob I fabricated on my little lathe. This is by far and away much easier to produce with a flat back. The front still needs to be polished a bit, but it's presentable.
I'll crank out a bunch more, but I think this is the way to go. Won't be noticeable in any way from the front once glued on the modified plastic reproduction knob.
I really would prefer to be able to fabricate all the parts that make up the Fisher knobs in my own garage in case the eBay supply of brass caps dries up. My son Matthew, has access to a large metal lathe which a friend is storing in Matthew's garage. He made a cap prototype out on some aluminum stock he had lying around:
These look pretty good, but are difficult for me to replicate with my much smaller lathe and a beginner's skill level. We knocked this around a bit and noticed that if the topmost bevel of was removed from a plastic reproduction knob, a brass cap with a completely flat back would fit. There is a small outer ridge of plastic sitting proud of the knurled or ribbed part of the plastic knob that would keep the brass cap centered.
This is a damaged stock knob I keep on the bench for fitting my brass rings and caps. Most of the outer ridge has been broken off, but there is a bit left at the top right and top left edges of the knob.
Front
Back
The cap on the left is a brass knob I fabricated on my little lathe. This is by far and away much easier to produce with a flat back. The front still needs to be polished a bit, but it's presentable.
I'll crank out a bunch more, but I think this is the way to go. Won't be noticeable in any way from the front once glued on the modified plastic reproduction knob.
Last edited:

Another update:
I've been working on coming up with an efficient routine for fabricating the brass caps. Finally able to create a nice front cap face consistently.

Machined cap, ready for final parting.
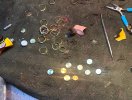
Some rings and caps ready for final finishing.
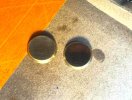
A couple of test caps with clear lacquer. Next time I'll remember to give them a turn on the buffing wheel before spraying on the lacquer.
I'm ordering the 3D printer this week. I've been putting it of until I came up with a reproducible method of fabricating the caps, but I think I'm there now.
I've been working on coming up with an efficient routine for fabricating the brass caps. Finally able to create a nice front cap face consistently.
Machined cap, ready for final parting.
Some rings and caps ready for final finishing.
A couple of test caps with clear lacquer. Next time I'll remember to give them a turn on the buffing wheel before spraying on the lacquer.
I'm ordering the 3D printer this week. I've been putting it of until I came up with a reproducible method of fabricating the caps, but I think I'm there now.


i didn't think the caps I made yesterday were the best they could be in appearance.
Here's eight I made this morning. I think all but the cap furthest in the right are usable. There's a bit of variation if you compare the beveled area on the lower two caps, but when I've made enough, I'll grade them like eggs so a set of knobs will have caps with the similar bevels. I've looked at some of the caps I have on my Fishers now, and can see a fair bit of variation.
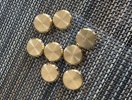
Here's eight I made this morning. I think all but the cap furthest in the right are usable. There's a bit of variation if you compare the beveled area on the lower two caps, but when I've made enough, I'll grade them like eggs so a set of knobs will have caps with the similar bevels. I've looked at some of the caps I have on my Fishers now, and can see a fair bit of variation.
Last edited:
Recently, I came across a 3D-printed option. I know it's far from perfect, but I guess it's better than nothing.
Yeah, I saw that a while back. I'd like to see a photo of the 3D-printed cap mounted on a Fisher knob. I'm thinking it's going to look a little "off" without the brass tone and reflection.Recently, I came across a 3D-printed option. I know it's far from perfect, but I guess it's better than nothing.
Just having a source for replacement knobs is huge, the brass trim is a bonus.Yeah, I saw that a while back. I'd like to see a photo of the 3D-printed cap mounted on a Fisher knob. I'm thinking it's going to look a little "off" without the brass tone and reflection.
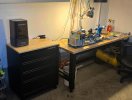
My 3D resin printer arrived. Found a place for it in the garage, because the UV printing operation emits a strong odour. I'll spend the next while learning about slicing software and UV exposure times. Getting the proper shade of brown for the knobs will be a learning curve I'm sure. To make it reproducible on a consistent basis will likely involve the use of pipettes. I'll post some pics of the process as I move forward for anyone interested.
Fisher Knobs 101:
I spent some time this evening pulling knobs off my receivers and refreshing my memory about the variety of knobs used. It seems that Fisher made a slight knob change when they moved from 500B/800B to 500C/800C and later to 400 production.
Example:
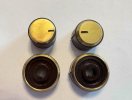
The two-piece knob set on the left is from a 500B while the set on the right is from a 500C. The later knobs have a rib in the side to presumably add more visual as well as tactile feedback about knob position. They eliminated the indentation and black paint on the rings.
All of these knob types are being modelled, but I'm thinking of simplifying things for myself by only printing only the later types with the rib. I don't really have a good method of indenting the brass ring to make an indicator since they are turned from brass pipe. Nor am I able to indent the black marks on the caps for a similar reason. In the past, many of the reproduction caps I purchased on eBay were plain so I would simply paint on the line before applying clear lacquer.
The later version of knobs work well on all the models, and in the past, I never hesitated substituting a 500C knob for a 500B knob if it was in better condition,
Last edited:

This is of huge benefit for the Fisher crowd! Much appreciated.Thanks for the kind words, dfunghi. I’m happy to contribute to the forum as a thanks to those who were happy to share their knowledge with me. Also would like to mention that my other son, a software developer, helped me with the modeling software.
3D Printing Update:
Took my first baby steps into the world of 3D printing today.

This is the software that comes with Anycubic 3D resin printers. I've added all the types of knobs that appear on 500B, 800B, 500C, 800C and 400 receivers. These are the knob models that accept the flat caps that I can make in my garage. The software allows importation of stl files which contain the knob shape information, allows knob placement on the build plate, as well as specification of the thickness of the slices and the length of UV light exposure for each layer. The stl files were created in AutoCAD by my eldest son.
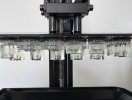
These are the knobs after printing and with uncured resin dripping off them. Total print time is an hour and twenty minutes. To start with, I'm printing the prototypes in clear resin. Matthew wants me to check knob fit on the shaft, as well as spring clip fit.
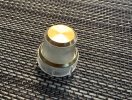
Here is a finished cured prototype with my reproduction brass cap and ring. I'll spend the weekend testing the fit on Fisher receivers. Hopefully if all goes well, I can start working on determining how much brown and black pigment is required per unit volume of clear resin to reproduce the brown Fisher knob colour. My pipettes for measuring pigment volume arrive hopefully on Monday.
Brass Cap Update:
My son corrected my thinking about the brass caps. He says it should be possible to create the indented pointer in the cap and he's grinding a punch for that purpose.
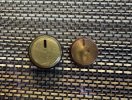
These are a couple of indented pointer versions in my collection. The one on the right is the most common version, I think, and the version I will try to reproduce, The pointer beginning in the edge of the bevel should be easier to reproduce consistently.
Took my first baby steps into the world of 3D printing today.
This is the software that comes with Anycubic 3D resin printers. I've added all the types of knobs that appear on 500B, 800B, 500C, 800C and 400 receivers. These are the knob models that accept the flat caps that I can make in my garage. The software allows importation of stl files which contain the knob shape information, allows knob placement on the build plate, as well as specification of the thickness of the slices and the length of UV light exposure for each layer. The stl files were created in AutoCAD by my eldest son.
These are the knobs after printing and with uncured resin dripping off them. Total print time is an hour and twenty minutes. To start with, I'm printing the prototypes in clear resin. Matthew wants me to check knob fit on the shaft, as well as spring clip fit.
Here is a finished cured prototype with my reproduction brass cap and ring. I'll spend the weekend testing the fit on Fisher receivers. Hopefully if all goes well, I can start working on determining how much brown and black pigment is required per unit volume of clear resin to reproduce the brown Fisher knob colour. My pipettes for measuring pigment volume arrive hopefully on Monday.
Brass Cap Update:
My son corrected my thinking about the brass caps. He says it should be possible to create the indented pointer in the cap and he's grinding a punch for that purpose.
These are a couple of indented pointer versions in my collection. The one on the right is the most common version, I think, and the version I will try to reproduce, The pointer beginning in the edge of the bevel should be easier to reproduce consistently.
Last edited:

That's a good thought, NIBW. My youngest son got me a copy of Solidworks, which my oldest son says is much easier to learn for modelling and creating stl files used by the 3D printer. I need a good project over the winter.Looks beautiful! And would be so nice to have something as accurate and available.
Maybe the plastic magic eye holder next?