• The move to the new server is done. There are some software and database maintenance updates in process. This has us passing the hat around to help out. We appreciate any donations. Seriously, even a dollar helps. The payment page may be found here - https://www.audiokarma.org/support.html

Reproduction Fisher Knobs

Knob Update:

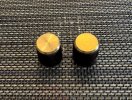
I'm still messing a bit with knob hole size and position, but making progress. Also working on coming up with the right recipe to reproduce the stock brown colour. The thing I need to remember is that although we want the knobs to look opaque, there needs to be enough translucency in the resin to allow the UV light of the printer to penetrate the resin to cure it. So it's a bit of a balance. It seems the best option is to start with clear resin and add brown pigment. I thought I'd need some black pigment top achieve the dark brown shade needed, but maybe not.
1.jpg

I've managed this after a day:

2.jpg

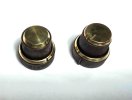
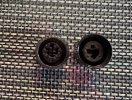
Hard to tell with this lighting, but in broad daylight, the repo's pretty close to the stock knob on right. The brass cap on the left is one of my garage creations.
3.jpg

If you look closely, you'll notice that the wall of the bottom of the reproduction is thicker than the wall of the stock knob on the right. Of all the Fisher receiver knob types, the lower skirt of this particular tuner/selector single knob has the thinest wall. This is an issue, because this skirt appeared too translucent in the first reproduction prototypes. Making the wall thicker from the inner side in the reproductions eliminates almost all of the translucency and still allows an outward stock appearance.

More to come in a few days.
 
Last edited:
It's good to see more out there but I would say these aren't so accurate. They look a bit too much like repros.
 
Small Update:

Been playing with the 3D printer all week. The brown colour of the Fisher knobs is a combination of mostly brown and a bit of red pigment and is reproducible between batches of resin. I had thought that I might have to print all required knobs for a particular receiver at the same time to ensure that all the knobs matched exactly in colour, but this isn't the case, which makes things much easier.

Trying to reproduce the indented pointer of the brass caps has been a challenge. My son ground me a punch, but I have discovered that it is difficult to obtain reproducible results with the punch. I know there are two basic types of brass pointers: those of the earlier 500B and 800B receivers and those of the later 500C, 800C and 400 receivers. RS Steve had a nice post about this about this a while back.

I've found that I can reproduce the early style of the caps and rings using a jeweller's saw and a diamond needle file, but not the later style with any method I have at hand:


IMG_3641.jpg

The left knob has the early style cap and ring indented pointers which are easily reproduced with the tools I mentioned and I'll use these on my early receivers. For the later receivers, I have enough of the caps like that on the right for my own use.

I'm able to print 3D knobs that my flat-backed caps fit on, as well as knobs that have the original top profile and fit the reproduction brass caps sold by the two main eBay sellers.

I'll post a pic or two hopefully next week with the finished reproduction knobs on a Fisher 500B or 800B.

Ultimately, (next April) I hope to make some sets of repo knobs for others that might want them with their choice of early or later knob style. To keep the folks at the IRS and US Customs and Border Protection happy, I'll have to sell these from Canada. As things stand now, there would be a 50 percent tariff applied for knobs shipped to the US (ouch!), but let's hope things are resolved soon.
 
These look really good. Appreciate your attention to the small details - makes all the difference.
 
My son tells me not to give up on making the new style caps yet. He told me about the use of an arbor press with a die that he can fabricate for me. I’ll look into this, but it may have to wait until I get back in April.
 
My son tells me not to give up on making the new style caps yet. He told me about the use of an arbor press with a die that he can fabricate for me. I’ll look into this, but it may have to wait until I get back in April.
this was my thought. a top die that creates the shape on the bottom die, and has the pointer on the die. make a holding jig for the brass disc and it’s reproducible. two top jigs means you can make them without the pointer, too.
 
My son is always teasing me about not knowing this kind of stuff. He says I only learned squishy science at school.
 
i picked up blacksmithing over the last decade and a couple of friends are machinists. but don’t knock the squishy science!
 
Knob Install:

Finished a complete set of early type repro knobs and installed them on an 800B that previously had a mix of early and late type, partly broken knobs. I coated the brass with clear lacquer.

IMG_3650.jpg


IMG_3651.jpg

IMG_3652.jpg

I'm pleased that all the bits could be made in the garage.

On a sour note, the UV unit on the 3D printer is acting up, so I'll need to troubleshoot.

I'm waiting for the arbor press to arrive to see about reproducing the later style brass caps.
 
Last edited:
Fabulous work, boon to the Fisher folks. There’s a dearth of reproduction parts at any price for those units.
 
Later Type Cap Update:

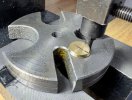
My son modified my arbor press and made a punch from a slot screw bit:

IMG_3672.jpg

IMG_3671.jpg

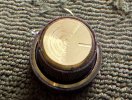
It works very well in producing good reproducible indented pointers as in the later type knob caps. Here's a cap with unpainted pointer fresh from the press placed on an old prototype knob:

IMG_3676.jpg

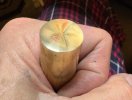
I've been thinking about how I can improve and consistently reproduce the face of the caps. When I examine stock and other repo caps, I see quite a variation in the finish of the front of the caps: Some show a lot of turning marks of the machined brass while others have almost a mirror finish. I wonder if those with the mirrored finished are reproduction caps from stamped sheets of brass. Not sure.

When I'm turning the brass rod in the lathe, I also see quite a variation in the finish as well depending on how much lathe chatter is present. I think the best way to achieve a consistent finish that is very shiny but still shows some turning marks is to apply grades of sandpaper to the face as it turns in the lathe. This should produce a finish much like that of the end of the brass rod below. The finish looks better in real life than it does in the pic.

IMG_3683.jpg

I'm hoping to show a 500c or 800c with these later knob style repros tomorrow or the day after.

Also happy to report that the 3D printer is back in operation.
 
Last edited:
Later Type Knob Install:

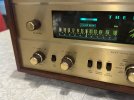
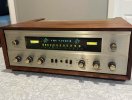
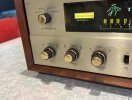
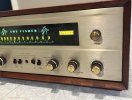
I finished a complete set of later type repro knobs and installed them on an 500C:

1.jpg

2.jpg

3.jpg

These have the faces of the caps finished with fine sandpaper while they are still on the lathe. I try to leave some of the turning marks on the caps but still obtain a more uniform cap appearance across a set of mounted knobs. I think this is definitely the way to go moving forward.

Just a tip for anyone who comes across this at some later date and is interested in reproducing the knobs and is new to 3D printing: I've learned that with the amount of brown pigment that needs to be added to the clear resin to reproduce the dark brown knob colour, it's very important to remove any remaining resin in the vat and thoroughly remix it before proceeding to the next print. Otherwise the pigment will settle to the bottom of the vat and prevent reliable knob attachment to the build plate.
 
Last edited:
Back
Top Bottom