• The move to the new server is done. There are some software and database maintenance updates in process. This has us passing the hat around to help out. We appreciate any donations. Seriously, even a dollar helps. The payment page may be found here - https://www.audiokarma.org/support.html

Russco Cue Master build

This was a productive day.
First, yesterday I received some brass 1/2 x 13 grub screws and Delrin rod. I mistakenly ordered 3/8 rod which is too thick to fit into the screw without going through or weakening the threads. I cut off about three inches, inserted it into my 1/2” drill and spun it on the bench sander. Quick work there to get it down to the size of the hole I bored into the screw. A drop of thick CA glue to secure it I cut it and sanded it to 1500 grit with the slightest dome.
IMG_4324.jpeg
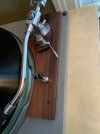
Next was to fashion an arm lift that would integrate with the arm rather than just look added on. Well…….It works.
IMG_4327.jpeg
I also used inserts and allen bolts to secure the turntable to the plinth. I don’t think the lead shot is necessary and I’m ready to just enjoy it. Did the new grub screw/pad help the noise level? Not sure about that, although my impression is that the sound is a bit more transparent and clear. Bolting it securely to the plinth may have something to do with that. I still have a bit of hum the moment the stylus hits the groove and no grounding arrangement seems to help. I wonder if new motor mounts would improve that. Still, it is a beautiful sounding turntable. Just bought a new DL-103 because this one has a solid year on it. Need to replenish my audio budget………
 
This was a productive day.
First, yesterday I received some brass 1/2 x 13 grub screws and Delrin rod. I mistakenly ordered 3/8 rod which is too thick to fit into the screw without going through or weakening the threads. I cut off about three inches, inserted it into my 1/2” drill and spun it on the bench sander. Quick work there to get it down to the size of the hole I bored into the screw. A drop of thick CA glue to secure it I cut it and sanded it to 1500 grit with the slightest dome.
View attachment 3147353
Next was to fashion an arm lift that would integrate with the arm rather than just look added on. Well…….It works.
View attachment 3147357
I also used inserts and allen bolts to secure the turntable to the plinth. I don’t think the lead shot is necessary and I’m ready to just enjoy it. Did the new grub screw/pad help the noise level? Not sure about that, although my impression is that the sound is a bit more transparent and clear. Bolting it securely to the plinth may have something to do with that. I still have a bit of hum the moment the stylus hits the groove and no grounding arrangement seems to help. I wonder if new motor mounts would improve that. Still, it is a beautiful sounding turntable. Just bought a new DL-103 because this one has a solid year on it. Need to replenish my audio budget………
Outstanding work :thumbsup:
 
After cleaning the main bearing and changing the grub screw the Wow measurement improved, although I’m not sure how accurate these phone apps are. I used 5W20 synthetic Mobil 1. Tell me I screwed up and should use something else. I thought going with a heavier oil than what was I there might drop the speed but I can’t hear 2%. IMG_4328.png
 
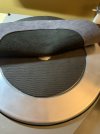
The platter design is pure utilitarian. A DJ could have had a 45 on the platter and put a 12” over it and when that was done playing, removed it, made a quick comment or possibly run a short commercial and had the 45 ready to go. Might be wrong, but why else have the 45 adapter built in like this? A problem arose when I removed the felt because that put the center of an LP slightly higher than the outside edge.
Well, I fixed that and got the vinyl further from the metal platter which may lower the noise floor somewhat. IMG_4329.jpegIMG_4330.jpeg
 
Your minimum speed is too high, this is where the idler pressure screw comes into play, slight adjustment should bring the speed down and negate idler vibration….you’re still running the original idler?

Andy
 
Your minimum speed is too high, this is where the idler pressure screw comes into play, slight adjustment should bring the speed down and negate idler vibration….you’re still running the original idler?

Andy
I have adjusted that stop by backing it out just enough to engage and spin the platter with sufficient torque to overcome some resistance from a finger against the edge. It’s probably no more than a half turn beyond getting the platter spinning. I read that somewhere on the Russco web archives but can’t find it now.
The capstan is clean and seems to be centered on the motor shaft with no detectable problem there.
The original wheel is soft and I can find no defects.
Yes, getting the speed closer to 33.3 would be nice but I’m still a babe in the Russco world so all guidance is welcome.
 
I did have the other one running close to 33.3 for a few minutes before it stopped. I could possibly change capstans and/or platters to see if that helps. Same wheel on both.
 
I believe I initially put hydraulic pump oil in the well and that might cause it to run slower than 20W synthetic.
 
On the other hand, assuming a side averages 22 minutes, running 2% fast will finish a side in 21 minutes and 33 seconds. That will allow me to listen to more music and have a bit more excitement in it. Perspective………
 
The pressure screw adjustment requires a light touch, it should be done on a warmed up table…..put Blue Loctite on mine to secure the screws better, but Teflon tape would also work.

If you can’t adjust to 33.33 and maybe even a bit lower then something’s amiss.
 
BTW experimenting with different oil velocity is fine, I’ve even mixed my own concoction for some tables, but I’d do it after it’s working to spec….
 
One more thought—let’s say you turn the adjustment screw out 1/16 of a turn with no immediate results, let it run a few minutes before doing any more adjustments….
 
The oil I was thinking about is Robinair Vacuum Pump oil. I poured out a little and it seems to be about 30W. The description on their website doesn’t disclose too much but it is clear, paraffin based and non detergent. I will go through the adjustments the best I can but will switch the oil to see. One thing I’m not terribly sure of is the relationship between fore and aft motor position in the slots and the screw stops on the front. The motor position is about 1/8”-3/16” back from full front and the screws are about flush with the front of the threads, just back from the plate. I know there is some instruction on the Russco site about adjusting speed and stating that the screw adjustments have little effect, but I can’t find it. So much information has passed my brain that I can’t remember it all.
 
Several days ago, I got sloppy with the oil and got some on the idler and inside of the platter. Time to go to the kitchen sink and wash everything in warm soapy water. After that, I noticed some gunk on the inside of the platter so I went at it with a scotchbrite pad, not taking much off but apparently leaving some aluminum for the rubber wheel to pickup. The wheel had some grey aluminum on the edge so I cleaned it well. After doing my best to adjust things it is still running slightly below 34rpm, but the w/f number is consistently about .1% which I would think is good for one of these. Going to run with this and buy a delrin wheel down the road. I’ve indulged a bit and would like to be a bit better with my audio finances.

The well is now filled with straight 30w and it will probably stay in there.
 
The motor is going to spin at whatever rpm the frequency supports….That’s why ROK refers to the same type adjustment as “fine speed control” we’re talking 1/10s and probably no more than 1 rpm, depending on the actual idler.
 
In the Russco link I posted in #54 it discussed the speed issue and that old, hard wheels can cause faster speed.
 
In the Russco link I posted in #54 it discussed the speed issue and that old, hard wheels can cause faster speed.
If the idler is too hard, it could explain why you can’t get a proper adjustment….it might get a bit better with use.
 
@Roger Gorke and I have been messaging back and forth about the issue of hum with the stylus in the groove, motor on but platter not spinning. In my case, I believe it is almost entirely caused by motor vibrations traveling both through the main bearing and tonearm mount. I have the delrin in the spindle bearing and don’t know what else can be done about the tonearm as it is vastly better than mounting the arm directly to the aluminum plinth. At his suggestions, I experimented with rubber grommets, washers and bushings. At this point, I am happy with the results both in mechanical hum getting through and the mechanical vibration heard from the motor itself. The only change from the pictures is I added an original washer above the rubber but below the aluminum base subchassis. It was important to make the bolts fairly tight but the arrangement has more flex than the original aluminum bushings. These are standard hardware store items. In the pic with everything on the bolt, the
motor goes to the left.
IMG_4341.jpeg
IMG_4340.jpeg
 
I have made some progress with lowering the noise floor to the degree it is barely audible at any reasonable listening volume.
First, I installed new mounts from KJQ. They are the two screw style and all three are the front style with a rating of 2# for 1/16” of movement. I have some of the ROK mounts coming as well and I may fashion one of those for the rear but they may not get used. Honestly, the original mounts look pretty good. It will be interesting to see if the new silicone mounts come online.
In the process of changing the mounts I worked on the grounding arrangement. The motor is securely grounded to the top plate, which is grounded to the SUT. For some reason I had that going to the phono stage which made no sense. The tonearm is grounded to the SUT as well, and the SUT is grounded to the phono stage. I moved the SUT to a separate shelf and carefully dressed the cables. Idler rumble is inaudible so the hum with the stylus in the groove was the only problem and while it’s still there it’s just barely there and lower than say, the refrigerator in the other room. Not a factor.

One thing I did in the effort of dampening the platter with the assumption that it was transferring motor vibration was to fill the low area with liquid Flex Seal. It took 48hrs to set up but I believe it helped. I’m using a Jake’s Deerhide mat with an extra layer of thin leather underneath to account for the approximately 1mm higher 45 adapter at the spindle.

Time to play side 2 of some Wes Montgomery.
 
Back
Top Bottom