• The move to the new server is done. There are some software and database maintenance updates in process. This has us passing the hat around to help out. We appreciate any donations. Seriously, even a dollar helps. The payment page may be found here - https://www.audiokarma.org/support.html

Sansui 8080 Service Mod - Need Guidance

cecilk

Active Member
I am in the middle of a Sansui 8080 restoration - boards are all done.

Now I'm going to perform the service modification as detailed in SSI-0004E Service Bulletin, which can be found on HiFiEngine. Got all the needed parts and I've read through the instructions a few times. Just had a few questions on some of the steps before starting:
  • In Step 3, it instructs that "The earth contact on PCB F-2546 can be ameliorated by soldering a piece of mesh-lead or any piece of thick, well-conducting wire from point 03 or 06 to the adjacent earth lug". This seems pretty straightforward - just solder a thick wire between those points to achieve a better connection to ground?

  • In Step 4, it instructs to "Check on PCB F-2436 if the two points of coils L01, 02 are connected by a jumper. If so, please remove the jumper." What if there is no jumper present? On my board L01 and L02 are also not present. The unit worked fine without them - looks like that's they way it came from factory. Should I just not worry about this step?

  • In Step 5, it instructs "On the original prints F-2546 there is a jumper between points 38 and 36, and between points 37 and 35. Those jumpers have to be removed." I don't see jumpers but these pins do appear to be connected and soldered together somehow. So just remove solder and then resolder individual pins without creating a connection between these points?
For additional visual reference, I created a Google Slides document detailing each step required with photos from the board.

Before starting this - just wanted some guidance so I know I'm on the right path. Thanks in advance!
 
Register to hide this ad
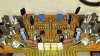
I'll let others chime in with the protection and PS board. Here's a good res. pic of a modified driver amp. The other cement resistor is on the back. There's no coils and no jumpers for coils. No R55/56 either.

oDcKT4F.jpg


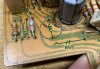
Here's another one, where you can actually see what's going on under the fuse:

4iSbULa.jpg


...and another one to show you what the factory did with the (now vacant) L2 real estate:

CZiskTh.jpg
 
Register to hide this ad
Here's another one, where you can actually see what's going on under the fuse:

These photos are very helpful - thanks!

That transparent cover seems rather essential to prevent contact with other components. I have heat shrink - any suggestions as to where to find that type of transparent cover material? Is that just a form of heat shrink? Or something thicker?
 
Register to hide this ad
I am in the middle of a Sansui 8080 restoration - boards are all done.

Now I'm going to perform the service modification as detailed in SSI-0004E Service Bulletin, which can be found on HiFiEngine. Got all the needed parts and I've read through the instructions a few times. Just had a few questions on some of the steps before starting:
  • In Step 3, it instructs that "The earth contact on PCB F-2546 can be ameliorated by soldering a piece of mesh-lead or any piece of thick, well-conducting wire from point 03 or 06 to the adjacent earth lug". This seems pretty straightforward - just solder a thick wire between those points to achieve a better connection to ground?

  • In Step 4, it instructs to "Check on PCB F-2436 if the two points of coils L01, 02 are connected by a jumper. If so, please remove the jumper." What if there is no jumper present? On my board L01 and L02 are also not present. The unit worked fine without them - looks like that's they way it came from factory. Should I just not worry about this step?

  • In Step 5, it instructs "On the original prints F-2546 there is a jumper between points 38 and 36, and between points 37 and 35. Those jumpers have to be removed." I don't see jumpers but these pins do appear to be connected and soldered together somehow. So just remove solder and then resolder individual pins without creating a connection between these points?
For additional visual reference, I created a Google Slides document detailing each step required with photos from the board.

Before starting this - just wanted some guidance so I know I'm on the right path. Thanks in advance!
Step 3 Yes, just add a ground wire.
Step 4 Concentrate on the word "if"... If the two.... "if" not, ignore the step. :D
Step 5 Suck the solder bridge off (the "jumper" is solder) and resolder without bridging the 2 pins.
 
These photos are very helpful - thanks!

That transparent cover seems rather essential to prevent contact with other components. I have heat shrink - any suggestions as to where to find that type of transparent cover material? Is that just a form of heat shrink? Or something thicker?
That's just vinyl tubing, nothing special. The left fuse could short against one of the SS-5 bridge diodes, and the right fuse could short against the regulator heat sink, both on the main board when the driver board is inserted. To avoid any of that, mount the pigtail fuse right down on the board and it won't stick out enough to touch anything, and you won't need insulating tubing.
Driver board shorter fuses.jpg
 
Ok - I see why I was confused - on my board R43 is in a slightly different location on the board (while being in an equivalent place in the circuit).

I need to move the top pin of the resistor R43 to the left (hitherto unused) pin of where R55 is marked to go. Then put the fuse across the unused right pin of R55 and the now available top pin of R43.

Yes?

IMG_2065.JPG

Mine also has jumper across R49 instead of a resistor. That's how it was when I opened it up - leave it?
 
I need to move the top pin of the resistor R43 to the left (hitherto unused) pin of where R55 is marked to go. Then put the fuse across the unused right pin of R55 and the now available top pin of R43.
yes. This is only done so that R43 and the fuse lead don't need to both pass through the same hole. The right side of R55 and the top of R43 is literally the same location on the schematics.
Mine also has jumper across R49 instead of a resistor. That's how it was when I opened it up - leave it?
Is this what came with the 8080? With the 8080/9090 SM compliant units R49/R50 needs to be a 4.7Ω metal film ('fusible') and so does R47/R48, where I see another jumper in your pic.
 
Ok - I see why I was confused - on my board R43 is in a slightly different location on the board (while being in an equivalent place in the circuit).

I need to move the top pin of the resistor R43 to the left (hitherto unused) pin of where R55 is marked to go. Then put the fuse across the unused right pin of R55 and the now available top pin of R43.

Yes?

View attachment 2181078

Mine also has jumper across R49 instead of a resistor. That's how it was when I opened it up - leave it?
There are 2 versions of this board. One will have the -1 and the trace layout is a little different. I don't know about that jumper you have across R49. However you can change the position (the bulletin mentions depending on the position) of R43 (and it's brother) to make a pigtail fuse fit like in the photo I put up. My photo is of the F-2436-1 not the earlier F-2436. The board in the Service Manual is the earlier non -1 board too. The service bulletin mentions the F-2436-1 board. Sansui was always a bit confusing.. I personally only have the earlier F-2436 in my QRX-6001 and 7001 and they are not subject to this mod update so I never looked into it when used in the 8080/9090. In light of that, perhaps someone else should chime in about that jumper.
 
yes. This is only done so that R43 and the fuse lead don't need to both pass through the same hole. The right side of R55 and the top of R43 is literally the same location on the schematics.
Is this what came with the 8080? With the 8080/9090 SM compliant units R49/R50 needs to be a 4.7Ω metal film ('fusible') and so does R47/R48, where I see another jumper in your pic.
I was thinking that too about the 4.7 Ohm fusible instead of the jumpers. There must be another service bulletin somewhere covering the change. Or someone used the F-2436 from a QRX-6001/7001 which has the jumper instead of fusible resistor. :dunno:
 
^ there's also the older F-2436 of the 881 where the 'fusibles' are not actually fusibles, the differentials are 2SC1222, the diodes are different and some resistors (say R21/R22 for example) have notably different values than the later F-2436-1 tun. These can be easily converted to the later run (1976 service mod included), but require meticulous comparison of the existing values vs. the 8080/9090 service manual.
 
^ there's also the older F-2436 of the 881 where the 'fusibles' are not actually fusibles, the differentials are 2SC1222, the diodes are different and some resistors (say R21/R22 for example) have notably different values than the later F-2436-1 tun. These can be easily converted to the later run (1976 service mod included), but require meticulous comparison of the existing values vs. the 8080/9090 service manual.
Ahh yes, I forgot about the 881 using this board too. :thumbsup: That is why you see silkscreening for what appears to be "missing" components. The board was configured differently in different models.
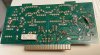
 
There are 2 versions of this board. One will have the -1 and the trace layout is a little different.

Mine is marked F-2436-1

It has NO components in the following empty positions:
R51, R52, R55, R56, R57, R58, L01, L02

It has metal jumpers instead of components in the following positions:
R47, R48, R49, R50, D07, D08

Boards looked original and did not have any signs that it had been modified or had any components changed.

R21/22 are both 1.8k as service manual lists. Any other resistors to check that might have different values?

I did purchase 4.7 ohm fusible resistors for the restoration based on the service manual parts list before I realized that they were not present. So I could put these in. But my inclination is to keep things "as is" unless there is a convincing reason to change.
 
Last edited:
It's getting hard to keep track of all those changes. Can you post a clear pic of the entire thing? Any resistors on the back?
 
OK that's great. Thanks! It's looking like a later run F-2436 but before implementation of the 1976 service mod.

These are the values of components on the F-2436-1 for the 8080/9090 that differ from the older 881 boards. You may want to verify all of them:

D05/06 VD1212 (two 1N4148 in series)
D07/D08 jumper'd
R51/52/55/56/57/58 vacant
L01/L02 coils vacant

C03/04 100pF/50V ceramic
C05/06 15pF/50V ceramic
C11/12 100μF/80V electrolytic
C15/16 0.1μF/50V mylar
C17/18 100pF/50V ceramic

R07/08 68KΩ
R13/14 22Ω
R15/16 3.3KΩ 22Ω
R21/22 1.8KΩ
R23/24 270KΩ
R29/30 metal film 'fusibles' 390Ω
R33/34 3.3KΩ
R39/40 metal film 'fusibles' 10Ω
R43/44 metal film 'fusibles' 22Ω
R47/48/49/50 metal film 'fusibles' 4.7Ω
R901/902 (back) 18KΩ

T01...TR04 2SC1708 => KSC1845
TR05/06 2SA818 or 2SA818 => KSA1381 (note pinout)
TR09/10 2SC1628 or 2SC1720 => KSC3503 (note pinout)
 
Last edited:
The only differences I am seeing from your list on my board are that:

R15/16 are both 22Ω on my board
R47/48/49/50 are jumpers on my board

Also -
I replaced TR05/06 (2SA818) with KSA1220AY
I replaced TR09/10 () with KSA2690AY
 
The only differences I am seeing from your list on my board are that:

R15/16 are both 22Ω on my board
R47/48/49/50 are jumpers on my board

Also -
I replaced TR05/06 (2SA818) with KSA1220AY
I replaced TR09/10 () with KSA2690AY
The 1220/2690 will be fine. That's what I used there too. I would say to just add the fuses, rearrange the two resistors to allow for the fuses, follow Tom's advice on the jumpers/resistors, and call it a day. You can always go back in later if anything arises. But as long as you "Crank Responsibly", there shouldn't be any issues. The service bulletins and mods came out because of people having failures while cranked up :rockon: too much for too long.
 
Back
Top Bottom