• The move to the new server is done. There are some software and database maintenance updates in process. This has us passing the hat around to help out. We appreciate any donations. Seriously, even a dollar helps. The payment page may be found here - https://www.audiokarma.org/support.html

Sansui F-2624 New Build From Affinity for Artifacts Question(s)

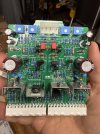
Hello! I’ve just nearly finished building this board and it’s beautiful. Very grateful to Ben for providing the BOM along with the blank PCB on eBay. I unfortunately have made somewhat of a rookie mistake in attaching the bottom connectors as they are misaligned with my 7070 male pins and won’t plug in.

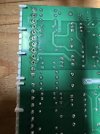
I’m not as confident desoldering as I am soldering and don’t want to damage the board after all the time I’ve put into this. I’ve started some desolder work on one of the connectors but it won’t budge yet. Have some wick on the way for tomorrow. I’m also ok with cutting the connector apart and removing each pin one by one if that’s the approach with the least risk of damage. Would much rather spend another 10 bucks on new connectors than damage the board.

Any tips? What’s my best path forward? Photo of the board and in progress desolder work attached. Thank you.
 

Attachments

  • IMG_0613.jpeg
    IMG_0613.jpeg
    153.2 KB · Views: 49
  • IMG_0616.jpeg
    IMG_0616.jpeg
    103.2 KB · Views: 45
Register to hide this ad
I don't see any misalignment. The newer Molex sockets I have found to be a very much tighter fit on the old pins. Could it be that you are experiencing that and not misalignment? They do take some pressing into place whilst supporting the pcb into which it is being plugged. Try tilting the board in such a way that you are entering fewer pins at one time ie start at one end and rock it into place sequentially.
 
I don't see any misalignment. The newer Molex sockets I have found to be a very much tighter fit on the old pins. Could it be that you are experiencing that and not misalignment? They do take some pressing into place whilst supporting the pcb into which it is being plugged. Try tilting the board in such a way that you are entering fewer pins at one time ie start at one end and rock it into place sequentially.
Thanks @DougBrewster I have the Molex soldered into the correct holes of the new PCB, so no misalignment there. But I feel like plugging it in is borderline going to break something.

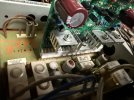
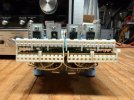
Here are some more photos. I can get it onto the pins a little ways before it feels like uncomfortable forcing. Comparing it to the old board shows that the connectors on the old board are spaced apart 1 to 2 mm more.
 

Attachments

  • IMG_0617.jpeg
    IMG_0617.jpeg
    122.9 KB · Views: 45
  • IMG_0619.jpeg
    IMG_0619.jpeg
    125 KB · Views: 45
  • IMG_0620.jpeg
    IMG_0620.jpeg
    127 KB · Views: 45
But I feel like plugging it in is borderline going to break something.
Yes, it does feel like that and it's important to support the pcb holding the male/pins section. They do ease somewhat after a few insertions and removals. That said it does appear in your middle pic that some misalignment is present unless it's camera angle. I've seen a couple of comments here about how tight the new sockets are but never heard of anyone breaking anything.
 
Tried again this morning with the bottom cover removed so I could support the PCB the male pins are connected to. I think I’m going to have to desolder/remove at least one of the Molex connectors and adjust it to match the male pins better. It’s just not going to slide all the way on it seems.

Planning to test fit it once it’s removed before soldering it back to the PCB.

Anyway, back to my original question, any suggestions for desoldering the Molex without destroying the board?
 
Thanks @Warren-Oates, good to know the new boards are resilient enough to take some abuse. I’m probably being over cautious because I lifted a pad a few years ago on an old board. I’ll take it slow and steady with wick and pump.
 
I’ll take it slow and steady with wick and pump
That's the idea, :thumbsup: depending on the hole clearances on the board, the socket should almost 'drop out' once you have removed the solder. (tip: use extra flux to promote heat transfer and cleaning of soldering iron tip and work).
 
Also, I have found that taking a small jeweler's screwdriver and carefully flexing the contacts in the molex connector helps with the first couple of installs. Very important to support the power supply board while installing the card. You might take a look at all those solder points where the power supply board pins attach checking for cold solder joints (usually a visible ring around the solder point). The molex install look fine, no need imo to remove them.
 
Also, I have found that taking a small jeweler's screwdriver and carefully flexing the contacts in the molex connector helps with the first couple of installs. Very important to support the power supply board while installing the card. You might take a look at all those solder points where the power supply board pins attach checking for cold solder joints (usually a visible ring around the solder point). The molex install look fine, no need imo to remove them.
Thanks I actually got one of the Molex removed last night. If it ends up it was unnecessary I’ll chalk it up to experience. I will be desoldering the main filter caps at some point too and feel a bit more confident now.

Doing a dry run test fit with the connector removed, there’s still very little wiggle room to shift that connector to the right and widen the gap between the 2 Molex. I’ll give the jeweler screwdriver tip a shot!

Is it ever necessary to file down the pins on the Molex so they have more wiggle room in the pinholes? Or I swear I saw something here on AK about drilling out the female holesa little on each connector. The male pins are all bending toward the center of the new board quite a bit causing a lot of tension. If that’s normal I’ll re-solder the Molex and give the install another go.
 
Update, I got it to install successfully! The jewelers screwdriver trick helped a lot @Overundr1 The connector I removed melted a bit, ordered a new one. Once that arrives I’ll solder it back in and should be in business. I don’t see any cold solder joints on the power supply. A couple of them look to be bridged but I’m assuming that’s intentional from the factory.
 
Ok, I’ve made progress. I got the new Molex connector today and soldered it back onto the board. Installed the board and plugged the unit into DBT and it passed the test, all good and I was feeling excited so I set the DC offset and bias. Hooked up my speakers and I’m getting a decent hum that’s not there with the old board installed.

With the original board installed aux, phono, and tuner all have very quiet output, almost inaudible. This issue has been present for some time and I’ve been running audio through the tape inputs with a DAC and external phono preamp. I was halfway hoping the new F2624 would resolve these issues.

With the new board, aux has some output but it’s scratchy. Tuner is still very quiet. Tape inputs are a little better than aux but not much. I’m wondering if it’s time to take it to the shop, unless anyone here can point me in the right direction. Feeling discouraged.
 
Double checked and dialed in offset and bias a bit more. New board is now working as it should on tape 1. Aux, phono, and tuner all do not work, which matches behavior with the original board installed. This is a separate issue I’m choosing not to focus on for now. :)

Hum with the new board installed gets a little better with top and bottom shielding back in place, but there’s still some hum present. I’m going to check for ground continuity and reflow some connector joints to see if that will resolve.
 
At the risk of killing any pride I have left, I’m posting this in case it helps someone else. Turns out testing on a shoddy electrical outlet on an extension cord in the basement of a 100 year old house is not ideal for keeping things grounded. Moved the unit upstairs on power conditioner and hum is gone, new board works perfectly. Now time to tackle the other issues. Thanks for the help on eBay @EastPoint
 
Huge improvement! Treble smoother and isn’t as harsh. Tighter sound with a bigger soundstage. Very pleased. Thanks to all who put time into the new board design, pretty cool that this thing even exists. ♥️
 
Back
Top Bottom