• The move to the new server is done. There are some software and database maintenance updates in process. This has us passing the hat around to help out. We appreciate any donations. Seriously, even a dollar helps. The payment page may be found here - https://www.audiokarma.org/support.html

SME 3009 Series 2 cueing dashpot cleaning?

Ok, I'm back with a very belated update - well, not as much of an update as another failed attempt and some new questions.

Finally got around to trying to remove the dashpot cover again - unfortunately, it is on there very tight! Someone may have glued or sealed it at some point - no amount of applied heat, or force with rocking the jacket back and forth made it even budge. Anything more aggressive than I tried will definitely result in damage of a near-mint cover/the arm, so I backed off for now.

As some additional evidence it may have been messed with at some point, the arm's descent starts fast, slows down to a very nice and smooth, slow speed, then makes one faster drop at the end of the descent - as if there are air bubbles trapped in the system.

Some reading around suggests that people seem to have an easier time with removing the dashpot cover on the Improved versions of these arms, often with little resistance. I've also read that SME made a tool for removing the covers without damage.

What are the chances of finding one those tools? I know I will damage something taking any more aggressive measures, so for me it's probably a case of find the tool, swap for a later dashpot assembly, or damage parts to get the job done...
 
^ what does constant pumping have to do with it, if you can't take the dashpot cover off? Pumping is the action you take after you fill the dashpot piston space with silicone oil to bleed the air out. It cannot be performed if you haven't even exposed that space yet. How is it remotely related to manually operating the tonearm?
 
Last edited:
I can take the dashpot off, was talking about the same movement even when it's been cleaned and filled- it moves slowly 9/10ths of the way down and just drops the last 1/10th. I have pumped it with the screw out and it seems to have bled out to me but obviously not, don't know what i'm missing.

. Manually- sorry, i meant more of a manually moving the lifting arm down to prevent it from banging my needle on the record.
 
Hi everyone. Thanks to all for the infos and usefull detailed pics.
Have a 3012 with diamond shape dashpot and "magician hat" yoke. It's lowering pretty slowly so seems fine on this side. The problem is that when lifted up (cue lever up) it won't stay locked up...instead as soon as i release the cue lever in the up position, it starts to go all the way back down...albeit slowly as it should...
Do you have an idea what can be wrong with it? Thanks for your help!
 
Last edited:
Thanks. Don't think so unfortunatly. I cleaned it touroughly here and sprayed tlc. Can't see any goo here. Seems smooth as it should. Can't figure out what the problem is
 
Thanks. Don't think so unfortunatly. I cleaned it touroughly here and sprayed tlc. Can't see any goo here. Seems smooth as it should. Can't figure out what the problem is
I'm not 100% sure but the shaft may be a separate piece that fits into the cone shaped piece where the lever is screwed into. If it is a separate piece, double check that it fits quite tight and doesn't rotate when fully inserted in the hole. Also make sure when the queuing lever is up, the flat part is pointing down and is parallel to the floor. If it's not parallel and is angled in any way, the round part of the shaft opposite the flat part is not sitting at the maximum point of the semi-circle (part of the shaft).
c020.gif


Needless to say .....

IMG_4179.jpeg

IMG_4182.jpeg

IMG_4178.jpeg


Hope my pathetic explanation proves helpful and sheds some light. In the end, you can probably find a replacement of this complete piece on the net, if so desired.

Cheers.
 
Thank you very much @tnsilver for the very useful post!

I can't remove the upper top of the mechanism, is it fixed somehow?
Thank you
 

Attachments

  • capture.PNG
    capture.PNG
    70.9 KB · Views: 25
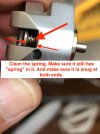
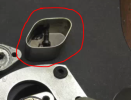
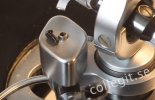
^ if that's the dashpot cover you've got, as opposed to the round ones found on early SME's, it should pop out. Remove the cue bar first, then, try to apply some reasonable heat (hair drier) on the dashpot cover, grab it, and pull up gently while jiggling.
 
No luck.

The spring compresses, but just won't come out. And I don't want to pull with force (yet) :D. Also, there's no sleeve. I checked under the microscope.

And, it's not "one piece".

View attachment 1884164


I sent an email to SME (UK) as well as Alfred at SME (Canada). He's a pretty cool character, very pleasant and helpful. We'll see what constructive replies (if any) I get.

In the meantime, I'm just scratching my head ....

I thought about gripping the cylinder with a vise-grip with just enough grip so as not to damage the circumference and see if it either unscrews or pulls out ....... but, that's just stupid and desperate thinking. Let's see what Alfred replies. If it's not favourable, we'll make a plan B.
Hi the_nines did you get any answers from SME UK or Canada ?
Thx
 
Since this thread is the best I've found on the restoration of the SME dashpots, I thought I should add my small contribution to it.

As anybody who's read this thread has already seen, the S2 dashpots can't be taken apart for a proper cleanup and refill. They were filled and sealed at the factory, not meant for later service by laypersons. The problem with these is that the design requires the chamber being completely filled with a damping oil of the correct viscosity. Any trapped air in the system will either kill off any damping, or cause a quick drop with a soft "click" at the end of the of the cueing motion. From spending hours at most audio forums, this seems to be the part that most diy folks finally give up on.

The final piston drop is due to trapped air bubble(s) under the piston being squeezed up by the lowered piston, leaving the piston without any support from below, instead pressing the piston downwards. After lifting the arm up again, the bubble is then pressed back below the piston, staying there until the next time it is lowered. Often one can also hear the same click sound from the bubble passing by the piston while lifting too.

As you've seen, some folks have succeeded in filling their dashpots up by letting the silicone oil flow in below the piston, often in a process of a couple of days. On an early 3012 I worked on I didn't. Cueing on this particular arm became far too fast with 300k silicone, and it also was plain impossible to rid of the air bubbles using the more common methods.

I finally got it sorted out. For these difficult dashpots one has to use a similar method as in the factory, using a vacuum chamber. What we need is to get rid of any trapped air in each step before proceeding.

I had to use 500k silicone oil. Air bubbles do rise in it, but very slowly. Also, if you fill the entire area above the piston with oil, there is no way for the air below to seep out, effectively preventing the from oil flowing down. If you don't have any vacuum chamber, this is one main obstacle to remember: make sure you always leave an opening at one edge of the piston while waiting for the oil to flow. For this it is best to keep the dashpot angled, filling up the oil step by step at the bottom end of the bowl.

Or, as I did:

1: Start the process with the cueing arm in the lifted position. Fill up the bowl generously with 500k silicone oil, making sure you cover the entire cylinder area, and let it settle for a while. Place the armlift part in a vacuum chamber and give it a run. The trapped air below will bubble up through the oil. Turn the vacuum pump off without opening the valve at the chamber, and wait until most of the foam has settled. Then let air back into the chamber, slowly: the vacuum below the piston will suck a fair bit of the oil where we want it. Fill up with more oil, and repeat several times, until you are certain no more air comes up from below. Remember, air bubbles move very slowly in silicone oil this thick, so even with my "industrial grade" vacuum chamber this first step took about 2-3 hours - with a pump unable to get to 99.8% / 2 mbar the process will take even longer.

2: Lower the cueing arm, and do not touch it again until the entire job is done (you do not want to pull in new air). Put the part back into the chamber, and do one more run.

Fill up the top part of the dashpot above the piston with a generous amount of oil, and also add a bit of oil into the bottom part of the dashpot top, the lid part. Run the vacuum again, to get rid of the air bubbles you certainly have embedded into the latest batch of oil. Possibly fill up once more, and run again until you are quite free of bubbles.

3: Carefully mount the top part in place; try to avoid trapping more air than necessary. Mount the two screws at the corners, but do not screw them all the way in - instead place a couple of 0,5-1 mm thick spacers in the gap between the dashpot and the top, as in this photo:

sme_dashpot_before_last_vac.jpg

Put the part in the vacuum chamber, this time in an angled position with the the third small screw hole at the topmost position. Run the vacuum again a couple of times.

This is a photo of the last vac, with a last annoying bubble. It took at least a half an hour for it to pop. Pop it must, to avoid sucking the air back again.

sme_dashpot_in_last_vac.jpg

4: When you don't see any more bubbles: Take out the spacers, and screw the two corner screws tight. Rerun the vacuum once or twice, until you are free from bubbles. Seal the dashpot with the last small screw.

This entire job took me about 8 hours with a strong vacuum pump. Quite messy, with some overflow of oil in each step, but the final result got pretty much perfect.
 
Last edited:
I've got this pump: https://www.easycomposites.eu/ec4-composites-vacuum-pump

Probably not available in US, but you could look for something with similar specs. I use this gear when making the silicone and PU turntable parts I sell, where some of the materials I use require a high vacuum within a minute or so before hardening. This means I can't spare the time for vaccing any chamber of the size that shop does sell, but instead I've found a small one from another shop. But unless you plan for that kind of work, mostly any chamber will do.
 
...of course, this kind of a vac is also perfect for any work on sintered bearings, both as a first step when draining them from old oil, and then refilling them after baking in an oven to melt out the polymerised remnants.

I do recommend them for anybody doing serious work on vintage turntables.
 
Giving this thread another revival! This should really be stickied for SME owners...(thanks tnsilver for sharing your knowledge!)

Thinking of doing this with my Series II dashpot, as it does drop a bit too fast for my liking on it's own, and I've been given the "un-fixable" tale about it before...(thankfully proven by this thread to be BS.).

My main question is if 500K cst is OK to use? or if is it too thick/better to stick with 300K? Any extra advice on getting the dashpot cover off without damaging anything? (and is a precision screwdriver thin enough?).

Would definitely be nice to have a slow, smooth descent like other arms I've used...
A few years ago I was also unsure about the density of fluid. I didn't want a fast lowering nor did I want to wait long. I wanted the luxurious look and feel of a steady moderate speed descent and it came with the 500,000 fluid. I've done 4 out the seven I own and each one now has a wonderfully gentle and controlled placement into the groove. I also found some dash-pots come apart easily while others are stubborn.
FM
 
Back
Top Bottom