You are using an out of date browser. It may not display this or other websites correctly.
You should upgrade or use an alternative browser.
You should upgrade or use an alternative browser.
SME 3009 Series 2 cueing dashpot cleaning?
- Thread starter the_nines
- Start date


I think mine might be aluminum. I don't remember brass.The piston inside the SME 3009/3012 cueing dashpot is typically made of brass or aluminum, depending on the specific production year and version of the tonearm.


Sir Bakerman
Active Member
This site is awesome. Thanks! Now I have a good idea of what to do. Much appreciated, Zwuttoo.

Mine (S2 Improved) was dropping like a stone, so I just took the top off (with the 2 red screws and the vent screw) and put in as much 300K as I could fit. Screwed the top down tight with the vent open and it's dropping nice and slow now. I'll work the queueing over the next day and if it still drops slowly, I'll close the vent and button it up.
I’ve made a few passes at rebuilding the dashpot on my SME 3009 Unimproved, and I found a method that skips the hours spent waiting for thick silicone fluid to settle. With a syringe, the whole process takes about 30 minutes each time.
Because the piston on the Unimproved is captive on the ram shaft and cannot be removed, the key is getting the fluid completely underneath it without trapping air.
Here is the step-by-step process I arrived at:
1. Removing the Dashpot cover and cap
2. The tool: Blunt-Tip Hobby Syringes
3. Cleaning the Chamber
5. Packing and Reassembly
Because the piston on the Unimproved is captive on the ram shaft and cannot be removed, the key is getting the fluid completely underneath it without trapping air.
Here is the step-by-step process I arrived at:
1. Removing the Dashpot cover and cap
- To pop the tight silver cover off, use a small screwdriver for leverage against the tonearm support arm. Gently pry it up a bit at a time from each side. Once the seal is broken and it is up a bit, you can remove it with your fingernails.
- Remove the center bleed cap screw first. This relieves pressure so you don't fight it during removal or re-mounting.
- Remove the left and right dashpot cover screws.
- Use needle-nose pliers to fully lift the dashpot cap off.
2. The tool: Blunt-Tip Hobby Syringes
- I bought a "Glue Applicator Syringe with Blunt Tip Needle" assortment pack from Amazon.
- Select the largest needle size that will physically fit inside the 4 holes on the top of the piston.
3. Cleaning the Chamber
- Push the piston all the way down and clean the top area with Q-tips.
- Pull the piston all the way up. Inject isopropyl alcohol directly into the 4 holes using a syringe, then suck the old diluted compound back out.
- Repeat this several times to dilute and remove the old fluid, Suck as much residual fluid as you can through the syringe. Lower the piston, and dry the excess with a Q-tip, then raise it again. Use an empty syringe to blow air through the holes, and leave it to fully evaporate. The alcohol can dilute the thick stuff, so make sure it’s all gone before proceeding.
- You cannot suck high-viscosity silicone fluid up through a syringe. Remove the plunger and pack a few CCs directly into the back end of the syringe barrel.
- The Heat Trick: Put the loaded syringe inside a sealed baggie and submerge it in a cup of hot water (heated to boiling in the microwave) for 5 minutes. This gives you a short window where the thick fluid becomes pliable and flows.
- With the tonearm piston up, insert the needle into one of the holes and press the plunger. It takes a lot of pressure to get it out of the syringe, but it works.
- Rotate your injection between all 4 holes to ensure it fills evenly and doesn't trap any air underneath. Continue until the fluid emerges from the 4 holes in the piston.
5. Packing and Reassembly
- Once the area below the piston is full, use a spreading tool to pack a bunch of the thick fluid above the piston.
- Also pack the inside of the dashpot cap. The goal is to have zero air pockets below the cap when you reassemble.
- With the center bleed screw still removed, push the dashpot cover back down over the ram and screw it down. You should see excess fluid express out of the sides and out of the center hole as you tighten.
- Tighten the two side screws fully, then reinstall and tighten the center bleed screw.
- Wipe away the expressed fluid first, then use alcohol to clean up any remaining residue.
- Test the lift lever to see if it is raising and lowering at your desired speed.

Seems reasonable enough, but I'm a bit confused about this part:I’ve made a few passes at rebuilding the dashpot on my SME 3009 Unimproved, and I found a method that skips the hours spent waiting for thick silicone fluid to settle. With a syringe, the whole process takes about 30 minutes each time.
Because the piston on the Unimproved is captive on the ram shaft and cannot be removed, the key is getting the fluid completely underneath it without trapping air.
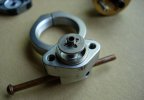
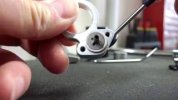
I know there are several variations of these arms, but does anybody have a photo showing the "4 holes on the top of the piston". I may be dim, but as far as i know, I've never seen one with any holes at all. The one I had in my previous photos certainly didn't have any. For anybody having such an arm using a syringe certainly would seem a good idea. This could also explain a bit of the differences in how this operation has turned out in different attempts.Select the largest needle size that will physically fit inside the 4 holes on the top of the piston.
[ Edit: added a warning for the o-ring ]
- Pull the piston all the way up. Inject isopropyl alcohol directly into the 4 holes using a syringe, then suck the old diluted compound back out.
Unless you have some plastic or rubber parts in the vicinity while working, I'd recommend using acetone instead. Mind that o-ring! From the common household chemicals it is the most effective solvent for silicones.
Last edited: