

You are using an out of date browser. It may not display this or other websites correctly.
You should upgrade or use an alternative browser.
You should upgrade or use an alternative browser.
Teac X7R Auto Reverse function
- Thread starter Richiecee
- Start date
Register to hide this ad

dhnash
Super Member
A few things to check:
1. Make sure the sensing foil applied to the Mylar side of the tape (not the oxide side that faces the tape heads).
2. Make sure the tape is properly threaded (the tape should pass over, not under the post on the guide roller located on the left side).
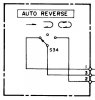
3. Make sure that neither of the two timer push buttons are pressed in (see attachment).
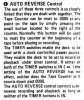
1. Make sure the sensing foil applied to the Mylar side of the tape (not the oxide side that faces the tape heads).
2. Make sure the tape is properly threaded (the tape should pass over, not under the post on the guide roller located on the left side).
3. Make sure that neither of the two timer push buttons are pressed in (see attachment).

Richiecee
Active Member
Still cannot get to auto reverse even correcting 1 and 2. How can I test the post which I did not realize was the sensor? Can I just touch using aluminum foil?A few things to check:
1. Make sure the sensing foil applied to the Mylar side of the tape (not the oxide side that faces the tape heads).
2. Make sure the tape is properly threaded (the tape should pass over, not under the post on the guide roller located on the left side).
3. Make sure that neither of the two timer push buttons are pressed in (see attachment).
View attachment 908418
tks
Rich
dhnash
Super Member
Yes, that can be done. If that doesn't work you should download the service manual for the unit from:
https://www.hifiengine.com/hfe_downloads/index.php?teac/teac_x-7_7r_service.pdf
To download the document you will need to register with HiFi Engine which is free. It is possible that the grounding spring in the left side guide roller is missing or out of position. You will find a drawing of the assembly in the manual (Page 28). You can check this by unscrewing the aluminum cap that covers the roller. The spring is located under the cover and it is secured to the roller with a screw. The free end of the spring should be touching the rod that the roller rides on connecting the roller to ground. If you take the assembly apart, be careful not to lose either of the two plastic washers that are on the rod, one underneath and one on top of the roller. There is less chance of losing a washer if you do this with the unit laying on its back instead of sitting upright.
https://www.hifiengine.com/hfe_downloads/index.php?teac/teac_x-7_7r_service.pdf
To download the document you will need to register with HiFi Engine which is free. It is possible that the grounding spring in the left side guide roller is missing or out of position. You will find a drawing of the assembly in the manual (Page 28). You can check this by unscrewing the aluminum cap that covers the roller. The spring is located under the cover and it is secured to the roller with a screw. The free end of the spring should be touching the rod that the roller rides on connecting the roller to ground. If you take the assembly apart, be careful not to lose either of the two plastic washers that are on the rod, one underneath and one on top of the roller. There is less chance of losing a washer if you do this with the unit laying on its back instead of sitting upright.

Richiecee
Active Member
I have this already and will take a look...tks!Yes, that can be done. If that doesn't work you should download the service manual for the unit from:
https://www.hifiengine.com/hfe_downloads/index.php?teac/teac_x-7_7r_service.pdf
To download the document you will need to register with HiFi Engine which is free. It is possible that the grounding spring in the left side guide roller is missing or out of position. You will find a drawing of the assembly in the manual (Page 28). You can check this by unscrewing the aluminum cap that covers the roller. The spring is located under the cover and it is secured to the roller with a screw. The free end of the spring should be touching the rod that the roller rides on connecting the roller to ground. If you take the assembly apart, be careful not to lose either of the two plastic washers that are on the rod, one underneath and one on top of the roller. There is less chance of losing a washer if you do this with the unit laying on its back instead of sitting upright.
Richiecee
Active Member
So far I have done the following:
1. Made sure sensing foil is on the side of tape not facing heads.
2. Made sure is threaded over sensing post but after reviewing the section called "Inertia Rollers and Sensing Post" it says the tape should be threaded between roller and sensing post.
3. Made sure Timer is "Out"
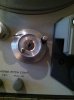
4. Supplied pic of roller with cap off. The pic on page 28 is not helpful but I will say I saw a diagram of this a year ago and cannot remember where. It is very hard for the spring to rest on roller post as it is very narrow. I try to get the spring to lay against post and then apply cover but to no avail.
Any thoughts?
best
Rich
1. Made sure sensing foil is on the side of tape not facing heads.
2. Made sure is threaded over sensing post but after reviewing the section called "Inertia Rollers and Sensing Post" it says the tape should be threaded between roller and sensing post.
3. Made sure Timer is "Out"
4. Supplied pic of roller with cap off. The pic on page 28 is not helpful but I will say I saw a diagram of this a year ago and cannot remember where. It is very hard for the spring to rest on roller post as it is very narrow. I try to get the spring to lay against post and then apply cover but to no avail.
Any thoughts?
best
Rich
Attachments
Richiecee
Active Member
could it be the sensing foil I am using?I have this already and will take a look...tks!
dhnash
Super Member
Made sure is threaded over sensing post but after reviewing the section called "Inertia Rollers and Sensing Post" it says the tape should be threaded between roller and sensing post.
This wording is somewhat ambiguous. The auto-reverse system requires a momentary electrical connection to be made between the sensing post and ground. This happens when the side of the tape with the aluminum foil on it passes over the inertia roller, which is supposed to be connected to ground, and the sensing post at the same time making this electrical connection. Since the tape is threaded over the inertia roller, this can only happen if the tape is also threaded over the sensing post rather than under it.
It is very hard for the spring to rest on roller post as it is very narrow. I try to get the spring to lay against post and then apply cover but to no avail.
The spring does not rest "on" the roller post. It should contact the side of the post. One of the plastic washers is then placed onto the rod to help prevent the spring from moving out of position when the cap is screwed on.
Did you perform the test using aluminum foil to short the sensing post to the inertia roller which should be grounded? Do you have equipment for making resistance measurements (a DMM)?
Did you also check the position of the auto-reverse switch?
Last edited:
Richiecee
Active Member
ok. I made sure the spring is making contact and being held by the plastic washer.This wording is somewhat ambiguous. The auto-reverse system requires a momentary electrical connection to be made between the sensing post and ground. This happens when the side of the tape with the aluminum foil on it passes over the inertia roller, which is supposed to be connected to ground, and the sensing post at the same time making this electrical connection. Since the tape is threaded over the inertia roller, this can only happen if the tape is also threaded over the sensing post rather than under it.
The spring does not rest "on" the roller post. It should contact the side of the post. One of the plastic washers is then placed onto the rod to help prevent the spring from moving out of position when the cap is screwed on.
Did you perform the test using aluminum foil to short the sensing post to the inertia roller which should be grounded? Do you have equipment for making resistance measurements (a DMM)?
Did you also check the position of the auto-reverse switch?
tried the alum foil trick and no go
I do have a small machine that will measure DMM. If not, I know where to get one.
And yes I checked the position of the switch.
Richiecee
Active Member
I do have a DMM. I just tested the ground between the post and roller and got a beep so it looks like the ground is now working.This wording is somewhat ambiguous. The auto-reverse system requires a momentary electrical connection to be made between the sensing post and ground. This happens when the side of the tape with the aluminum foil on it passes over the inertia roller, which is supposed to be connected to ground, and the sensing post at the same time making this electrical connection. Since the tape is threaded over the inertia roller, this can only happen if the tape is also threaded over the sensing post rather than under it.
The spring does not rest "on" the roller post. It should contact the side of the post. One of the plastic washers is then placed onto the rod to help prevent the spring from moving out of position when the cap is screwed on.
Did you perform the test using aluminum foil to short the sensing post to the inertia roller which should be grounded? Do you have equipment for making resistance measurements (a DMM)?
Did you also check the position of the auto-reverse switch?
dhnash
Super Member
The roller should be "grounded" (actually connected to the chassis of the unit) so you should see a reading close to 0 ohms if you take a resistance measurement between the roller and the chassis. The sensing post should not be at ground (chassis) potential unless it is shorted to the roller by a section of auto-reverse sensing foil or something else. Can you measure the voltage between the post and the roller? It should be a DC voltage probably in the neighborhood of +5 VDC.
Richiecee
Active Member
I tested the voltage and I get crickets. I tested a 9 volt to make sure my meter was working.The roller should be "grounded" (actually connected to the chassis of the unit) so you should see a reading close to 0 ohms if you take a resistance measurement between the roller and the chassis. The sensing post should not be at ground (chassis) potential unless it is shorted to the roller by a section of auto-reverse sensing foil or something else. Can you measure the voltage between the post and the roller? It should be a DC voltage probably in the neighborhood of +5 VDC.
dhnash
Super Member
The fact that you do not measure any voltage on the sensing post provides a reason why the auto-reverse is not operating. I'm not sure how comfortable you are disassembling the unit to troubleshoot the problem further. One possible cause is a poor connection between jack J37 and plug P37 which are shown on the schematic and provide the electrical connection to the sensing post. The metal contacts of these connectors sometime oxidize and this can result in a poor connection. This type of problem is usually addressed by separating the jack and plug, spraying a contact cleaner like Deoxit D5 on the contacts and then reconnecting and disconnecting the connectors multiple times to remove the oxidation and restore a good connection. If you do not feel comfortable doing this, you may want to consider taking the unit into a shop that is qualified to troubleshoot and repair the problem. One such shop is New Jersey Factory Service (http://www.njfactoryservice.com/) which specializes in reel to reel repair and is very familiar with Teac units. They are located in Emerson, NJ which is about an hour driving time from Staten Island.
Richiecee
Active Member
w
what about the switch ?The fact that you do not measure any voltage on the sensing post provides a reason why the auto-reverse is not operating. I'm not sure how comfortable you are disassembling the unit to troubleshoot the problem further. One possible cause is a poor connection between jack J37 and plug P37 which are shown on the schematic and provide the electrical connection to the sensing post. The metal contacts of these connectors sometime oxidize and this can result in a poor connection. This type of problem is usually addressed by separating the jack and plug, spraying a contact cleaner like Deoxit D5 on the contacts and then reconnecting and disconnecting the connectors multiple times to remove the oxidation and restore a good connection. If you do not feel comfortable doing this, you may want to consider taking the unit into a shop that is qualified to troubleshoot and repair the problem. One such shop is New Jersey Factory Service (http://www.njfactoryservice.com/) which specializes in reel to reel repair and is very familiar with Teac units. They are located in Emerson, NJ which is about an hour driving time from Staten Island.
dhnash
Super Member
The switch doesn't appear to be in the circuit that supplies voltage to the sensor post. In terms of troubleshooting the problem further, I think it would make sense to seek advice from someone who is more familiar with the way the circuit operates. One possible source of assistance is Sam Palermo who is a member of this forum (skywavebe) and also a member of the Tapeheads.net forum. You might try sending him a PM and ask him to review this thread and to offer whatever advice he can about troubleshooting the problem.
Richiecee
Active Member
Ok. here we go. I opened the unit and found both ends which basically has a blue wire connecting both. I did clean contacts but not sure that is the issue. when I connect my DMM to the blue lead coming out of the sensing post and ground it, I get 4.85 volts. When I put the screw on through the hole to the post, I get nada!
Richiecee
Active Member
we r in business! like i mentioned, I tested the connections and got 4.85 volts but when inserted through the top plate, it seemed to ground against the unt hence no voltage when installed with the sensing post. I inserted a nylon washer and all is good....thanks!The switch doesn't appear to be in the circuit that supplies voltage to the sensor post. In terms of troubleshooting the problem further, I think it would make sense to seek advice from someone who is more familiar with the way the circuit operates. One possible source of assistance is Sam Palermo who is a member of this forum (skywavebe) and also a member of the Tapeheads.net forum. You might try sending him a PM and ask him to review this thread and to offer whatever advice he can about troubleshooting the problem.