• The move to the new server is done. There are some software and database maintenance updates in process. This has us passing the hat around to help out. We appreciate any donations. Seriously, even a dollar helps. The payment page may be found here - https://www.audiokarma.org/support.html

Technics SU-V4X, first time restoration

@ElectTech Thanks again. Although I'm not completely happy with my current speakers, I don't want to burn them off just yet. Those dummies are added to the shopping list.

I can also tell that even the basic equipment is going to cost me a fair bit more than this amp did :D Every hobby is expensive going in, I suppose. But TBF I only paid slightly more for the amp than a can of DeoxIt will cost me domestically...

@SVI2004A Hold on, hold on ;) I'm not done checking the input board yet. I'll get back to you on this second part.
 
On main board, check for dry joints on pre drive transistors (2 red sections) and current stabilisers (orange area)
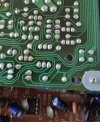
I did remove the bottom this morning and, although I can't be sure at a glance exactly which joints connect to which parts, there are a lot of cracked and miscoloured solders here. Some of them are even visible in this blurry mobile snapshot:

IMG_20251013_115652.jpg

Maybe I'm in over my head, and the amp really does need a professional servicing?
 
yeah can see them forming on those 4 transistors…. Easy enough to redo those joints
Also check the relay there…
do thoroughly look over input board
 
yeah can see them forming on those 4 transistors…. Easy enough to redo those joints
Also check the relay there…
do thoroughly look over input board
I'll focus on the transistors and relay you pointed out for now. Looks to me like there are plenty of other joints that could need some TLC, but one step at a time :)

Re: the input board, I see is some discoloured solder on the vertically mounted differential amp/equalizer PCB. Is that relevant to this issue, or am I chasing shadows now?
 
Being the low skills, no tools newb I am, I was happy that on this International Repair Day, my local repair café in Malmö had an open workshop and some patient volunteers that didn't wince too visibly at my resoldering attempts.

The plot thickened a bit when it turned out some previous owner had replaced a pre-drive transistor by cutting it off and soldering the replacement to the old pins still in the board. I imagine that only adds more points of failure?

I was far from the only walk-in at the repair café, so I can't say we had time for a thorough checkup of all possible dry solders, but I got the edge taken off my DIY anxiety :)

The amp is still settling on my worktable after its day out (we had the first frost of the winter last night), but I'm looking forward to hear how the initial fixes went.

(Edited to add: Much better balance altogether between channels, although still a slightly lower output on the right, with a subtle static buzz on that channel when music is playing. No buzz during silences.)

A volunteer pointed out an issue with the balance dial, where it seems to only work intermittently as it's turned. That is, the balance is only adjusted at some points of the dial, and when it's turned to ether side from there the sound returns to neutral (or very close). Does this strike you as a cleaning job or more soldering?
 
Last edited:
Being the low skills, no tools newb I am, I was happy that on this International Repair Day, my local repair café in Malmö had an open workshop and some patient volunteers that didn't wince too visibly at my resoldering attempts.

The plot thickened a bit when it turned out some previous owner had replaced a pre-drive transistor by cutting it off and soldering the replacement to the old pins still in the board. I imagine that only adds more points of failure?

I was far from the only walk-in at the repair café, so I can't say we had time for a thorough checkup of all possible dry solders, but I got the edge taken off my DIY anxiety :)

The amp is still settling on my worktable after its day out (we had the first frost of the winter last night), but I'm looking forward to hear how the initial fixes went.

(Edited to add: Much better balance altogether between channels, although still a slightly lower output on the right, with a subtle static buzz on that channel when music is playing. No buzz during silences.)

A volunteer pointed out an issue with the balance dial, where it seems to only work intermittently as it's turned. That is, the balance is only adjusted at some points of the dial, and when it's turned to ether side from there the sound returns to neutral (or very close). Does this strike you as a cleaning job or more soldering?
On your question: "The plot thickened a bit when it turned out some previous owner had replaced a pre-drive transistor by cutting it off and soldering the replacement to the old pins still in the board. I imagine that only adds more points of failure?"
A: Not necessarily, if the new soldering was done correctly - surfaces were clean, right solder, right temperature, right flux. I have done it a handful of times when it was impossible to desolder the old component because the other side of the PCB was not reachable, but I don't recommend this approach.

You can have a lot of fun in this hobby, but I recommend you watch some tutorials on what tools to have and how to solder and desolder. Also, you should have a pretty good (basic) understanding of how inductors, capacitors, diodes (incl. Zener and LEDs), BJT transistors, FETs, and transformers work. Many YT channels provide good lessons (per suggestions below). I can tell you that, when I started this hobby of repairing & restoring & collecting vintage audio equipment, YT was in its infancy, and I used to buy tools and components at the old RadioShack stores in my neighborhood. That was fun, but it was very time-consuming. My soldering & desoldering skills were terrible; I am no expert now, but there is no comparison. Fortunately, I already had a good understanding of electronics, so it made things easier for me.

A simple guide to electronic components

How To Set Up An Electronics Lab

Soldering Tutorial Part 1 - Tools

Soldering Tutorial Part 2

XrayTonyB

Mend It Mark
 
@ElectTech Thanks for all your advice and helpful links. I really appreciate the input from people who know far better than me in these matters. And I try to learn before I head on into rash repairs that might mess things up.

I've gotten the hang of reading hifi specs, but the actual innards and their schematics? I'll get there eventually with the syllabus you've sketched up, but for now I'm at the mercy and advice of kind folks like @SVI2004A
 
It's taken me a while to get the necessary tools together in between work and payday, but I cracked on with my first resoldering job this morning. Testing the amp it plays beautifully in both channels again!

There is still some crackle on the volume dial, and dead spots on the balance knob. I've learned that's probably just dirty potentiometers, so I had my deoxit knockoff ready to clean them out. Here's where I'll need the last bit of help with this project:

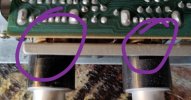
Where in tarnation am I supposed to spray the cleaner in? The potentiometers are so tightly packed into the frame and input selector PCB, I can only find these narrow openings when I tease off the front panel:

2025-11-01-12-46-33-176_1_1.jpg

And the volume potentiometer has a completely different setup with only a 1mm square opening that I can see. Sure, I can fit the spray straw in, but is the cleaner going where it needs to?

@ElectTech @SVI2004A , I'm eyeing you for help one last time

Edit: I must've found the right places, because everything plays like a dream now. Thanks for all your help, guys!
 
Last edited:
It's taken me a while to get the necessary tools together in between work and payday, but I cracked on with my first resoldering job this morning. Testing the amp it plays beautifully in both channels again!

There is still some crackle on the volume dial, and dead spots on the balance knob. I've learned that's probably just dirty potentiometers, so I had my deoxit knockoff ready to clean them out. Here's where I'll need the last bit of help with this project:

Where in tarnation am I supposed to spray the cleaner in? The potentiometers are so tightly packed into the frame and input selector PCB, I can only find these narrow openings when I tease off the front panel:

View attachment 3625584

And the volume potentiometer has a completely different setup with only a 1mm square opening that I can see. Sure, I can fit the spray straw in, but is the cleaner going where it needs to?

@ElectTech @SVI2004A , I'm eyeing you for help one last time

Edit: I must've found the right places, because everything plays like a dream now. Thanks for all your help, guys!
Yes, sometimes there is no opening, or enough space, to apply the deoxit (or equivalent) inside the potentiometers or switches.

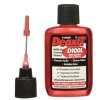
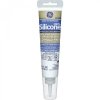
I have rarely disassembled a potentiometer or switch to clean it and apply the deoxit. I have seen 'Mend It Mark' fully disassembling components several times, and then putting them in an ultrasonic cleaner/bath, but that is well above my experience and capabilities. What I have had to do in some noisy switches was to open a little hole (being careful not to drop dust or residue inside the switch), and apply deoxit (or similar), then cover the little hole with a non-conductive clear silicone (shown below). In small holes, you have to use a needle applicator or a syringe, like the picture below.


deoxit .jpgsilicone1.jpg


Tutorials:

Cleaning Controls...

Switch cleaning - see at 48m 30s
 
Last edited:
Yeah, it took me a while turning and flipping the amp to find the tiny openings I could apply the cleaner in. Seems so far like I did right :) In hindsight I might have been better off with a needle tip or brush than the spray straw, but with a little bit of care everything worked out.

Now for the next challenges, because with the amp working I can tell my TT probably needs a cartridge upgrade, and perhaps the speakers are due for a replacement :D
 
Yeah, it took me a while turning and flipping the amp to find the tiny openings I could apply the cleaner in. Seems so far like I did right :) In hindsight I might have been better off with a needle tip or brush than the spray straw, but with a little bit of care everything worked out.

Now for the next challenges, because with the amp working I can tell my TT probably needs a cartridge upgrade, and perhaps the speakers are due for a replacement :D
I often spray Deoxit (or a similar product) into a disposable plastic cup, then transfer the liquid into a syringe to apply it to tiny openings in potentiometers or switches. The spray from the straw directly to the equipment can sometimes make a mess, depending on the case.

Regarding a new cartridge for your JVC turntable, I suggest an audio-technical AT95E or an audio-technica AT-VM95E. I have two JVC DD QL turntables with the AT95E. The following site gives more suggestions. The AT85EP cartridge would work too, but it needs an AT-PMA1 P-Mount to 1/2" Adapter.

turntableneedles
 
I see a lot of people recommending the Audio Technica cartridges, so any one of those are definitely on the table. I already have an Ortofon OM lying around to be tested... but that's going to require some VTA adjustment to work as it's a bit taller than the stock (and AT) cartridges.
 
The SU-V4X has been in daily use for more than a month now, and I'm delighted with the results. It's such a wonderful little amp, great sound stage, and lovely detail. I feel confident listening to it that whatever issues I hear are coming from the turntable or speakers.

@SVI2004A Thanks for your advice and patience. I just saw a silver faced SU-V9 on a local online marketplace, and almost pulled the trigger after your comments about its phono stage. I want to spend some time with the V4X first, though — and maybe if I wait a little longer one of those delicious black models with silver knobs will turn up!

Thanks to everyone else who helped out here as well, I'm very grateful for you giving of your time and experience to a beginner :hug:
 
I suggest an audio-technical AT95E or an audio-technica AT-VM95E. I have two JVC DD QL turntables with the AT95E.
I went with an Ortofon OM10, because I could get a used cartridge at a good price, and found a discounted replacement stylus. It was a bit of a hassle adjusting the tracking because of the unusual shape, but it has played well for the last week. I must have broken it in by now, and it sounds real good.

I've considered the ATs for a long time, also the VM540 carts get a lot of honorary mentions. For now I think I'll see how far this OM upgrade path goes, though. I mean, clearly it goes to 40 but financially that could be a long way off...
 
It's good that you found a suitable cart and stylus for your TT. I have "old ears" and am not very demanding on the specs, I just tend to pick elliptical styli and moving magnet cartridges - Audio-Technica has been satisfying to me (and my budget). In terms of the phono preamp inside the power amplifier ... I finally settled on a few vintage power amps or receivers that I restored -- later I finally matched my TT equipped with an AT95E with a Behringer PP400 Phono Preamp (about USD 25.00), then connected it to the AUX input of the power amp I was using/experimenting with. That was quite satisfying to me, not trying to be strictly frugal, but not trying to break my budget for hobbies either. Years later, I (highly) restored a vintage Toshiba SY-665 pre-amp that, for me, has a very nice phono stage for moving coil or moving magnet cartridges. So, now I am satisfied with my TT equipped with an AT95E and my Toshiba SY-665 pre-amp, just varying the power amp and the speakers sometimes.
 
@ElectTech I have a faint tinnitus hum myself after too many concerts without earplugs when I were younger. I just need a system that can play well within my (very slightly) reduced range :)

I'm definitely not knocking Audio Technica, when I were just getting back into stereo equipment one of their styli made a world of difference on a cheap old Sony deck. They can really make those older models sing, especially coming from an OEM cart or stylus...

And now, given my budget, I had my eyes set on either an AT cartridge or the Ortofon. I guess the latter intrigued me more, both the form factor and the reputation that Danish audio has. I'm originally Danish, but I've been away from stereo so long, I didn't even know it was so well regarded internationally :rflmao:

Maybe my next system upgrade is finding some Danish Dali speakers to go with the cartridge — see how that complements all my Japanese vintage kit ;)
 
Back
Top Bottom