

You are using an out of date browser. It may not display this or other websites correctly.
You should upgrade or use an alternative browser.
You should upgrade or use an alternative browser.
The synopsis of a Yamaha B-1 restoration
- Thread starter rottalpha
- Start date

Thank you Pete! This was a very nice follow up for this piece. Very nice center piece to a lovely system. Great thread fella.
Garry~
Garry~

Pete, don't you ever sleep !!!
How can he when he knows there are still so many B1s out there that are about to blow up at any moment from all of the black legged components and poorly designed circuits that the Yamaha engineers built around those precious V-FET's 50 years ago. It's enough to keep any B-1 owner awake at night.

My B1 is on 24/7 and I always sleep with 1 ear open just in case ...


The best part of that video he made made was mentioning me, with out using my name, as the nice guy who cut a hole in his PS board #2How can he when he knows there are still so many B1s out there that are about to blow up at any moment from all of the black legged components and poorly designed circuits that the Yamaha engineers built around those precious V-FET's 50 years ago. It's enough to keep any B-1 owner awake at night.
My B1 is on 24/7 and I always sleep with 1 ear open just in case ...
lol Some times I wish I was more like Pete, but on second though, I'd rather sleep a little more than he does !
Athanasios

yeah, "the real slim shady please stand up"The best part of that video he made made was mentioning me, with out using my name, as the nice guy who cut a hole in his PS board #2
Some times I wish I was more like Pete, but on second though, I'd rather sleep a little more than he does !
Athanasios
I also offered to "plug" that hole so that your B1 does not end up being lighter than when it left the factory.
Last edited:
You mean poor choice of parts, not poorly designed circuits. How many of your B1s still have the original Sanken cans or the big filter cap cans still in them?How can he when he knows there are still so many B1s out there that are about to blow up at any moment from all of the black legged components and poorly designed circuits that the Yamaha engineers built around those precious V-FET's 50 years ago. It's enough to keep any B-1 owner awake at night.
My B1 is on 24/7 and I always sleep with 1 ear open just in case ...
Also still curious why you sit in the cheerleader's bench and rarely share any of your work???
yeah, "the real slim shady please stand up"
I also offered to donate a permanent "plug" for that hole so that your B1 does not end up being lighter than when it left the factory.
Hey you finally woke up !! lol
Once again Awesome videos Pete, if My B-1 works as is, maybe I could get one of those fancy new -200 boards so there's no draft in the one I have now
lolAthanasios
Nash, odd hour on west coast are working business hours somewhere else. Just like you, I do something else for a living. This is just a hobby. Sometimes that something else has me doing things at odd west coast hours.Pete, don't you ever sleep !!!
5 am eastern time when you posted so 2 am west coast!
Nice gear your friend has there!
Athanasios
that would be a good way to plug that hole, wouldn't it?Hey you finally woke up !! lol
Once again Awesome videos Pete, if My B-1 works as is, maybe I could get one of those fancy new -200 boards so there's no draft in the one I have now
Athanasios

zaibatsu
yam
I'm interested in this tour and don't need a guide, please PM me upcoming dates when you'll be away.Some Yamaha connoisseurs traveled to my place and got to listen to most of my gear…left with a restored b-1 in the end
Don't worry I won't take a Yamaha, just a Honda.

Honda has the better sound for sure. You are welcome to come by any time. Will you come by boat?I'm interested in this tour and don't need a guide, please PM me upcoming dates when you'll be away.
Don't worry I won't take a Yamaha, just a Honda.

The B1 replaced $30k monoblocks…..
Nice gear your friend has there!
Athanasios

Thanks Gary.Thank you Pete! This was a very nice follow up for this piece. Very nice center piece to a lovely system. Great thread fella.
Garry~
While not a fully detailed description, it is at least directionally intended to emphasize the required extent of work required to address fundamental issues with a 50 years old amplifier. It should also reflect the difference of a thorough restoration vs a simple repair job.
Even the work required to repair these units can span over many months, and require a lot of spoon-feeding even for techs who claim decades of experience:
What is the best replacement for these “Orange” resistors.
The top one obviously cooked the cap above it.
audiokarma.org
Service Manual Errors? Yamaha B-1 pages 16 - 21?
Are their documented errors in the Yamaha B-1 service manual? Specifically pages 16 - 21? If so, what are they? Anyone know?
audiokarma.org
Yamaha B-1 trouble shooting needed
I am attempting to bring a B-1 back to life. Totally unknown history except it came out of an estate sale. One cell of the power filters were open. Replaced those and the rectifiers and have gone through all of the boards. No parts tested bad, all fuses were intact. All voltages confirmed...
audiokarma.org
Last edited:
I watch many of these videos Pete and one of the reasons I appreciate yours is that even if the viewer doesn't understand fully, anyone can recognize the quality and professionalism in your work, not the least of which your passion for the hobby. I have lived my life with one simple rule when it comes to any work I do .... Doing it right, because it's the right thing to do. And I teach that to my employees. Some get it, some ... do not. Your video's highlight that thinking for those who recognize the message.Thanks Gary.
While not a fully detailed description, it is at least directionally intended to emphasize the required extent of work required to address fundamental issues with a 50 years old amplifier. It should also reflect the difference of a thorough restoration vs a simple repair job.
Even the work required to repair these units can span over many months, and require a lot of spoon-feeding even for techs with decades of experience.
Very good point regarding the time it takes to do this kind of work. Video's are often spread out over a long period of time. I'm reminded of that every time a tech say's He has several pieces he needs to get to that have been sitting there for a couple of years.
Garry~

This brings me here, to ask rottalpha if he has any specific shipping precautions to insure undamaged delivery of one of these back breakers.Recently blew the boating budget on 240V EU versions of some Yamaha gear.
Now I wish I had the boat to help get them shipped over here!
 ,
,James
Hi James,This brings me here, to ask rottalpha if he has any specific shipping precautions to insure undamaged delivery of one of these back breakers.
James
Basically:
- B1 in foil or bag to prevent foam, dust, other unwanted particles to enter the unit,
- 2inches of semi hard foam around the unit
- Thick carton box
- 2in semi hard foam around the first carton box
- Second thick carton box
- Use tape and straps around the second box for better containment but also for places to grab the box for the shipping gorillas.
- It is imperative that the unit is super snug inside the wrappers and that the foam is neither too soft to collapse or too hard so that if there's external impact, it is not transferred to the unit.
- Cutouts for feet and knobs, buttons is very beneficial.
- If a UC-1 is part of the equation, it must be shipped in a separate box.
Will look for some photos of prior shipments and add them soon.
Last edited:
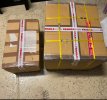

Hi James,
Basically:
- B1 in foil or bag to prevent foam, dust, other unwanted particles to enter the unit,
- 2inches of semi hard foam around the unit
- Thick carton box
- 2in semi hard foam around the first carton box
- Second thick carton box
- Use tape and straps around the second box for better containment but also for places to grab the box for the shipping gorillas.
- It is imperative that the unit is super snug inside the wrappers and that the foam is neither too soft to collapse or too hard so that there’s external impact is transferred to the unit.
- Cutouts for feet and knobs, buttons is very beneficial.
- If a UC-1 is part of the equation, it must be shipped in a separate box.
Will look for some photos of prior shipments and add them soon.
Thanks for the detailed answer!
This is pretty much how I shipped the C-1, and zaibatsu let me know that the packing was acceptable.
I was originally planning on building a crate for the B-1 but there are special considerations for shipping to Australia because of insect infestations. So it will be double boxed on a plastic half Euro-pallet and the UC-1 will of course be shipped separately.
,James
Sounds good. I see that the B-1 is going from a good place to another good placeThanks for the detailed answer!
This is pretty much how I shipped the C-1, and zaibatsu let me know that the packing was acceptable.
I was originally planning on building a crate for the B-1 but there are special considerations for shipping to Australia because of insect infestations. So it will be double boxed on a plastic half Euro-pallet and the UC-1 will of course be shipped separately.
James