• The move to the new server is done. There are some software and database maintenance updates in process. This has us passing the hat around to help out. We appreciate any donations. Seriously, even a dollar helps. The payment page may be found here - https://www.audiokarma.org/support.html

Thorens TD150 MKII / Tone-arm - opinions needed!

ahsketch

Member
Hello everyone!
I recently bought a Thorens TD150 MKII in unrestored condition. It's a nice project!
I admit that I don't know much about this model yet, and I discovered after the fact that the tonearm has a lot of missing parts, some easier to replace than others (right side of photo is my table).

So I see 3 options:
- Finding the missing parts and completing the arm (expansive, almost impossible)
- Finding a complete arm (stock TP13a), is the quality worth it?
- Might as well replace with a better arm at this point, I heard SME's are a good choice? Drop your suggestions below!

Anyhow, I just want to get various opinions and advice on the project (for now in relation to the arm). I need general help from knowledgeable people.
Also, If anyone has experience working on this specific table, I'd love to get in touch. I'll absolutely have more questions along the way!

Cheers,
Anthony
413130421_748141227220629_6712873311265871222_n.png
 
Register to hide this ad
Counterweight locking screw. Some metric thumbscrew should thread right in.
Tracking force adjusting weight. What do you need that for? Just use the counterweight to set the tracking force. Need a good scale but for 10 bucks those digital things are fine. Set the force and lock in the counterweight. Sure the arm is gonna want to rotate a bit over to the left due to the weight of the cartridge but shouldn't make the table unusable. Or use some fixed kind of weight on that rod. Someone knows the weight of that ball.
As to the antiskate, who uses all the antiskate a set up calls for? I use about 25% or so. You can make a hanging weight with some nylon thread and a nut or even a machined cylinder with a hole in it for the thread and a larger hole on the bottom to receive the knot that keeps the weight on the thread. Someone knows the mass of that weight.

Now that you have saved that money and you are listening to that fine table, refreshed while you get the parts to make the original arm work, you can take your time and look for the right tonearm for the cartridges you want to use and the right deal. And spend some of that time making a new armboard for the new arm.

So you need to know:

What are the threads in the counterweight lock screw
What is the mass of the tracking force adjusting weight
What is the mass of the anti-skate hanging weight

Oh, welcome to ak.

theanalogdept has a thorens section, Steve has lots of info there.
vinylnirvana might have some parts. ddarch (Dave) does some nice restorations.
always use a Thorens belt on Thorens tables that don't have speed adjust for accurate speed.
 
Last edited:
- Finding the missing parts and completing the arm (expansive, almost impossible)

The small ball (VTF adjuster) is not necessary, you can adjust VTF with the main ball.

The screw for the main ball can perhaps be replaced with a regular screw, perhaps you can find one that fits perfectly.

The antiskating weight (little weight on a string) is not necessary if you are tracking a conical over, say. 2.0 grams. In fact, many high quality tonearms of the 60s and even 70s had no antiskating system. I am right now listening to an AT-VM95C cartridge with zero antiskating, because the tonearm has no antiskating system. Sounds pretty good.

I would suggest you to better invest your time in trying to disassemble the tonearm to clean and maybe polish the vertical tonearm bearings. These ones

1704642498550.png

1704642511694.png

Polish the end tips with metal polish. Use a dremel so you can rotate the thingies at high speed while you apply metal polish (silver polish) with a cotton cloath with your hand.

Then fit them again (with a slight amount of the lowest viscosity oil you can get) and adjust for zero play but the lowest friction possible. A good friction test is cutting a 2x\2cm (or maybe 3x3cm) piece of paper: Balance the tonearm so it stays level (0 grams tracking force), then put the piece of paper over the headshell. The tonearm should deflect down. If it does, friction is low enough. Try to get this adjustment right, it takes patience and time.

This bearing service and friction adjustment will do a DRAMATIC improvement in sound quality.

Also, make sure the tonearm wires are ok, including the ground wire.
 
The small ball (VTF adjuster) is not necessary, you can adjust VTF with the main ball.

The screw for the main ball can perhaps be replaced with a regular screw, perhaps you can find one that fits perfectly.

The antiskating weight (little weight on a string) is not necessary
We agree on this.

Nice notes on the bearing adjustment. All this should be enough to get the arm ready to work and give the OP a chance to find a replacement at the right price.
 
I'll closely read and consider your answers, thanks a lot! In the meantime I've notice that my arm has quite a lot of lateral play, is this normal or fixable at all?? (see sketch below)play.JPG
 
There should not be lateral play. You need to service the bearings. First start servicing the vertical (for vertical movement) bearings, the ones I pointed to.

Once you remove the vertical bearings you can grab the horizontal bearing alone and check if there is play. Probably it is just fine and requires no problem.

It's more likely that the vertical ones need service. I have no experience with this tonearm, however in my experience the vertical bearings tend to be damaged more easily than the big ball races used on the horizontal bearings.
 
I've done some of these arms, and @flavio81 did get it right. These arms actually are quite nice when properly restored, well worth fixing. If you should consider replacing the arm, remember that the springs in the suspension are dimensioned for the weight of this arm. Most more modern arms are quite a bit heavier, which will affect the balance of the suspended inner chassis - in worst case making it impossible to balance it correctly with only a vertical movement after adjustment. A badly balanced inner chassis will wobble sideways by any external vibration, or even from oscillations in the belt, affecting the tension of the belt = flutter. So, with an improper choice of upgrade arm, you may end up with both a deck and an arm sounding worse than they should.

Two things to look out for on these arms. The wiring and the connection against the headshell can often be finicky after more than 50 years, requiring a resolder of the connections at the inside of the arm connector - or a rewire. Neither job is fun, since the connections at the inside of the arm are pretty inaccessible for soldering, and an unused connector can't be found for love nor money. It is a good idea to measure for continuity before starting work on the arm, so you know what lies ahead. You should see a consistent resistance from end to end of less than 1 ohm on each wire, without any major fluctuations. A fluctuating resistance on a wire is a sure sign of a bad solder somewhere along the line, probably causing a bad hum.

Another fun thing you'll find out if you skip the smaller TVF weight, which is quite OK if you've got a VTF scale, is that the actual TVF on these arms is affected in two ways by the position of the counterweight. Due to the arm geometry, not only the distance from the bearings, but also the angle in which the counterweight is locked in has a notable effect on VTF. So when adjusting it, make sure to keep the counterweight in the same angle, or you'll go nuts.
 
Last edited:
Oh, one more thing: skip the dried out rubber grommets at the base of the arm. Those are a remnant of outdated ideas of damping of motor vibrations into the arm. Better to not have them, since that gives a better way to sink the vibrations from the cartridge into the the tonarm board and the chassis instead of having them running back and forth within the arm. That improves the audible dynamics and timing. And of course, the old grommets are dead by now, anyhow.
 
@tothmes @flavio81
- Regarding the tonearm, I really want to work on it properly and not cause any harm (aka take my time and be informed). The arm needs servicing (obviously) including the bearings. I think the entire arm should be disassembled and cleaned, once piece at a time. I haven't found a clear guide on how to do so (which part to take out first, what to be careful about, etc etc). If anyone is willing to guide me and answer more questions along the way (perhaps via messages or something) I'd truly appreciate it. I will try to keep the arm.
- I truly appreciate the help as a side note, my grommets are indeed dried up and cracked/distorted and I wanted to look into that when the time comes. Do you have access to another resource that confirms that they are indeed not needed? Apart from the change in dampening, what about the change in height removing them would cause?
 
I truly appreciate the help as a side note, my grommets are indeed dried up and cracked/distorted and I wanted to look into that when the time comes. Do you have access to another resource that confirms that they are indeed not needed? Apart from the change in dampening, what about the change in height removing them would cause?
The height of the arm pillar (VTA) is adjustable on these arms, so that is no problem. Removing rubber grommets like these is pretty much standard procedure among SME users since at leat the eighties. Can't recall any other arms even having those.
 
If you plan on taking the arm apart: Best leave the spring steel bottom bearing part in place while doing so. There is no need to have it loose, and there are recurring reports on those breaking if done wrong. Apart from that these arms are so beautifully simple that one really can't go much wrong with them. And as always, no oil in tonearm bearings, but you already knew that.
 
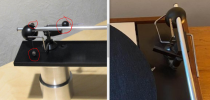
@tothmes I'm afraid I have even less knowledge than what you'd expect (first time working on a turntable, but I am very meticulous). If I understand your previous post, you mean leaving the circled parts (the part called "console" which I assume contain the bearings?) and the vertical shaft screwed in the armboard at all time, while working on the arm?


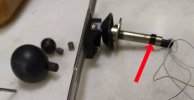
Capture1.JPG
 
Sorry for the bad and stolen photo, but I don't have access to my own photos from where I am right now. The part i meant is the one at the tip of the red arrow. The bottom end of it is the thrust plate of the horizontal bearing, with the steel tip of the arm pillar resting on it (which also means there is nothing to adjust in this bearing). This part can be taken off, but if so, it must be pulled out downwards, not sideways. But the arm can be fixed with it in place.

kugelarm_bottom_bearing.jpg
 
Ok so let's start from the beginning. The current state of my tonearm is: Headshell removed, back counterweight in place, without its knob, no anti-skating weight in place, no stylus force weight (and knob) in place.

I would like to understand the use of the big counterweight knob. I can slide the weight on the arm, but the friction is strong enough to keep in in place. is the knob only there to further "lock" it in?

To remove the big counterweight, do I need to remove these parts first (see below) (how to I remove them)? after that, can I just slide out the weight?

Capture1.JPG
 
The knob is only there to lock the counterweight in place with the VTF set at 0 g. After that you were supposed to adjust VTF with the smaller right side weight. The counterweight has a damping rubber bushing in the hole where the arm tube goes in - it is that friction you can feel when moving it around. As far as I can remember, you should be able to pull the weight off backwards unless something is wrong. That's what was supposed to be done before moving the machine around, to spare the bearings. I can have a look at mine later this evening.
 
very clear, thank you. After reading the description of the 3 parts (circled in my latest post) in the service manual, I noticed that one of them is called the "sleeve for counterweight" meaning this is the damping rubber bushing you're talking about. sorted. S808-225A is a plug, and S871-006 is a screw plate.

Are they the next logical thing to remove?

I'm guessing the plug is just there to plug the end of the tube (can be pulled off?), but what's the use of the screw plate/how should it be removed?
 
As I remember it, the screw and the plate are for the arm ground wire connection. Leave it in place until you have taken the vertical bearings apart - by then you'll see how it all fits together.
 
Understood. Let's go back to the beginning, again, no shame to say I'm don't have much knowledge on this arm.

So with all that's been said, I now know they're 2 sets of bearings (horizontal and vertical) that I need to service. They are fragile and might be damaged and are probably causing the current play. I also want to clean up the tonearm parts.

In its current state, should I slide off the counterweight before taking apart the vertical bearings? what are the steps to service those bearings?
 
Back
Top Bottom