• The move to the new server is done. There are some software and database maintenance updates in process. This has us passing the hat around to help out. We appreciate any donations. Seriously, even a dollar helps. The payment page may be found here - https://www.audiokarma.org/support.html

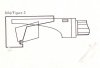
Thorens TP60 (headshell) gauge dimensions

the_nines

Lunatic Member
Hope this crude diagram is of help to those wishing to build their own gauge.
The measurements are in (mm) and are as precise as I can possibly make them.
The gauge is used to allign the stylus tip to a specific point on the gauge.

IMG_2729.jpg


The gauge is the acrylic looking thing below with "Thorens" written on it.

IMG_2714-1.jpg


Good luck & hope this helps.

Cheers.
 
Last edited:
Register to hide this ad
That's brilliant thanks

I've lost count of the number of times I've asked for this info

Others will thank you if you post this on Vinyl Engine Forum

Cheers
 
I'm sure many can use this info. I personally use an alignment protractor and adjust the VTA via the tone arm mount. But great Thorens info!
Regards,
Jim
 
I'm sure many can use this info. I personally use an alignment protractor and adjust the VTA via the tone arm mount. But great Thorens info!
Regards,
Jim

Which protractor are you using for your TD160, I have an MKII and am mot sure which one to use.
 
Looks very much like the one that came with the Philips turntable.
I have one.
The Dual have a similar one.
The dimensions for all three should be collected and store somewhere!
 
'S blood! Hen's teeth! And other oddities!

Balifly said:
Looks very much like the one that came with the Philips turntable.
I have one.
The Dual have a similar one.
The dimensions for all three should be collected and store somewhere!

So! I knew the Duals came with one and obviously I knew the Philips came with one, but heretofore didn't know some of the Thorens came with one as well.

Here's a shot showing the Philips one from the manual which is as close to seeing one that I've gotten since ours sadly, like so many second hand units, came without one.

jig.jpg


Hen's teeth indeed.
 
Hope this crude diagram is of help to those wishing to build their own gauge.
The measurements are in (mm) and are as precise as I can possibly make them.
The gauge is used to allign the stylus tip to a specific point on the gauge.

IMG_2729.jpg


The gauge is the acrylic looking thing below with "Thorens" written on it.

IMG_2714-1.jpg


Good luck & hope this helps.

Cheers.


Thank you for this. Long and very sorely needed by all of us!
 
Am I right in saying that Cartridges had a VTA of 15 degree back then so this little widget is less likely to be accurate with newer carts?
 
With the Thorens word right side up the front of the headshell is slammed into the gauge and the needle is supposed to be positioned in the notch on the now top of the gauge.

Edit:
In this configuration, with the gauge right side up, the headshell will be upside down but the needle will be on top near the V-notch in the short part of the gauge allowing you to see it and make adjustments.
 
Last edited:
With the Thorens word right side up the front of the headshell is slammed into the gauge and the needle is supposed to be positioned in the notch on the now top of the gauge.

No I think its the opposite - take a look at the manual & the longer arm of the gauge fits over the headshell ie The shell fits into the top left section of the diagrams.

I don't understand the bottom left drawing though - why is there a raking angle on it?

I've had part of a go in drawing this in cad but got flumoxed

edit image added
 

Attachments

  • Thorens Gauge Diagram.jpg
    Thorens Gauge Diagram.jpg
    30.4 KB · Views: 126
Last edited:
I don't understand the bottom left drawing though - why is there a raking angle on it?

The top view (original post, pic 1, lower left diagram) of the gauge is a trapezoid, a four-sided figure with one pair of parallel sides.

So when looked at front view (lower right diagram) the left side shows a bit. Remember....it's a trapezoid cube (for lack of a better term).

SIDE VIEW:

IMG_2852.jpg


TOP VIEW:


IMG_2853.jpg


FRONT VIEW:

IMG_2855.jpg


MORE PICS WITH HEADSHELL INSERTED:


IMG_2858.jpg


IMG_2869.jpg


IMG_2870.jpg


IMG_2860.jpg


IMG_2861.jpg


IMG_2862.jpg
 
Got it... really simple (I think).

When you put the headshell flat on its back up against a wall with stylus pointing to the sky, the stylus is supposed to be at a height of 25mm and 10mm from the wall.

Make sense ??
 
This thread reminded me... I've got an extra gauge. I'd be happy to send it to someone who can use it, free of charge. First come, first serve, I reckon.

DSCN9008.jpg
 
Back
Top Bottom