• The move to the new server is done. There are some software and database maintenance updates in process. This has us passing the hat around to help out. We appreciate any donations. Seriously, even a dollar helps. The payment page may be found here - https://www.audiokarma.org/support.html

VPI 16.5 new to me: Deep dive on some stuff, fan mod I want to do

dddj74

New Member
Hey everyone!

I've recently acquired a used VPI 16.5. I contacted VPI with the serial # for their estimate of the age, but looking at it, it can't be more than 10 years old, and opening it up, everything looks pristine.

That said, I had some problems out of the gate, some of which I may have caused by mistake. The turntable stopped on me a few times but after I had I turned on the vacuum before the turntable a few times, and I was rotating the record 5 times before shutting off the vacuum.

Did these mistakes cause the problem I'm about to describe? I don't know. But here's a short list:

1) I took off the cork center and noticed the three screws were very loose, with some sawdust, suggesting stripping.

2) I took off the rest of the plate fixing the motor and arbor/spindle assembly to the top of the machine. I noted the two hex screws on the arbor/spindle assembly were tight as a drum. BUT, big issue for me was the arbor/spindle assembly was wiggling noticeably side to side. Its own up and down sliding action was fine, so the wiggling to me indicated something broken. [I emailed VPI about this].

3) Thinking this was caused by heat and maybe my mishandling, I thought at least I could try the fan mod, described herein the now famous account here: http://www.audiointelligent.com/rcmmuseum.htm and this one here, https://forum.polkaudio.com/discussion/87672/improvements-to-the-vpi-hw-16-5-record-cleaning-machine, here https://forum.audiogon.com/discussions/vpi-16-5-problem-2 and more here: https://www.audiokarma.org/forums/index.php?threads/rcm-modifications.343158/ , and many other posts. Mark D'Ambrosio, paging Mark..... !

So, here are some questions about this mod:

Cutting MDF in a circle. You need a saber saw? I don't own one. What's the process? I did a dry run on some scrap plywood with my Dremel circle tool with their multipurpose bit and it was far from a smooth process. I had to do multiple passes. Not sure I want to chance this on a machine I paid pretty good money for, even used. How about a hole saw? In that case, I have an 88mm square fan. If I use a hole saw bit that's a little smaller, i.e., 3.25" (82 mm), is that alright? Then, how do you position or stabilize the portion of the machine being cut? I want to make a hole in the back, which necessitates taking out the switches in front. I'm not sure how to take that off, the terminals are on there pretty snug.

My best thinking: if I use masking tape, and am careful and slow with the Dremel, I can get a serviceable hole (hehehehe). But seems risky... not cool, given the excellent condition.... I could try a saw hole that's slightly smaller, but does it need to be especially sharp to cut through the MDF.... I could put the hole on the side.

On that note: Wiring the fan to the AC power, or turntable. How do you do that? What's the process?

Maybe when sharing the mods there's a certain level of skill assumed. But hey, I want to stretch a little. I've done all kinds of DIY projects. I just don't want to **** up if I can avoid it. Thanks!

PS: I would like to seal it further, maybe with three layers. Can I put polyurethane sealant right on the MDF, or does it need a primer first?


 
Register to hide this ad
I don't know, mine is probably 25yrs+ and no mods or problems. I think you can possibly get new replacement parts, maybe you need a motor and platter?
 
I'm here! :)

The first link you have posted is me on AIVS's site.
You'll note in part 2 of my article the mention and pictures of a Platter retrofit to Acrylic and a Neoprene Rubber Mat.

That Platter is made by a machinist friend and was turned on a lathe. I have no idea what a replacement Platter would cost for the 16.5, but I'm sure not that much. I also once read where the more expensive HW-17 and Typhoon RCMs used an Acrylic Platter that does fit the 16.5. Years ago, I recall the price for that Platter at about $50.

Sounds like what happened to your Platter was over time it had gotten loose, and buggered the mounting holes to the Motor Arbor. If I recall, and according to my article, those 3 Mounting Screws are a very small wimpy 6-32.

VPI would surely have a replacement MDF Platter they'll sell you, one way to find out what such costs, is call them.

The Platter Motor itself is then mounted to a Plate, and has Rubber Standoffs to mount the Motor to that Plate. Do you see those? That Plate is then simply screwed to the Top Deck.

As for the Platter Motor seeming intermittent, and not always working with the Switch flipped, this might be simply a switch problem. The Platter should be able to be switched on without the Vacuum Motor on, and is independent of the Vacuum Motor circuitry,
 
A little difficult to understand what you describe, but are you saying that the Drive Shaft itself on the Platter Motor has excess play? In other words, and in your eyes, the Platter Motor is also damaged besides the Platter?

There should be zero excess lateral or vertical play of that Motor's Driveshaft.

Going by memory, that motor is a Dayton Brand, and I believe something like 13rpm. There should be the brand and model number on that Motor Housing.

If you for say needed a new Platter Motor, I believe somewhere like WW Grainger has them, and likely a good deal less money than buying direct from VPI.
 
As for the Fan Mod, I describe in detail what I did. I found the position on the inside rear cabinet wall where the fan could be positioned, and marked and drilled a couple of the holes from the inside of the machine.

This then allowed me to properly position the Matching Fan Shroud on the outside of the Cabinet to finish marking and drilling the rest of the holes, then using the Fan Shroud to then draw the larger circular opening for the fan.

Yes, I traced a circle on the outside of the Cabinet using the Shroud as the Template, cut the hole with a Sabre Saw, then sanded the hole clean with sandpaper.

The Fan of course needs to be a 120V model. I merely wired direct to the incoming AC, no switch, so that as soon as the RCM is plugged in, the Fan fires up and runs continuously.
 
Another option of where to mount a fan: Perhaps not optimal, but your RCM may have some vent holes on the bottom cover? Here too could be an area where to mount a cooling fan?

One can then simply enlarge those vents for better air flow, or like in my mod, cut the larger circular hole.

The reason I didn't choose that area for a fan was in the future possibility of fluid leakage from the Recovery Tank and Vacuum Motor Interface then dripping down onto the Fan..
 
I believe the Platter Motor on my 16.5 (which is about 9-10 years old) is Dayton #3M099. (18rpm) This motor appears to be discontinued, and the replacement Dayton Motor is #52JE29. Appears to be a simple direct swap replacement, and this newer Motor might be what's on your RCM?

It's known that the older #3M099 that's in my RCM was always a motor that sounded like there was Gravel in the Gearcase. Just the nature of the beast is all.

Price at Grainger for the #52JE29 Motor is $64.50. Wouldn't surprise me if it's twice the price from VPI.
 
With some care, a Platter that has had the 3 Mounting Holes become enlarged due to the Mounting Screws coming loose, and there's now a great deal of slop and not a positive attachment of the Platter to the Platter Motor Arbor, all is still not lost.

One can carefully fill those 3 holes with a product such as a 2-Part JB Weld Epoxy Glue, let dry, and by using the Motor Arbor as a Template, neatly re-drill, and countersink those three holes.

This would then fix this Platter you have, provided the threaded holes in the Motor Arbor are not mangled. If they are, the Motor Arbor can also be re-drilled to take a larger 8/32 Screw with the correct size Drill Bit, and Tap.
 
With some care, a Platter that has had the 3 Mounting Holes become enlarged due to the Mounting Screws coming loose, and there's now a great deal of slop and not a positive attachment of the Platter to the Platter Motor Arbor, all is still not lost.

One can carefully fill those 3 holes with a product such as a 2-Part JB Weld Epoxy Glue, let dry, and by using the Motor Arbor as a Template, neatly re-drill, and countersink those three holes.

This would then fix this Platter you have, provided the threaded holes in the Motor Arbor are not mangled. If they are, the Motor Arbor can also be re-drilled to take a larger 8/32 Screw with the correct size Drill Bit, and Tap.

Could he use a stainless t-nut/bolt assembly, to prevent future problems? :idea:

https://www.amazon.com/Stainless-Threaded-Quantity-Bolt-Dropper/dp/B01LFFB4BW
 
Could he use a stainless t-nut/bolt assembly, to prevent future problems? :idea:

https://www.amazon.com/Stainless-Threaded-Quantity-Bolt-Dropper/dp/B01LFFB4BW

Well, the Screws that retain the Platter to the Motor Arbor have to come from the top.

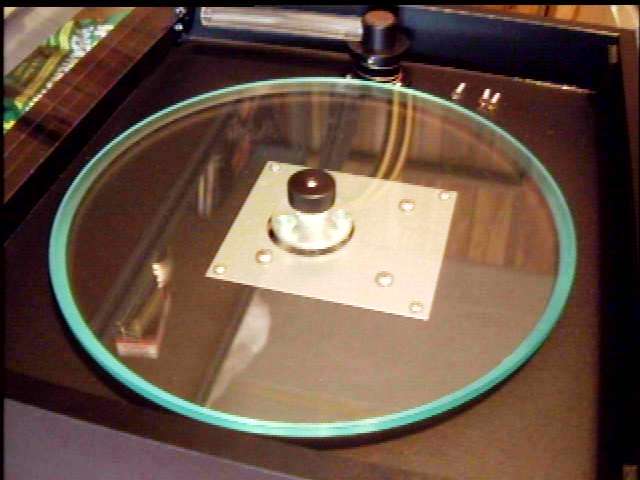
By nutting any screws-nuts to attach the Platter to the Arbor, then there would be no way to then attach the Motor Arbor to the Output Drive Shaft of the Platter Motor. Hopefully this image of my 16.5 Platter will help illustrate that.

Mark_VPI_16.5_Photo_1.jpg
 
https://www.audiokarma.org/forums/index.php?threads/rcm-modifications.343158/ , and many other posts. Mark D'Ambrosio, paging Mark..... !

So, here are some questions about this mod:

Cutting MDF in a circle. You need a saber saw?

PS: I would like to seal it further, maybe with three layers. Can I put polyurethane sealant right on the MDF, or does it need a primer first?


You need a router. A Saber saw will not cut a very smooth curve.

You can go straight to a sealer if you want, just go very light on the first coat. You can also use wood stain on it if you want. Make sure to let it dry if you stain, before you seal.

I believe the Platter Motor on my 16.5 (which is about 9-10 years old) is Dayton #3M099. (18rpm) This motor appears to be discontinued, and the replacement Dayton Motor is #52JE29. Appears to be a simple direct swap replacement, and this newer Motor might be what's on your RCM?

It's known that the older #3M099 that's in my RCM was always a motor that sounded like there was Gravel in the Gearcase. Just the nature of the beast is all.

Price at Grainger for the #52JE29 Motor is $64.50. Wouldn't surprise me if it's twice the price from VPI.

Those Dayton motors are everywhere, even grainger doesn't mark them up much (unlike every other item they sell). If vpi is selling them for half msrp, everyone is losing money on that sale and you should buy every one they have...
 
Best way I've found to cut a circle of that size is to mark it, cut it as close as you can with a sabre saw / jig saw then use a belt sander to finish the edge off to the line.
 
You need a router. A Saber saw will not cut a very smooth curve.

You can go straight to a sealer if you want, just go very light on the first coat. You can also use wood stain on it if you want. Make sure to let it dry if you stain, before you seal.


Those Dayton motors are everywhere, even grainger doesn't mark them up much (unlike every other item they sell). If vpi is selling them for half msrp, everyone is losing money on that sale and you should buy every one they have...

I'll respond to both latest posts below
 
What I believe the original poster is referring to, is how to cut the hole in the Cabinet for the Cooling Fan Mod.
In either instance, Router, or a Sabre Saw, you're going to be making that hole freehand, there can be error with either if the person using the tool doesn't know how to use either.

As I no doubt explained in my article which the OP linked to, and can say again, before I began, I located a suitable area to mount the fan on the rear panel.

I drilled a couple pilot holes for the fan through the cabinet I then covered the rear panel of the cabinet with masking tape so that the Sabre Saw would not mar the Black Laminate on the Case.

Using the Machine Screws as Pilot Pins to properly locate the Outside Fan Shroud, I was able to then drill the two remaining Holes for the Fan, and then trace the full 4" circular pattern cutout for the Fan.

I then drilled a Pilot Hole to insert the Scroll-Sabre Saw Blade in the Cabinet in the scrap area, stayed within the traced circle, and finished simply with sandpaper, The hole was as perfect as can be, just as if I used a 4" Hole Saw.

Lastly, I then carefully masked and sprayed the raw exposed MDF with Black Spray Paint I believe.

There would be no way to use a Belt Sander for this Mod Installation. For fabricating a new Platter, then yes, I suppose such could be used.

The Thickness of the Platter is 1/2".

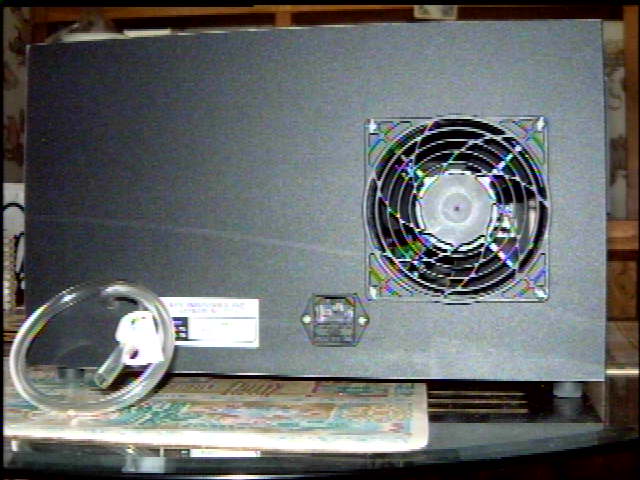
Here's the finished result.


snapshot2.jpg
 
What I believe the original poster is referring to, is how to cut the hole in the Cabinet for the Cooling Fan Mod.
In either instance, Router, or a Sabre Saw, you're going to be making that hole freehand, there can be error with either if the person using the tool doesn't know how to use either.

As I no doubt explained in my article which the OP linked to, and can say again, before I began, I located a suitable area to mount the fan on the rear panel.

I drilled a couple pilot holes for the fan through the cabinet I then covered the rear panel of the cabinet with masking tape so that the Sabre Saw would not mar the Black Laminate on the Case.

Using the Machine Screws as Pilot Pins to properly locate the Outside Fan Shroud, I was able to then drill the two remaining Holes for the Fan, and then trace the full 4" circular pattern cutout for the Fan.

I then drilled a Pilot Hole to insert the Scroll-Sabre Saw Blade in the Cabinet in the scrap area, stayed within the traced circle, and finished simply with sandpaper, The hole was as perfect as can be, just as if I used a 4" Hole Saw.

Lastly, I then carefully masked and sprayed the raw exposed MDF with Black Spray Paint I believe.

There would be no way to use a Belt Sander for this Mod Installation.

Here's the finished result.


snapshot2.jpg

My bad, I read it as making a new platter. A Saber would absolutely be my choice for the fan mod, or a coping saw, should the correct hole size not be available.
 
You need a router. A Saber saw will not cut a very smooth curve.

You can go straight to a sealer if you want, just go very light on the first coat. You can also use wood stain on it if you want. Make sure to let it dry if you stain, before you seal.


Those Dayton motors are everywhere, even grainger doesn't mark them up much (unlike every other item they sell). If vpi is selling them for half msrp, everyone is losing money on that sale and you should buy every one they have...

Re-read my previous post. I didn't say VPI would be selling "anything" at half MSRP, I said would likely be "double" the price I shown in the Graniger link for the platter motor
 
My bad, I read it as making a new platter. A Saber would absolutely be my choice for the fan mod, or a coping saw, should the correct hole size not be available.

That's OK, I'm a little confused as well as to what exact problems the OP has, and what might be the best, easiest, and least expensive ways to initiate whatever fixes he might need.

From examination of the original MDF Platter that VPI uses on the 16.5, I get the impression that they too used a lathe to fabricate the Platter, so that Platter, akin to like a Turntable Platter would spin quite true.

The MDF Platter also has a Beveled Edge, and you might be able to see such from my custom made Green Edge Clear Acrylic Platter, as it was an exact copied clone of the original MDF Platter.
 
On the Top Motor Mounting Plate in my Platter illustration, you see 2 separate sets of 4 screws. The outer 4 Screws attach the Mounting Plate to the Top Deck. The inner 4 Screws are where the Platter Motor is attached to the Top Plate, and there are 4 Rubber Standoffs-Spacers used at those locations.

These Rubber Spacers I imagine were used to give the Motor and Platter a little bit of "give" and some flexibility in that the Vaccum Wand would achieve and help insure proper full contact across the Record Surface.
 
In one link the OP provided, one person added Dynamat to the inside of the cabinet in hopes to reduce noise.

I tried that too, and probably long before this person done such. All the Dynamat did, was increase the weight of an already quite heavy RCM, and basically did zero to lessen noise.

Not long after I installed such, and heard no worthy appreciable difference, I opened up the RCM again, and took it all out.
 
Back
Top Bottom